Saltar al contenido principal
HP Pavillion dm1-3010nr Hard Drive Replacement

HP Pavillion dm1-3010nr Hard Drive Replacement

Amitpal Gill

Amitpal Gill y otro contribuidor

Última actualización: December 13, 2018

15 minuto
Moderado
Guía de Estudiante Destacada

Introducción

Ir al paso 1

Hard Drives are main components of your laptop. A bad hard drive can affect the speed of your computer. If you are experiencing slow loading times when opening programs or saved files, you should replace your hard drive.

Qué necesitas

Herramientas

  1. HP Pavillion dm1-3010nr Hard Drive Replacement, Battery: paso 1, imagen 1 de 1
    • Flip the device over, so that the bottom cover is exposed.

    • Slide the black locking mechanism into its unlock position.

  2. HP Pavillion dm1-3010nr Hard Drive Replacement: paso 2, imagen 1 de 1
    • After unlocking the mechanism, slide the battery out of its compartment.

  3. HP Pavillion dm1-3010nr Hard Drive Replacement, Hard Drive: paso 3, imagen 1 de 1
    • With the battery removed, the back cover can be taken off with your hand.

  4. HP Pavillion dm1-3010nr Hard Drive Replacement: paso 4, imagen 1 de 1
    • Use your Phillips 0 screwdriver to remove the four 2.5mm Phillips screws which hold the hard drive in place. You can see the 4 screws in the picture circled in red.

  5. HP Pavillion dm1-3010nr Hard Drive Replacement: paso 5, imagen 1 de 1
    • To disconnect the hard drive from the motherboard, pull the black tab as seen in the picture.

  6. HP Pavillion dm1-3010nr Hard Drive Replacement: paso 6, imagen 1 de 2 HP Pavillion dm1-3010nr Hard Drive Replacement: paso 6, imagen 2 de 2
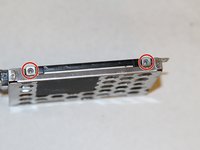
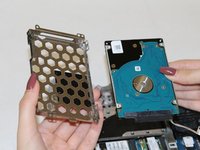
    • After removing the enclosure from the device, use your Phillips 0 screwdriver to remove four 3mm Phillips screws. There are two screws on each side of the hard drive enclosure.

Conclusión

To reassemble your device, follow these instructions in reverse order.

Una persona más ha completado esta guía.

Amitpal Gill

Miembro Desde 10/22/18

375 Reputación

3 Guías creadas

Equipo

UC Davis, Team S7-G1, Lore Fall 2018 Miembro de UC Davis, Team S7-G1, Lore Fall 2018

UCD-LORE-F18S7G1

3 Miembros

4 Guías creadas

Un comentario

Schritt 5 ist leider komplett falsch. Der SATA-Stecker muss von der Festplatte/SSD gezogen werden. Nicht irgendein Kabel vom Motherboard. Den Stecker zieht man einfacher von der HDD/SSD weg, wenn man zuerst Schritt #6 ausführt, dann ist die Metall-Lasche am Kopf des Steckers nicht mehr im Weg.

Peter C. - Contestar

Agregar Comentario

Ver Estadísticas:

Ultimas 24 horas: 0

Ultimos 7 días: 1

Ultimos 30 días: 17

Todo El Tiempo: 1,341