
HP Envy x360 m6-aq003dx Battery Replacement

Introducción
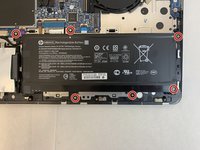
Ir al paso 1This guide will be go over how to replace an old and/or faulty battery. The guide starts with back panel already removed. If needed, go to our guide going over how to remove the back panel from the laptop. While working on the laptop it is recommended to use a tray to keep track of the screws that are removed to avoid misplacing any of them.
Qué necesitas


-
-
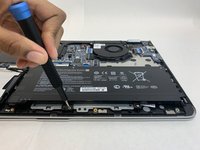
Turn the laptop over and use the plastic opening tool to take off the rubber pads. You only need to take off the two pads at the top for this device.
-
-


To reassemble your device, follow these instructions in reverse order.
To reassemble your device, follow these instructions in reverse order.
Cancelar: No complete esta guía.
4 personas más completaron esta guía.

Equipo

Embry-Riddle Aeronautical University, Team S13-G3, Lamothe Fall 2019 Miembro de Embry-Riddle Aeronautical University, Team S13-G3, Lamothe Fall 2019
ERAU-LAMOTHE-F19S13G3
4 Miembros
5 Guías creadas