Saltar al contenido principal
HP Envy x360 15m-bq021dx Display Replacement

HP Envy x360 15m-bq021dx Display Replacement

Richard Donald Battel

Richard Donald Battel y otro contribuidor

Última actualización: December 28, 2021

40 minuto - 1 hora
Moderado
Herramientas Incorrectas
Necesita mejores imágenes
Mejor introducción

Introducción

Ir al paso 1

When displays get old they may have groups of pixels that die or have all of them die making it impossible to see anything. Replace the display using our guide.

Qué necesitas

Herramientas

Ver más…

  1. HP Envy x360 15m-bq021dx Display Replacement, Battery: paso 1, imagen 1 de 2 HP Envy x360 15m-bq021dx Display Replacement, Battery: paso 1, imagen 2 de 2
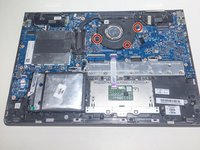
    • On the back panel of the device, remove the four (4) M2.5xL6 screws at the top of the photo using a Phillips #0 screwdriver.

    • Unscrew the three (3) screws at the bottom of the photo using a T5 Torx screwdriver.

  2. HP Envy x360 15m-bq021dx Display Replacement: paso 2, imagen 1 de 3 HP Envy x360 15m-bq021dx Display Replacement: paso 2, imagen 2 de 3 HP Envy x360 15m-bq021dx Display Replacement: paso 2, imagen 3 de 3
    • To remove the back cover, use the black spudger to lift up on the edges of the cover.

    • Use a suction cup to assist in lifting the back cover

  3. HP Envy x360 15m-bq021dx Display Replacement: paso 3, imagen 1 de 1
    • Use the Philips #0 screwdriver to remove six (6) M2.0x3.2 screws from battery.

  4. HP Envy x360 15m-bq021dx Display Replacement: paso 4, imagen 1 de 1
    • Using the Philips #0 screwdriver, remove the final screw from the battery connected to the SSD storage unit.

  5. HP Envy x360 15m-bq021dx Display Replacement: paso 5, imagen 1 de 1
    • Lift and pull the front of the battery up and out (away from the connector) to remove.

  6. HP Envy x360 15m-bq021dx Display Replacement, Cooling Fan: paso 6, imagen 1 de 2 HP Envy x360 15m-bq021dx Display Replacement, Cooling Fan: paso 6, imagen 2 de 2
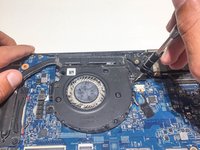
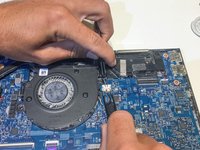
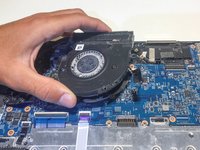
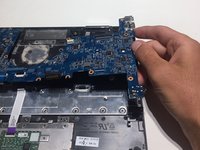
    • Using a Philips #0 screwdriver, remove the three M2x4 screws located around the cooling fan as shown in this picture.

    • Be careful as the fan might be sharp in some places when removing it.

  7. HP Envy x360 15m-bq021dx Display Replacement: paso 7, imagen 1 de 2 HP Envy x360 15m-bq021dx Display Replacement: paso 7, imagen 2 de 2
    Herramienta utilizada en este paso:
    Tweezers
    $4.99
    • Remove the connector clip with the tweezers.

  8. HP Envy x360 15m-bq021dx Display Replacement: paso 8, imagen 1 de 1
    • Remove the four spring loaded screws with a Philips #1 screwdriver.

  9. HP Envy x360 15m-bq021dx Display Replacement: paso 9, imagen 1 de 2 HP Envy x360 15m-bq021dx Display Replacement: paso 9, imagen 2 de 2
    • Remove the cooling fan.

  10. HP Envy x360 15m-bq021dx Display Replacement, Motherboard: paso 10, imagen 1 de 3 HP Envy x360 15m-bq021dx Display Replacement, Motherboard: paso 10, imagen 2 de 3 HP Envy x360 15m-bq021dx Display Replacement, Motherboard: paso 10, imagen 3 de 3
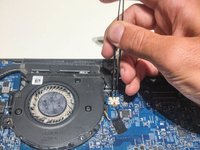
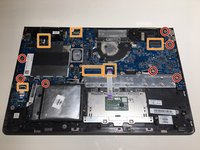
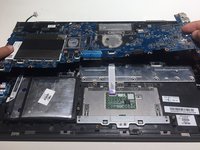
    • Using a Phillips #1, remove the seven M2.0x3.2 screws.

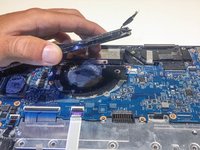
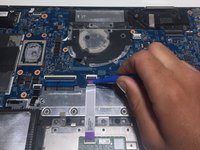
    • Undo the six connections using the blue opening tool.

  11. HP Envy x360 15m-bq021dx Display Replacement: paso 11, imagen 1 de 3 HP Envy x360 15m-bq021dx Display Replacement: paso 11, imagen 2 de 3 HP Envy x360 15m-bq021dx Display Replacement: paso 11, imagen 3 de 3
    • Carefully remove the aux port from the frame of the computer as shown.

  12. HP Envy x360 15m-bq021dx Display Replacement: paso 12, imagen 1 de 2 HP Envy x360 15m-bq021dx Display Replacement: paso 12, imagen 2 de 2
    • Pull the mother board up and away from frame of the computer.

  13. HP Envy x360 15m-bq021dx Display Replacement, Speakers: paso 13, imagen 1 de 1
    Herramienta utilizada en este paso:
    Tweezers
    $4.99
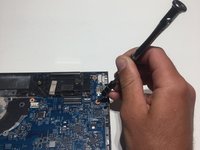
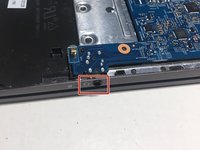
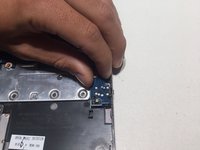
    • Use the tweezers to remove the cords from their restraints.

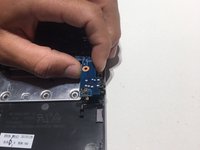
    • Lift the speakers out of the laptop.

  14. HP Envy x360 15m-bq021dx Display Replacement, Display: paso 14, imagen 1 de 1
    • Remove the three 4.4 mm screws from each hinge using a Phillips #0 screwdriver.

  15. HP Envy x360 15m-bq021dx Display Replacement: paso 15, imagen 1 de 1
    • Lift the hinges with the spudger.

  16. HP Envy x360 15m-bq021dx Display Replacement: paso 16, imagen 1 de 1
    • Use the spudger to detach the the screen from the display.

  17. HP Envy x360 15m-bq021dx Display Replacement: paso 17, imagen 1 de 1
    • Slowly remove the tape.

  18. HP Envy x360 15m-bq021dx Display Replacement: paso 18, imagen 1 de 1
    • Disconnect the wire from the ports and take out the white sheet.

Conclusión

To reassemble your device, follow these instructions in reverse order.

0 comentarios

Agregar Comentario

Ver Estadísticas:

Ultimas 24 horas: 0

Ultimos 7 días: 4

Ultimos 30 días: 12

Todo El Tiempo: 890