Saltar al contenido principal
HP Envy x360 15-u473cl Wi-Fi Card Replacement

HP Envy x360 15-u473cl Wi-Fi Card Replacement

Matthew Ortman

Matthew Ortman y 2 otros contribuidores

Última actualización: January 7, 2020

10 - 15 minutos
Moderado

Introducción

Ir al paso 1

A failing Wi-Fi Card can lead to internet connection issues. If you’re struggling to connect to the internet, the Wi-Fi card in your device may need to be replaced. This guide will show how to replace the Wi-Fi Card in your device.

Qué necesitas

Herramientas

  • Spudger
    Spudger
  • iFixit Opening Tool
    iFixit Opening Tool
  • Phillips #0 Screwdriver
    Phillips #0 Screwdriver

Ver más…

  1. HP Envy x360 15-u473cl Wi-Fi Card Replacement, Battery: paso 1, imagen 1 de 2 HP Envy x360 15-u473cl Wi-Fi Card Replacement, Battery: paso 1, imagen 2 de 2
    • Power off your laptop before beginning disassembly.

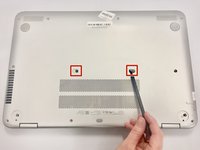
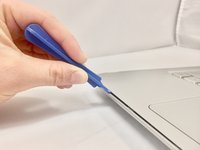
    • Pry off the 2 rear rubber pads (closest to the laptop hinge) using the plastic opening tool to reveal two screws.

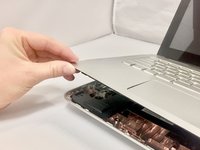
    • Remove the 2 anti-tamper proof covers using the spudger to reveal two screws.

  2. HP Envy x360 15-u473cl Wi-Fi Card Replacement: paso 2, imagen 1 de 1
    • Remove the fourteen 7mm screws using the Phillips #0 screwdriver from the bottom of the laptop.

  3. HP Envy x360 15-u473cl Wi-Fi Card Replacement: paso 3, imagen 1 de 2 HP Envy x360 15-u473cl Wi-Fi Card Replacement: paso 3, imagen 2 de 2
    • Turn the device right side up and open the lid.

    • Insert the plastic opening tool in between the keyboard plate and the base of laptop.

    • Run the tool along seem, prying up as you go.

    • Separate the keyboard plate from the base, lifting from the front.

  4. HP Envy x360 15-u473cl Wi-Fi Card Replacement: paso 4, imagen 1 de 1
    • There are 3 ribbon cables (black, white, and copper color) connecting the computer to the keyboard plate. Disconnect the 3 ribbon cables using the plastic opening tool by prying up the latches holding each cable in place.

    • Remove the keyboard plate from the device.

  5. HP Envy x360 15-u473cl Wi-Fi Card Replacement: paso 5, imagen 1 de 1
    • Remove the thick white ribbon cable covering the battery using the plastic opening tool by prying up the latches attaching each end.

  6. HP Envy x360 15-u473cl Wi-Fi Card Replacement: paso 6, imagen 1 de 1
    • Remove the three 4mm screws using the Phillips #0 screwdriver.

  7. HP Envy x360 15-u473cl Wi-Fi Card Replacement: paso 7, imagen 1 de 1
    • Disconnect the battery from the motherboard.

    • There may be tamper-proof tape holding the battery in place. Remove the tape if present.

    • Remove the battery from the device.

  8. HP Envy x360 15-u473cl Wi-Fi Card Replacement, Wi-Fi Card: paso 8, imagen 1 de 1
    • Remove one 3mm screw with the Phillips #00 screwdriver.

  9. HP Envy x360 15-u473cl Wi-Fi Card Replacement: paso 9, imagen 1 de 1
    • Disconnect the wireless card by pulling away from the black connector using the spudger.

    • Push up on the two wires to release the connectors and remove the Wi-Fi card from the device.

Conclusión

To reassemble your device, follow these instructions in reverse order.

Matthew Ortman

Miembro Desde 11/07/19

169 Reputación

2 Guías creadas

Equipo

IUPUI, Team S3-G3, Harley Fall 2019 Miembro de IUPUI, Team S3-G3, Harley Fall 2019

IUPUI-HARLEY-F19S3G3

3 Miembros

2 Guías creadas

0 comentarios

Agregar Comentario

Ver Estadísticas:

Ultimas 24 horas: 0

Ultimos 7 días: 1

Ultimos 30 días: 6

Todo El Tiempo: 753