Saltar al contenido principal
HP Envy 17-J013CL Motherboard Replacement

HP Envy 17-J013CL Motherboard Replacement

Matt McBride

Matt McBride y 2 otros contribuidores

Última actualización: August 15, 2019

15 minuto
Moderado

Introducción

Ir al paso 1

Use this guide if you want to replace the motherboard of your HP Envy 17-J013CL. The motherboard is the guts of the computer where all the internal parts connect together to make the whole thing work. Without it there is no way for signals and information to pass along one another. There are a lot of pins, sockets, and ports so it is important to stay grounded and be gentle with it. Bending it can also break it!

Qué necesitas

Herramientas

  1. HP Envy 17-J013CL Motherboard Replacement, Battery: paso 1, imagen 1 de 1
    • Lay the laptop with the battery facing towards you.

    • Remember to disconnect the AC cable and other power sources from the device before replacing/repairing parts.

  2. HP Envy 17-J013CL Motherboard Replacement: paso 2, imagen 1 de 1
    • Grab hold of the small battery slider and apply pressure to the right.

    • The laptop itself will push the battery out for you once the switch slides all the way to the right.

  3. HP Envy 17-J013CL Motherboard Replacement: paso 3, imagen 1 de 3 HP Envy 17-J013CL Motherboard Replacement: paso 3, imagen 2 de 3 HP Envy 17-J013CL Motherboard Replacement: paso 3, imagen 3 de 3
    • Pull the battery out and let go of the battery slider.

  4. HP Envy 17-J013CL Motherboard Replacement, Back Panel: paso 4, imagen 1 de 2 HP Envy 17-J013CL Motherboard Replacement, Back Panel: paso 4, imagen 2 de 2
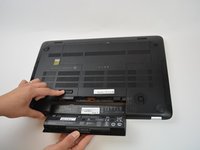
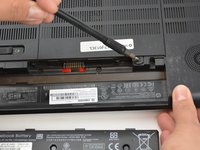
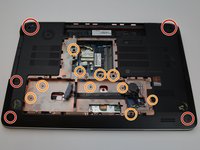
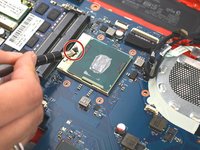
    • Use a PH1-screwdriver to loosen the 7mm screw. The screw will not fully come out as it is held by a washer underneath but will come out enough to open it.

  5. HP Envy 17-J013CL Motherboard Replacement: paso 5, imagen 1 de 1
    • Gently pull the back panel off starting from the battery side towards the back.

    • Pull it back as it snaps out of the holding sockets.

    • It is preferred to use both hands when pulling the back panel off to prevent bending it out of shape.

  6. HP Envy 17-J013CL Motherboard Replacement, Processor: paso 6, imagen 1 de 3 HP Envy 17-J013CL Motherboard Replacement, Processor: paso 6, imagen 2 de 3 HP Envy 17-J013CL Motherboard Replacement, Processor: paso 6, imagen 3 de 3
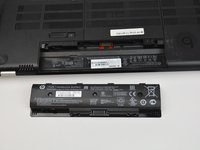
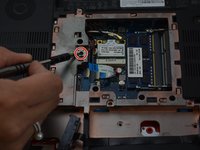
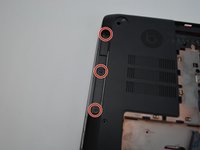
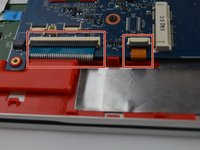
    • Locate the 7mm screw for the optical drive right next to the WLAN and Memory modules.

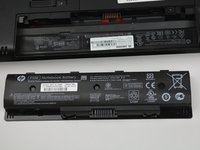
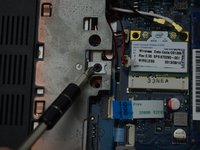
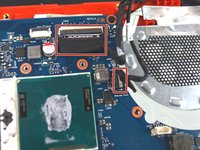
    • Remove the screw with a PH1-screwdriver to release the CD-drive.

  7. HP Envy 17-J013CL Motherboard Replacement: paso 7, imagen 1 de 3 HP Envy 17-J013CL Motherboard Replacement: paso 7, imagen 2 de 3 HP Envy 17-J013CL Motherboard Replacement: paso 7, imagen 3 de 3
    • Use a PH1-Screwdriver to remove all the 7mm screws.

    • Use a PH0-Screwdriver to remove the 3mm screws.

    • Use the same PH0-Screwdriver for the 2mm screws.

  8. HP Envy 17-J013CL Motherboard Replacement: paso 8, imagen 1 de 2 HP Envy 17-J013CL Motherboard Replacement: paso 8, imagen 2 de 2
    • Pull the under panel from the laptop by pulling at the edges once all screws are removed. Gently lift it off and place to the side.

  9. HP Envy 17-J013CL Motherboard Replacement: paso 9, imagen 1 de 1
    • Unscrew the coiled springs indicated in red from the the motherboard.

    • Remove the 7mm screws with a PH1-screwdriver to loosen the fan.

    • Unplug the fan from the motherboard.

  10. HP Envy 17-J013CL Motherboard Replacement: paso 10, imagen 1 de 1
    • Lift the fan out and then lift out the black grill covering the processor.

  11. HP Envy 17-J013CL Motherboard Replacement: paso 11, imagen 1 de 2 HP Envy 17-J013CL Motherboard Replacement: paso 11, imagen 2 de 2
    • Use a Flathead screwdriver to turn the screw 180 degrees to unlock the processor from the motherboard.

    • Gently and vertically lift the processor out.

    • When placing the processor chip back in, make sure the golden triangle is on the top-left corner of the motherboard slot.

    • Be careful not to bend the pins on the processor chip. Broken pins will render the chip useless.

  12. HP Envy 17-J013CL Motherboard Replacement, Motherboard: paso 12, imagen 1 de 1
    • Remove the 7mm screws holding down the motherboard to the frame.

  13. HP Envy 17-J013CL Motherboard Replacement: paso 13, imagen 1 de 2 HP Envy 17-J013CL Motherboard Replacement: paso 13, imagen 2 de 2
    • Locate the two bottom cables and lift up the black secure tabs.

    • Grab the cables by the translucent tabs and gently pull them out of the motherboard.

  14. HP Envy 17-J013CL Motherboard Replacement: paso 14, imagen 1 de 1
    • On the left side of the motherboard, remove the two cables by first lifting the black secure tabs and using the translucent tabs to pull them out.

  15. HP Envy 17-J013CL Motherboard Replacement: paso 15, imagen 1 de 1
    • Next to the WLAN, remove the two plugs indicated in red from the motherboard.

    • Be gentle when removing these two as too much stress can tear the cables from the plug.

    • Remove the flat cable from the motherboard by first lifting the securing black tab and pulling it out.

  16. HP Envy 17-J013CL Motherboard Replacement: paso 16, imagen 1 de 2 HP Envy 17-J013CL Motherboard Replacement: paso 16, imagen 2 de 2
    • Where the CPU fan was, lift the securing tabs on the cables and extract them from the motherboard.

  17. HP Envy 17-J013CL Motherboard Replacement: paso 17, imagen 1 de 1
    • Gently lift the motherboard from the laptop housing and pulling to the left.

Conclusión

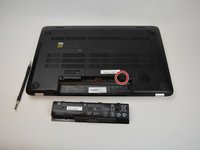
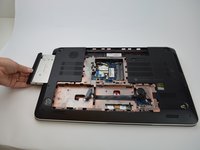
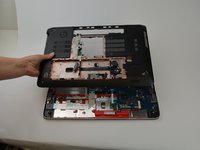
To reassemble your device, follow these instructions in reverse order.

5 personas más completaron esta guía.

Matt McBride

Miembro Desde 02/02/17

872 Reputación

6 Guías creadas

Equipo

USF Tampa, Team 16-6, Blackwell Spring 2017 Miembro de USF Tampa, Team 16-6, Blackwell Spring 2017

USFT-BLACKWELL-S17S16G6

3 Miembros

6 Guías creadas

Un comentario

What is the proper name of the housing that the motherboard sets in? I need to order one of these because all the hinge plastic is broken.

TIA

Jim

jsryhstymryuberJames Abt - Contestar

Agregar Comentario

Ver Estadísticas:

Ultimas 24 horas: 1

Ultimos 7 días: 1

Ultimos 30 días: 4

Todo El Tiempo: 3,170