Saltar al contenido principal
HP Elitebook 8570w Keyboard Replacement

HP Elitebook 8570w Keyboard Replacement

Marko Tardio

Marko Tardio y 3 otros contribuidores

Última actualización: October 17, 2024

20 minuto
Moderado
Necesita mejores imágenes

Introducción

Ir al paso 1

This replacement guide will show you how to disconnect the keyboard from your HP EliteBook 8570w. It consists of 7 moderately difficult steps that should guide you successfully.

Qué necesitas

Herramientas

  • Phillips #0 Screwdriver
    Phillips #0 Screwdriver
  • Spudger
    Spudger
  1. HP Elitebook 8570w Keyboard Replacement, Keyboard: paso 1, imagen 1 de 1
    • Begin by removing the back cover of the computer.

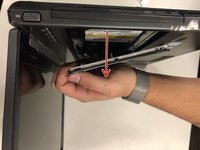
    • Push the marked slider to the right.

    • While pushing the slider, pull the cover towards yourself to remove.

  2. HP Elitebook 8570w Keyboard Replacement: paso 2, imagen 1 de 1
    • Locate the 3 screws marked in the photo.

    • Using a Phillips screwdriver, unscrew all 3 0.8mm screws completely and place to the side.

  3. HP Elitebook 8570w Keyboard Replacement: paso 3, imagen 1 de 2 HP Elitebook 8570w Keyboard Replacement: paso 3, imagen 2 de 2
    • Flip the computer so it is laying on its side.

    • Using your fingers or a tool, begin to wedge back/pull off the top of the keyboard panel.

    • Once freeing the keyboard panel from the computer, it should look like photo #2.

  4. HP Elitebook 8570w Keyboard Replacement: paso 4, imagen 1 de 1
    • Locate all 3 places of attachment marked in the photo.

    • Each de-attachment is explained in the following steps.

  5. HP Elitebook 8570w Keyboard Replacement: paso 5, imagen 1 de 2 HP Elitebook 8570w Keyboard Replacement: paso 5, imagen 2 de 2
    Herramienta utilizada en este paso:
    Tweezers
    $4.99
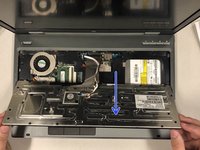
    • Locate the white rectangle base beneath the blue and white strip attached to the computer and keyboard.

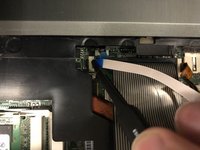
    • Using a wedging tool, pull the white base up slightly to loosen the grip on the blue and white strip.

    • With the white base slightly risen, use tweezers to carefully pull out/remove the strip from the computer.

  6. HP Elitebook 8570w Keyboard Replacement: paso 6, imagen 1 de 2 HP Elitebook 8570w Keyboard Replacement: paso 6, imagen 2 de 2
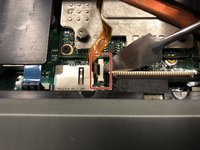
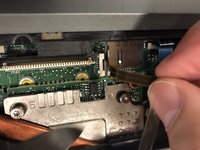
    • Locate the white rectangle base beneath the burn orange strip attached to the computer and the keyboard.

    • Like the previous step, use a plastic or nylon tool to slightly raise the white base to loosen the grip on the ribbon cable.

    • Using tweezers or your fingers, carefully pull up on the ribbon cable to completely detach it from the computer.

  7. HP Elitebook 8570w Keyboard Replacement: paso 7, imagen 1 de 1
    • Locate the black rectangle base at the bottom of the thick ribbon cable.

    • Like previous steps, use a tool to wedge the base upward to slightly lift it in order to loosen the grip on the silver ribbon cable.

    • While the base is lifted, use your fingers to carefully pull out the silver ribbon cable thus freeing it from the computer.

Conclusión

To reassemble your device, follow these instructions in reverse order.

3 personas más completaron esta guía.

Marko Tardio

Miembro Desde 11/06/17

226 Reputación

1 Guía escrita

Equipo

Baylor, Team S8-G5, Johnson Fall 2017 Miembro de Baylor, Team S8-G5, Johnson Fall 2017

BU-JOHNSON-F17S8G5

3 Miembros

5 Guías creadas

0 comentarios

Agregar Comentario

Ver Estadísticas:

Ultimas 24 horas: 7

Ultimos 7 días: 18

Ultimos 30 días: 47

Todo El Tiempo: 7,794