Saltar al contenido principal
HP Compaq NC6120 Monitor Replacement

HP Compaq NC6120 Monitor Replacement

Mateo Cuellar

Mateo Cuellar y 5 otros contribuidores

Última actualización: January 9, 2025

15 - 25 minutos
Fácil
Necesita mejores imágenes

Introducción

Ir al paso 1

Should the monitor of your HP Compaq NC6120 laptop stop functioning correctly, you may need to replace the monitor altogether. This is a simple replacement that can be done by removing a few easy screws.

Qué necesitas

Partes

  • Phillips #1 Screwdriver
    Phillips #1 Screwdriver
  • Spudger
    Spudger
  1. HP Compaq NC6120 Monitor Replacement, Monitor: paso 1, imagen 1 de 2 HP Compaq NC6120 Monitor Replacement, Monitor: paso 1, imagen 2 de 2
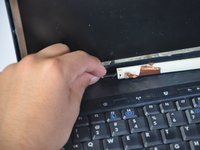
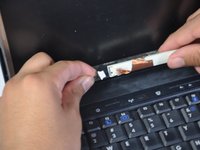
    • Locate and remove four black 5.1mm Phillips #1 screws from the left and right sides of the monitor.

  2. HP Compaq NC6120 Monitor Replacement: paso 2, imagen 1 de 3 HP Compaq NC6120 Monitor Replacement: paso 2, imagen 2 de 3 HP Compaq NC6120 Monitor Replacement: paso 2, imagen 3 de 3
    • Using a small spudger, remove the four black plastic covers from above the monitor, revealing screws underneath.

  3. HP Compaq NC6120 Monitor Replacement: paso 3, imagen 1 de 1
    • Remove the four screws that were just uncovered. They are 6.2mm 3.0 flathead screws.

  4. HP Compaq NC6120 Monitor Replacement: paso 4, imagen 1 de 1
    • Pry off the plastic case surrounding the monitor.

    • A spudger may be needed to pry off the case.

  5. HP Compaq NC6120 Monitor Replacement: paso 5, imagen 1 de 3 HP Compaq NC6120 Monitor Replacement: paso 5, imagen 2 de 3 HP Compaq NC6120 Monitor Replacement: paso 5, imagen 3 de 3
    • Remove the black and silver cable, located directly below the monitor.

    • Proceed to pull monitor approximately 10cm away from the back of the laptop case.

  6. HP Compaq NC6120 Monitor Replacement: paso 6, imagen 1 de 2 HP Compaq NC6120 Monitor Replacement: paso 6, imagen 2 de 2
    • Remove the grey cable (with yellow tip) connecting the monitor to the back plastic casing and the monitor will be free from the rest of the laptop.

Conclusión

To reassemble your device, follow these instructions in reverse order.

Una persona más ha completado esta guía.

Mateo Cuellar

Miembro Desde 04/08/15

601 Reputación

4 Guías creadas

Equipo

Cal Poly, Team 17-4, Forte Spring 2015 Miembro de Cal Poly, Team 17-4, Forte Spring 2015

CPSU-FORTE-S15S17G4

3 Miembros

6 Guías creadas

0 comentarios

Agregar Comentario

Ver Estadísticas:

Ultimas 24 horas: 0

Ultimos 7 días: 6

Ultimos 30 días: 12

Todo El Tiempo: 1,507