Saltar al contenido principal
Doxy Personal Massager Bearing and Screw Replacement

Doxy Personal Massager Bearing and Screw Replacement

Plum Rose

Plum Rose y otro contribuidor

Última actualización: February 12, 2025

15 minuto
Fácil
Guía aportada por comunidad

Introducción

Ir al paso 1

A visual guide for a manual i created recently

how to tear down and replace the bearings on a Doxy massager (original and die-cast editions) this may work on the new Doxy Die-Cast R which has internal batteries, but i haven't got one to tear down yet

  1. Doxy Personal Massager Bearing and Screw Replacement, Remove Silicone Cover: paso 1, imagen 1 de 3 Doxy Personal Massager Bearing and Screw Replacement, Remove Silicone Cover: paso 1, imagen 2 de 3 Doxy Personal Massager Bearing and Screw Replacement, Remove Silicone Cover: paso 1, imagen 3 de 3
    • Remove silicone head

  2. Doxy Personal Massager Bearing and Screw Replacement, Dissasemble the Head: paso 2, imagen 1 de 2 Doxy Personal Massager Bearing and Screw Replacement, Dissasemble the Head: paso 2, imagen 2 de 2
    • Use T20 Driver to disassemble the cast head

  3. Doxy Personal Massager Bearing and Screw Replacement, Remove Collar: paso 3, imagen 1 de 2 Doxy Personal Massager Bearing and Screw Replacement, Remove Collar: paso 3, imagen 2 de 2
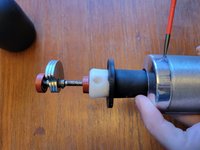
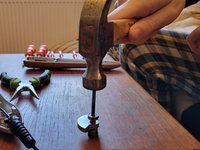
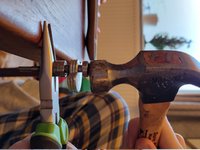
    • Use either prying force, impact, or torsion to break the glue under the metal collar

    • This may damage the collar visibly,

    • This will not stick back together, you will need some rubberised sealant or glue to put it back together

  4. Doxy Personal Massager Bearing and Screw Replacement, Dissassemble Body: paso 4, imagen 1 de 3 Doxy Personal Massager Bearing and Screw Replacement, Dissassemble Body: paso 4, imagen 2 de 3 Doxy Personal Massager Bearing and Screw Replacement, Dissassemble Body: paso 4, imagen 3 de 3
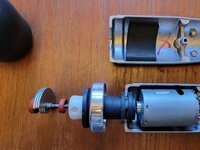
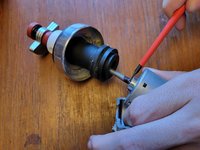
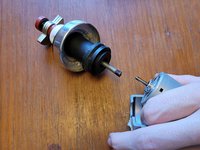
    • Use PZ1 Driver to remove body screws

    • Separate the two halves of the body

  5. Doxy Personal Massager Bearing and Screw Replacement, Unmount Neck: paso 5, imagen 1 de 2 Doxy Personal Massager Bearing and Screw Replacement, Unmount Neck: paso 5, imagen 2 de 2
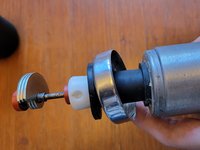
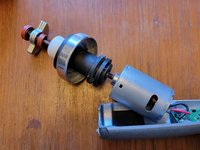
    • Gently pry the motor and neck from the body

    • Slide the neck up towards the counterweight

  6. Doxy Personal Massager Bearing and Screw Replacement, Dissassemble the Shafts: paso 6, imagen 1 de 3 Doxy Personal Massager Bearing and Screw Replacement, Dissassemble the Shafts: paso 6, imagen 2 de 3 Doxy Personal Massager Bearing and Screw Replacement, Dissassemble the Shafts: paso 6, imagen 3 de 3
    • Use screwdriver to pry the spring shaft from the motor shaft

  7. Doxy Personal Massager Bearing and Screw Replacement, Dissassemble the Vibration Shaft: paso 7, imagen 1 de 2 Doxy Personal Massager Bearing and Screw Replacement, Dissassemble the Vibration Shaft: paso 7, imagen 2 de 2
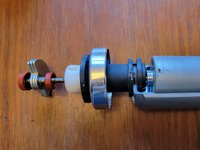
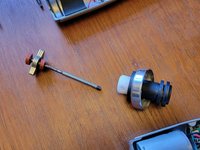
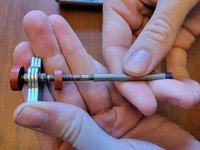
    • Unscrew the Spring shaft from the Counterweight shaft

  8. Doxy Personal Massager Bearing and Screw Replacement, Remove Vibration Collars: paso 8, imagen 1 de 2 Doxy Personal Massager Bearing and Screw Replacement, Remove Vibration Collars: paso 8, imagen 2 de 2
    • Remove the rubber damping collars and keep to hand

  9. Doxy Personal Massager Bearing and Screw Replacement, Remove Old Bearings: paso 9, imagen 1 de 2 Doxy Personal Massager Bearing and Screw Replacement, Remove Old Bearings: paso 9, imagen 2 de 2
    • Use screwdrivers or wedges to remove the two old bearings

  10. Doxy Personal Massager Bearing and Screw Replacement, Press new Bearings: paso 10, imagen 1 de 2 Doxy Personal Massager Bearing and Screw Replacement, Press new Bearings: paso 10, imagen 2 de 2
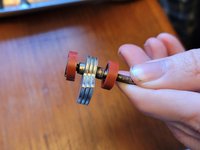
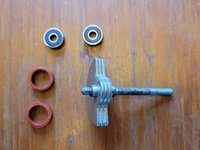
    • Press the new bearings into place

    • Be sure to only put force on the center bearing race as pressing from the outside race may damage the bearing

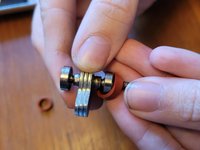
    • using one of the old bearings can help in distributing the load evenly

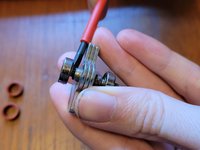
    • Replace the rubber dampers

Conclusión

To reassemble your device, follow these instructions in reverse order.

You should now have a working Doxy with new Bearings!
some lubricant may be used to free up the bearings if the grease they come with is too thick
but be careful not to lubricate the rubber collars as they can slip and increase friction on the counterweight

Documentos Adjuntos

Plum Rose

Miembro Desde 01/02/25

181 Reputación

1 Guía escrita

0 comentarios

Agregar Comentario

Ver Estadísticas:

Ultimas 24 horas: 0

Ultimos 7 días: 12

Ultimos 30 días: 53

Todo El Tiempo: 91