Saltar al contenido principal
Únete a la Comunidad de Reparación - Crear Cuenta

Disassembling Canon Powershot SD880 Logic Board

Qué necesitas

    1. Disassembling Canon Powershot SD880 Logic Board, Back Cover: paso 1, imagen 1 de 3 Disassembling Canon Powershot SD880 Logic Board, Back Cover: paso 1, imagen 2 de 3 Disassembling Canon Powershot SD880 Logic Board, Back Cover: paso 1, imagen 3 de 3
      • Remove the two 2.4 mm screws on the side of the camera that are next to the LCD screen using a Phillips #00 screwdriver.

      • Remove the two 4.1 mm screws on the other side using a Phillips #00 screwdriver.

      • One screw will be located under the rubber USB flap.

      • Remove the single 2.6 mm screw from the bottom of the camera using a Phillips #00 screwdriver.

      • Slowly pull the back cover off of the camera.

      Pregunta a FixBot

      Agregar Comentario

    1. Disassembling Canon Powershot SD880 Logic Board, Front Cover: paso 2, imagen 1 de 3 Disassembling Canon Powershot SD880 Logic Board, Front Cover: paso 2, imagen 2 de 3 Disassembling Canon Powershot SD880 Logic Board, Front Cover: paso 2, imagen 3 de 3
      • Remove the 2.6 mm screw from the bottom of the camera using a Phillips #00 screwdriver.

      • Remove the 4.1 mm screw from the menu button side of the camera using a Phillips #00 screwdriver.

      • The two screws on the other side of the camera were already removed when the back cover was taken off.

      Pregunta a FixBot

      Agregar Comentario

    1. Disassembling Canon Powershot SD880 Logic Board, Top Panel: paso 3, imagen 1 de 2 Disassembling Canon Powershot SD880 Logic Board, Top Panel: paso 3, imagen 2 de 2
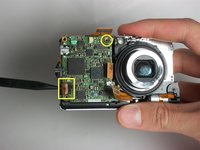
      • Unplug the green and white plugs that connect the top panel to the top of the logic board.

      • Dislodge the tab above the lens.

      • Dislodge the tab at the back.

      Pregunta a FixBot

      Agregar Comentario

    1. Disassembling Canon Powershot SD880 Logic Board, Logic Board: paso 4, imagen 1 de 1
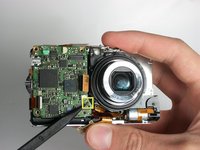
      • Remove 2 screws(1.75mm) using a screwdriver.

      • Detach 3 ribbons by pulling up on them. All are on the front of the camera.

      Pregunta a FixBot

      Agregar Comentario

    2. Disassembling Canon Powershot SD880 Logic Board: paso 5, imagen 1 de 2 Disassembling Canon Powershot SD880 Logic Board: paso 5, imagen 2 de 2
      • Remove the newly exposed screw(1.75mm) with screwdriver.

      • Unhinge the black tab to slide out the ribbon.

      • The only thing keeping logic board in place is a black nub. Lift the logic board from that corner with increasing force until it pops out.

      Pregunta a FixBot

      Agregar Comentario

Conclusión

To reassemble your device, follow these instructions in reverse order.

Cancelar: No complete esta guía.

Juan Miguel

Miembro Desde 01/13/11

104 Reputación

1 Guía escrita

Equipo

Cal Poly, Team 13-3, Forte Winter 2011 Miembro de Cal Poly, Team 13-3, Forte Winter 2011

CPSU-FORTE-W11S13G3

Miembros de 5

16 Guías creadas

0Guía Comentarios

Agregar Comentario

Ver Estadísticas:

Ultimas 24 horas: 0

Ultimos 7 días: 4

Ultimos 30 días: 23

Todo El Tiempo: 2,471