Saltar al contenido principal
Dell Latitude E6420 Fan Replacement

Dell Latitude E6420 Fan Replacement

Madysen Eames

Madysen Eames y otro contribuidor

Última actualización: May 23, 2018

20 minuto
Fácil

Introducción

Ir al paso 1

If the fan isn't working properly, the laptop can overheat. This guide will show users how to replace the fan.

Qué necesitas

Herramientas

Ver más…

  1. Dell Latitude E6420 Fan Replacement, Battery: paso 1, imagen 1 de 2 Dell Latitude E6420 Fan Replacement, Battery: paso 1, imagen 2 de 2
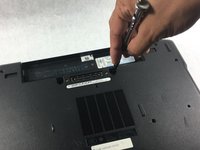
    • Push the tabs on the left and right of the battery out towards the edge of the case.

  2. Dell Latitude E6420 Fan Replacement: paso 2, imagen 1 de 1
    • While still pushing in the tabs, using your pinky finger, lift the battery out of the laptop.

  3. Dell Latitude E6420 Fan Replacement, CD/DVD Drive: paso 3, imagen 1 de 2 Dell Latitude E6420 Fan Replacement, CD/DVD Drive: paso 3, imagen 2 de 2
    • Push the button in on the CD/DVD drive to eject the drive.

  4. Dell Latitude E6420 Fan Replacement: paso 4, imagen 1 de 2 Dell Latitude E6420 Fan Replacement: paso 4, imagen 2 de 2
    • Slide the drive out of the laptop.

    • When removing the drive, keep it flat to prevent damage to anything inside the laptop.

  5. Dell Latitude E6420 Fan Replacement, Backplate: paso 5, imagen 1 de 2 Dell Latitude E6420 Fan Replacement, Backplate: paso 5, imagen 2 de 2
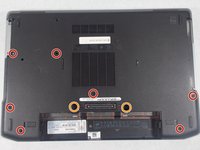
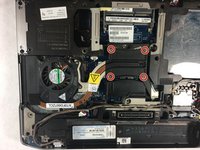
    • Using the screwdriver, remove seven 4mm Phillips #1 screws from the bottom of the laptop.

    • Using the screwdriver, remove two 9mm Phillips #00 screws from the bottom of the laptop.

  6. Dell Latitude E6420 Fan Replacement: paso 6, imagen 1 de 2 Dell Latitude E6420 Fan Replacement: paso 6, imagen 2 de 2
    • Gently lift the back plate off of the laptop making sure all of the tabs on the inside perimeter of the back plate are unhooked before lifting.

    • Be careful when removing the backplate. Lifting the backplate while the tabs are still hooked in will result in broken tabs.

  7. Dell Latitude E6420 Fan Replacement, Fan: paso 7, imagen 1 de 2 Dell Latitude E6420 Fan Replacement, Fan: paso 7, imagen 2 de 2
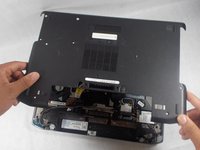
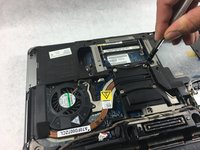
    • Using the screwdriver, remove four 10mm Phillips #0 spring screws from the fan assembly.

  8. Dell Latitude E6420 Fan Replacement: paso 8, imagen 1 de 2 Dell Latitude E6420 Fan Replacement: paso 8, imagen 2 de 2
    • Use the plastic opening tool to unclip the connector.

  9. Dell Latitude E6420 Fan Replacement: paso 9, imagen 1 de 1
    • Lift the fan out of the laptop.

Conclusión

To reassemble your device, follow these instructions in reverse order.

4 personas más completaron esta guía.

Madysen Eames

Miembro Desde 02/27/18

1,555 Reputación

7 Guías creadas

Equipo

Un comentario

very good explanatory steps. but you did not talk about the application of thermal paste for reassembly

Godwin Nwachukwu - Contestar

Agregar Comentario

Ver Estadísticas:

Ultimas 24 horas: 0

Ultimos 7 días: 2

Ultimos 30 días: 28

Todo El Tiempo: 2,325