Saltar al contenido principal
Dell Inspiron E1705 Upper Case and Screen Replacement

Dell Inspiron E1705 Upper Case and Screen Replacement

Evan Fairchild

Evan Fairchild y 8 otros contribuidores

Última actualización: January 3, 2023

15 - 20 minutos
Moderado

Introducción

Ir al paso 1

This guide is aimed to help you replace the upper case and screen of your Dell Inspiron E1705 in case of a failure or damage. The upper case is the housing that holds the screen itself along with the wires plugging into the screen. The main failures of this component include a cracked screen or a screen that does not display anything even when the computer appears to powered on.

Before conducting the repair make sure your laptop is powered off and unplugged from any external power source.

There are not any special skills needed for this repair. Basic knowledge of tools is all that is needed.

If replacing a cracked screen, take extra precaution of sharp edges that could cause harm to you. This can be mitigated by placing safety tape over the screen to keep sharp pieces covered when doing the repair.

Qué necesitas

Herramientas

  • Phillips #0 Screwdriver
    Phillips #0 Screwdriver
  • iFixit Opening Tool
    iFixit Opening Tool
  • Spudger
    Spudger

Ver más…

  1. Dell Inspiron E1705 Upper Case and Screen Replacement, Upper Case and Screen: paso 1, imagen 1 de 1
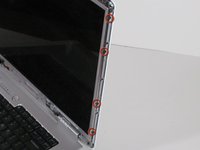
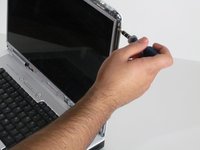
    • Use a spudger to remove the six rubber nibs and 2 plastic pieces on the bezel of the display.

    • Remove the eight Phillips #0 screws hidden under the rubber nibs and plastic pieces.

  2. Dell Inspiron E1705 Upper Case and Screen Replacement: paso 2, imagen 1 de 2 Dell Inspiron E1705 Upper Case and Screen Replacement: paso 2, imagen 2 de 2
    • Pry the plastic bezel from the back plate using a plastic opening tool.

    • Remove the plastic bezel entirely and set it aside.

  3. Dell Inspiron E1705 Upper Case and Screen Replacement: paso 3, imagen 1 de 2 Dell Inspiron E1705 Upper Case and Screen Replacement: paso 3, imagen 2 de 2
    • Remove the 4 screws along the left and right sides of the screen. There are 8 screws in total.

  4. Dell Inspiron E1705 Upper Case and Screen Replacement: paso 4, imagen 1 de 2 Dell Inspiron E1705 Upper Case and Screen Replacement: paso 4, imagen 2 de 2
    • Use the spudger to separate the screen from the back case.

    • Hold the screen in one hand and tilt the back case away from you.

    • The screen is connected to the back case by two leads.

  5. Dell Inspiron E1705 Upper Case and Screen Replacement: paso 5, imagen 1 de 2 Dell Inspiron E1705 Upper Case and Screen Replacement: paso 5, imagen 2 de 2
    • Remove the two leads from the screen. They will stay connected to the computer.

    • Do not touch the white tape on your replacement monitor.

    • Remove the screen carefully.

Conclusión

To reassemble your device, follow these instructions in reverse order.

9 personas más completaron esta guía.

Equipo

Cal Poly, Team 22-5, Maness Fall 2010 Miembro de Cal Poly, Team 22-5, Maness Fall 2010

CPSU-MANESS-F10S22G5

4 Miembros

11 Guías creadas

0 comentarios

Agregar Comentario

Ver Estadísticas:

Ultimas 24 horas: 0

Ultimos 7 días: 1

Ultimos 30 días: 4

Todo El Tiempo: 7,053