
Dell Inspiron E1705 Optical Drive Replacement
Introducción
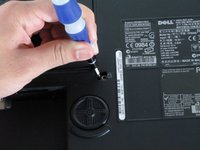
Ir al paso 1Before taking apart your computer at home be sure that your problem cannot be resolved using our troubleshooting guide for this item, or that it is a problem that does not require disassembly.
Qué necesitas
Herramientas


To reassemble your device, follow these instructions in reverse order.
To reassemble your device, follow these instructions in reverse order.
Cancelar: No complete esta guía.
3 personas más completaron esta guía.
Equipo

Cal Poly, Team 22-5, Maness Fall 2010 Miembro de Cal Poly, Team 22-5, Maness Fall 2010
CPSU-MANESS-F10S22G5
Miembros de 4
11 Guías creadas