Saltar al contenido principal
Dell Inspiron 8600 Lower Case Replacement

Dell Inspiron 8600 Lower Case Replacement

John Nesthus

John Nesthus y 9 otros contribuidores

Última actualización: June 11, 2021

45 minuto - 1 hora
Moderado
Fotos de acción
Necesita más imágenes
Herramientas Incorrectas
Pasos faltantes

Introducción

Ir al paso 1

This guide will show you how to remove the lower case of a Dell Inspiron 8600 for replacement or repair. In this guide we’ll show you how to remove critical components, how to correctly reassemble the device.

Qué necesitas

Herramientas

  1. Dell Inspiron 8600 Lower Case Replacement, Battery: paso 1, imagen 1 de 1
    • Remove the battery from the bottom left of the laptop as shown.

    • Remove the battery before operating on the computer to avoid electrocution.

  2. Dell Inspiron 8600 Lower Case Replacement, Hinge Cover: paso 2, imagen 1 de 3 Dell Inspiron 8600 Lower Case Replacement, Hinge Cover: paso 2, imagen 2 de 3 Dell Inspiron 8600 Lower Case Replacement, Hinge Cover: paso 2, imagen 3 de 3
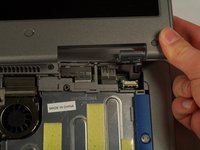
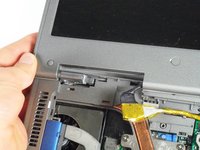
    • Insert a spudger into the notch at the far left side of the top blue panel and pry the hinge cover off.

    • You may need to pry the other side off as well. You can do this by inserting the spudger between the hinge and the top cover.

    • Be careful of the wire attached to the underside of the hinge cover.

  3. Dell Inspiron 8600 Lower Case Replacement: paso 3, imagen 1 de 1
    • Pull the small black tab on the right hand side of the laptop.

    • You have now removed the hinge cover.

  4. Dell Inspiron 8600 Lower Case Replacement, Keyboard: paso 4, imagen 1 de 3 Dell Inspiron 8600 Lower Case Replacement, Keyboard: paso 4, imagen 2 de 3 Dell Inspiron 8600 Lower Case Replacement, Keyboard: paso 4, imagen 3 de 3
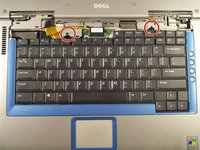
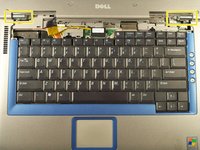
    • Using the Phillips #1 remove the screws at the top of the keyboard as indicated.

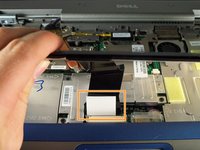
    • Do not just lift up. There is a tab underneath the keyboard that is still connected to the mother board.

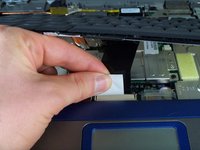
    • You will need to pull out the white tab underneath the keyboard upwards until it pops out of its socket.

    • The keyboard should be easily removable at this point.

  5. Dell Inspiron 8600 Lower Case Replacement, Display Module: paso 5, imagen 1 de 2 Dell Inspiron 8600 Lower Case Replacement, Display Module: paso 5, imagen 2 de 2
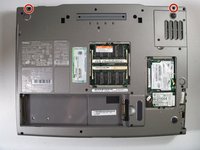
    • Flip the laptop over and remove the indicated screws.

    • Flip the laptop back over.

    • Find the two places where the display module is attached to the base of the computer.

  6. Dell Inspiron 8600 Lower Case Replacement: paso 6, imagen 1 de 1
    • Disconnect the video card from the display module by gently lifting upwards on the black tab.

  7. Dell Inspiron 8600 Lower Case Replacement: paso 7, imagen 1 de 2 Dell Inspiron 8600 Lower Case Replacement: paso 7, imagen 2 de 2
    • Lift the display module directly upwards from the base of the computer.

  8. Dell Inspiron 8600 Lower Case Replacement: paso 8, imagen 1 de 1
    • Now remove the display module.

  9. Dell Inspiron 8600 Lower Case Replacement, Lower Case: paso 9, imagen 1 de 1
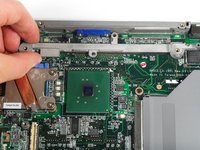
    • Remove the two screws holding down the upper case with a Phillips #1 screwdriver.

  10. Dell Inspiron 8600 Lower Case Replacement: paso 10, imagen 1 de 2 Dell Inspiron 8600 Lower Case Replacement: paso 10, imagen 2 de 2
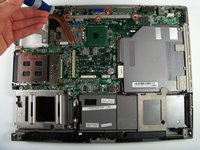
    • Using a Phillips #1 screwdriver, remove four screws attaching the metal bar to the motherboard.

    • Remove the metal bar which connects the motherboard to the lower case.

  11. Dell Inspiron 8600 Lower Case Replacement: paso 11, imagen 1 de 1
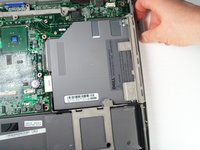
    • Disconnect the optical disk drive by gently pulling upward on the plastic connector to prevent connection damage.

  12. Dell Inspiron 8600 Lower Case Replacement: paso 12, imagen 1 de 3 Dell Inspiron 8600 Lower Case Replacement: paso 12, imagen 2 de 3 Dell Inspiron 8600 Lower Case Replacement: paso 12, imagen 3 de 3
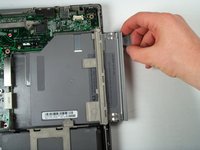
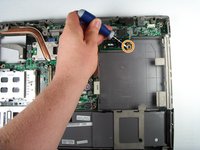
    • Remove the optical disc drive by pushing a small release button on the side of the laptop and then pulling it.

    • This will uncover one final screw. Use the Phillips # 1 to remove the screw.

  13. Dell Inspiron 8600 Lower Case Replacement: paso 13, imagen 1 de 1
    • Now, pop off the lower case for repair or replacement.

Conclusión

To reassemble your device, follow these instructions in reverse order.

John Nesthus

Miembro Desde 04/13/11

186 Reputación

6 Guías creadas

Equipo

Cal Poly, Team 18-22, Garner Spring 2011 Miembro de Cal Poly, Team 18-22, Garner Spring 2011

CPSU-GARNER-S11S18G22

Miembros de 4

16 Guías creadas

0 comentarios

Agregar Comentario

Ver Estadísticas:

Ultimas 24 horas: 0

Ultimos 7 días: 4

Ultimos 30 días: 22

Todo El Tiempo: 3,629