Saltar al contenido principal
Dell Chromebook 11-3120 Daughterboard Replacement

Dell Chromebook 11-3120 Daughterboard Replacement

Mitchell Stevens

Mitchell Stevens y 4 otros contribuidores

Última actualización: July 2, 2018

5 - 10 minutos
Fácil

Introducción

Ir al paso 1

The USB port allows for small amounts of data to be transferred from computer to computer via a USB drive. Sometimes these drives do not connect properly due to a broken motherboard. Here is a guide on how to properly replace the motherboard.

Qué necesitas

Partes

Herramientas

Ver más…

  1. Dell Chromebook 11-3120 Daughterboard Replacement, Back Panel: paso 1, imagen 1 de 2 Dell Chromebook 11-3120 Daughterboard Replacement, Back Panel: paso 1, imagen 2 de 2
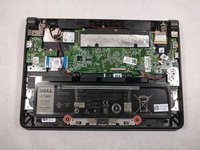
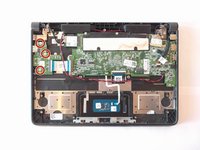
    • Use the #J0 screwdriver to unscrew the seven 4mm screws located around the back panel.

  2. Dell Chromebook 11-3120 Daughterboard Replacement: paso 2, imagen 1 de 2 Dell Chromebook 11-3120 Daughterboard Replacement: paso 2, imagen 2 de 2
    • Use the plastic opening tool to gently pry around the four sides of the back panel until the panel is fully released.

    • Taking the back cover off of the computer may require more force than expected. When using the opening tool, be careful not to use too much force on it, and make sure all the screws are removed.

  3. Dell Chromebook 11-3120 Daughterboard Replacement, Battery: paso 3, imagen 1 de 2 Dell Chromebook 11-3120 Daughterboard Replacement, Battery: paso 3, imagen 2 de 2
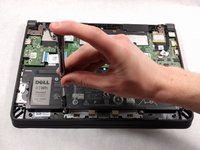
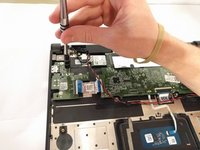
    • Using a JIS #0 screwdriver, unscrew the two 4mm screws securing the battery in place.

  4. Dell Chromebook 11-3120 Daughterboard Replacement: paso 4, imagen 1 de 1
    • Using the pointed end of a #2 spudger, remove the connection between the battery and motherboard by slightly pulling on the wires while pushing the tiny hole down using the spudger.

    • Pull out the battery from inside the laptop.

  5. Dell Chromebook 11-3120 Daughterboard Replacement, Daughterboard: paso 5, imagen 1 de 2 Dell Chromebook 11-3120 Daughterboard Replacement, Daughterboard: paso 5, imagen 2 de 2
    • Disconnect the bridge connection ribbon cable from the motherboard.

  6. Dell Chromebook 11-3120 Daughterboard Replacement: paso 6, imagen 1 de 2 Dell Chromebook 11-3120 Daughterboard Replacement: paso 6, imagen 2 de 2
    • Using a JIS #0 screwdriver, unscrew the three 4mm screws securing the daughterboard in place.

  7. Dell Chromebook 11-3120 Daughterboard Replacement: paso 7, imagen 1 de 1
    • Carefully lift out the daughterboard with the right-hand USB port from the laptop.

Conclusión

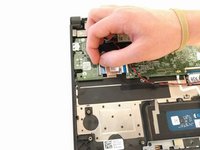
To reassemble your device, follow these instructions in reverse order.

Una persona más ha completado esta guía.

Equipo

0 comentarios

Agregar Comentario

Ver Estadísticas:

Ultimas 24 horas: 0

Ultimos 7 días: 4

Ultimos 30 días: 11

Todo El Tiempo: 963