Saltar al contenido principal
Casio CTK-3200 Side Panel Replacement

Casio CTK-3200 Side Panel Replacement

Connor Bentley

Connor Bentley y 3 otros contribuidores

Última actualización: December 31, 2024

5 - 10 minutos
Fácil

Introducción

Ir al paso 1

If your Casio keyboard (model CTK-3200) is having issues with faulty or broken speakers or keys, this is the second guide in fixing or replacing any of those issues.

Before using this guide, make sure to disconnect any external parts, tools, or modifiers from the keyboard's ports in order to make the removal process simpler. Only use the recommended tools for this project, any misuse of tools could result in injury. For more information on how to maintain project safety, see iFixit's Project Safety Page.

Before beginning, be sure that your keyboard is powered off, has no batteries, and is disconnected from any external power source.

Qué necesitas

Herramientas

  1. Casio CTK-3200 Side Panel Replacement, Center Front Panel: paso 1, imagen 1 de 2 Casio CTK-3200 Side Panel Replacement, Center Front Panel: paso 1, imagen 2 de 2
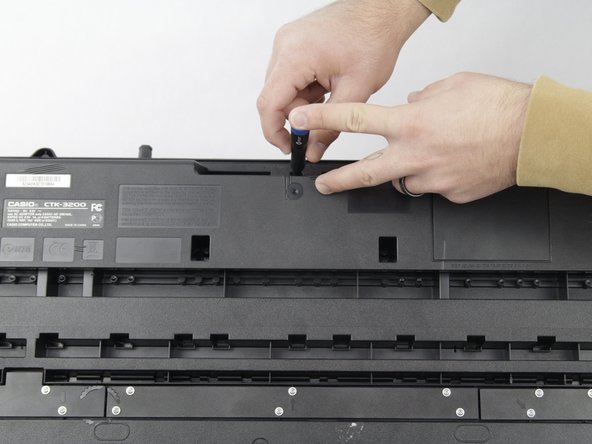
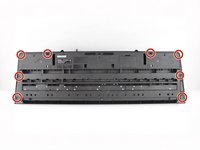
    • Remove the seven 10 mm Phillips #1 screws on the underside of the keyboard that secure the center front panel.

  2. Casio CTK-3200 Side Panel Replacement: paso 2, imagen 1 de 1
    • Flip the keyboard over and remove the central panel on the front and place it above the keyboard.

    • Make sure not to sever or strain any connections between the yellow-colored main board and the central panel.

    • If the panel is not easily removable, make sure all the screws are removed from the back.

  3. Casio CTK-3200 Side Panel Replacement, Side Panel: paso 3, imagen 1 de 2 Casio CTK-3200 Side Panel Replacement, Side Panel: paso 3, imagen 2 de 2
    • Remove all eight 10 mm Phillips #1 screws that secure the side panels.

  4. Casio CTK-3200 Side Panel Replacement: paso 4, imagen 1 de 1
    • Carefully remove one side panel at a time from the top of the keyboard and place it above the keyboard, making sure not to sever any connections between the yellow-colored mainboard and the side panels.

    • If the panels are not easily removable, make sure all the screws are removed from the back.

Conclusión

To reassemble your device, follow these instructions in reverse order.

Connor Bentley

Miembro Desde 10/23/24

219 Reputación

2 Guías creadas

Equipo

Cuesta, Team 10-4, Krynen Fall 2024 Miembro de Cuesta, Team 10-4, Krynen Fall 2024

CUESTA-KRYNEN-F24S10G4

Miembros de 4

6 Guías creadas

0 comentarios

Agregar Comentario

Ver Estadísticas:

Ultimas 24 horas: 0

Ultimos 7 días: 0

Ultimos 30 días: 3

Todo El Tiempo: 22