Saltar al contenido principal
Canon Powershot SX10 IS Rear and Front Casing Replacement

Canon Powershot SX10 IS Rear and Front Casing Replacement

garrett knox

garrett knox y 8 otros contribuidores

Última actualización: May 7, 2024

30 minuto
Moderado

Introducción

Ir al paso 1

This guide provides a walk through of the steps needed to remove the enclosure in order to access the internal parts of the Canon PowerShot SX10 IS . The front and rear casings protect the internals of the Canon PowerShot SX10 IS from debris and damage.

Replacing the rear and front casing might be necessary in instances where the camera has been damaged or if the camera is in need of maintenance. Repairing the rear and front casing of the camera will resolved the issue of a damaged case and will also renovate the outer design. This guide provides comprehensive instruction to disassembling the casing of the camera.

There is no specific training required prior to executing the guide. However, organization and the use of the proper tools will be crucial in the replacement process.

It is important to note that reassembly of the camera can be accomplished by following the provided steps in reverse.

Qué necesitas

Partes

Herramientas

Ver más…

iFixit gana una comisión si finalizas una compra usando estos enlaces.
  1. Canon Powershot SX10 IS Rear and Front Casing Replacement, Lithium Ion Battery: paso 1, imagen 1 de 1
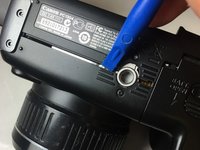
    • Open the door. Release the catch by sliding it towards the side of the camera.

    • Then slide the door towards the front of the camera.

  2. Canon Powershot SX10 IS Rear and Front Casing Replacement: paso 2, imagen 1 de 3 Canon Powershot SX10 IS Rear and Front Casing Replacement: paso 2, imagen 2 de 3 Canon Powershot SX10 IS Rear and Front Casing Replacement: paso 2, imagen 3 de 3
    • Remove AA batteries.

    • Using a fingernail or iFixit opening tools to pry up the battery cradle.

    • Remove CR1220 battery from the cradle.

  3. Canon Powershot SX10 IS Rear and Front Casing Replacement, Rear and Front Casing: paso 3, imagen 1 de 1
    • Remove two PH 00 screws on each side of the eyepiece.

  4. Canon Powershot SX10 IS Rear and Front Casing Replacement: paso 4, imagen 1 de 1
    • Remove the two PH 00 screws on the right panel of the camera.

  5. Canon Powershot SX10 IS Rear and Front Casing Replacement: paso 5, imagen 1 de 1
    • Remove five PH 00 screws on the bottom.

  6. Canon Powershot SX10 IS Rear and Front Casing Replacement: paso 6, imagen 1 de 3 Canon Powershot SX10 IS Rear and Front Casing Replacement: paso 6, imagen 2 de 3 Canon Powershot SX10 IS Rear and Front Casing Replacement: paso 6, imagen 3 de 3
    • Use the iFixit opening tool to free the back casing from the rest of the camera body.

    • Be careful because there is a ribbon cable that attaches the back casing to the motherboard.

    • Gently lift up on the black latch holding the ribbon cable in place and slide the ribbon out.

  7. Canon Powershot SX10 IS Rear and Front Casing Replacement: paso 7, imagen 1 de 2 Canon Powershot SX10 IS Rear and Front Casing Replacement: paso 7, imagen 2 de 2
    • Remove three screws on the left side of the camera.

    • Slide the left side casing up and off of the camera body.

  8. Canon Powershot SX10 IS Rear and Front Casing Replacement: paso 8, imagen 1 de 1
    • Remove two screws holding the front casing to the body.

  9. Canon Powershot SX10 IS Rear and Front Casing Replacement: paso 9, imagen 1 de 3 Canon Powershot SX10 IS Rear and Front Casing Replacement: paso 9, imagen 2 de 3 Canon Powershot SX10 IS Rear and Front Casing Replacement: paso 9, imagen 3 de 3
    Herramienta utilizada en este paso:
    Tweezers
    $4.99
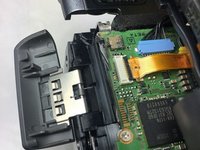
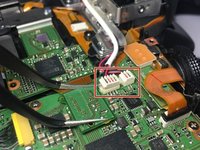
    • Remove two cables connected to the motherboard.

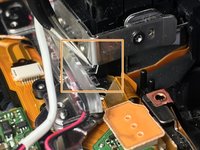
    • Use thin tweezers to push down on the clear piece and slide it out. At this point half of the clear piece should be free.

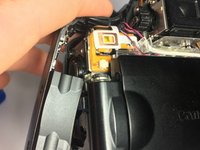
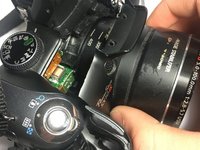
    • Remove one screw that is holding down the middle of the clear piece to the body of the camera. The whole structure with wires will swing out.

  10. Canon Powershot SX10 IS Rear and Front Casing Replacement: paso 10, imagen 1 de 3 Canon Powershot SX10 IS Rear and Front Casing Replacement: paso 10, imagen 2 de 3 Canon Powershot SX10 IS Rear and Front Casing Replacement: paso 10, imagen 3 de 3
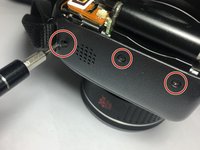
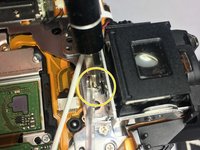
    • Using the iFixit opening tool, gently pry along the top edge of the front casing.

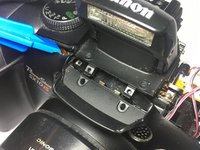
    • Move to the right side of the camera and gently pry at the top and bottom areas of this part of the casing. The front casing will come free once it has been pried here.

    • The front casing will be able to slide away from the body of the camera.

Conclusión

To reassemble your device, follow these instructions in reverse order.

Una persona más ha completado esta guía.

0 comentarios

Agregar Comentario

Ver Estadísticas:

Ultimas 24 horas: 1

Ultimos 7 días: 4

Ultimos 30 días: 24

Todo El Tiempo: 1,169