
Canon PowerShot SD1200 IS Motherboard
Sin estimación
Moderado
Rebanar y Trocear
Introducción
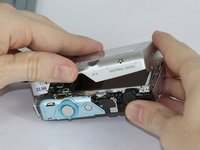
Ir al paso 1Use this guide to access the motherboard to reseat connections on the motherboard or to remove the motherboard for replacement.
Qué necesitas


-
-
-
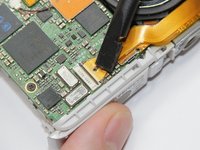
Remove the microphone connector by gripping it with the tool and gently, with a wiggling motion, pull it out.
-


Casi Terminas!
To reassemble your device, follow these instructions in reverse order.
Conclusión
To reassemble your device, follow these instructions in reverse order.
Equipo

USF Tampa, Team 17-5, Blackwell Fall 2016 Miembro de USF Tampa, Team 17-5, Blackwell Fall 2016
USFT-BLACKWELL-F16S17G5
3 Miembros
7 Guías creadas