Saltar al contenido principal
Canon PowerShot ELPH 150 IS  Face Plate Replacement

Canon PowerShot ELPH 150 IS Face Plate Replacement

Alex Larrimore

Alex Larrimore y 6 otros contribuidores

Última actualización: June 28, 2018

5 minuto
Moderado
Error de marcado
Mejor introducción

Introducción

Ir al paso 1

This guide will help users of all abilities to replace the faceplate/front panel of their camera.

Qué necesitas

Herramientas

  1. Canon PowerShot ELPH 150 IS  Face Plate Replacement, Back Plate/Menu Buttons: paso 1, imagen 1 de 2 Canon PowerShot ELPH 150 IS  Face Plate Replacement, Back Plate/Menu Buttons: paso 1, imagen 2 de 2
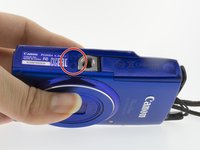
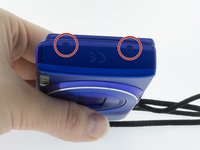
    • Locate the ON/Off button on the top of the camera and hold it down until the screen and all lights on the camera go dark.
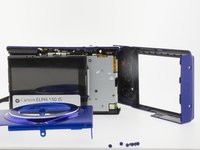
  2. Canon PowerShot ELPH 150 IS  Face Plate Replacement: paso 2, imagen 1 de 1
    • Locate the back plate of the camera (contains the LCD screen and menu buttons).

  3. Canon PowerShot ELPH 150 IS  Face Plate Replacement: paso 3, imagen 1 de 2 Canon PowerShot ELPH 150 IS  Face Plate Replacement: paso 3, imagen 2 de 2
    • To remove the back plate you will need to unscrew the 6 support screws securing it to the camera.

    • Use a Phillips #00 screwdriver to remove the first 2 screws on the bottom of the camera.

  4. Canon PowerShot ELPH 150 IS  Face Plate Replacement: paso 4, imagen 1 de 3 Canon PowerShot ELPH 150 IS  Face Plate Replacement: paso 4, imagen 2 de 3 Canon PowerShot ELPH 150 IS  Face Plate Replacement: paso 4, imagen 3 de 3
    • Remove the next 2 screws located behind the AV port using the same Phillips #00 screwdriver.

  5. Canon PowerShot ELPH 150 IS  Face Plate Replacement: paso 5, imagen 1 de 2 Canon PowerShot ELPH 150 IS  Face Plate Replacement: paso 5, imagen 2 de 2
    • Use a Phillips #00 screwdriver to remove the final 2 screws from the blue side panel.

  6. Canon PowerShot ELPH 150 IS  Face Plate Replacement: paso 6, imagen 1 de 3 Canon PowerShot ELPH 150 IS  Face Plate Replacement: paso 6, imagen 2 de 3 Canon PowerShot ELPH 150 IS  Face Plate Replacement: paso 6, imagen 3 de 3
    • Use your hands or a spudger to gently pry the front and back case apart along the seams on the bottom of the camera.

    • Completely remove the back plate.

Conclusión

To reassemble your device, follow these instructions in reverse order.

Alex Larrimore

Miembro Desde 03/05/17

305 Reputación

3 Guías creadas

Equipo

0 comentarios

Agregar Comentario

Ver Estadísticas:

Ultimas 24 horas: 5

Ultimos 7 días: 8

Ultimos 30 días: 16

Todo El Tiempo: 773