
Asus X551CA Hard Drive Replacement
Introducción
Ir al paso 1The hard drive is where a computer permanently stores information, making it very important. A broken or damaged hard drive must be replaced to restore proper functioning.
Qué necesitas
Kits de reparación
Estos kits contienen todas las piezas y herramientas necesarias para completar esta guía.


Partes


Herramientas


Ver más…
-
-
Turn the laptop upside-down and remove the following screws using a Phillips #0 driver:
-
Two 9.5 mm screws in the middle of the back edge, and one 9.5 mm screw in the right edge
-
Two 4.3 mm screws in the back corners
-
One 17.5 mm screw at the left edge near the optical drive
-
Three 4.3 mm screws in the front edge
-
-
-
-
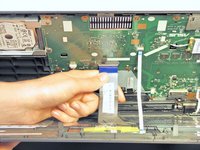
Invert the laptop in order to gain access to the ribbons.
-
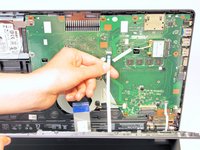
Remove each ribbon by flipping the small white plastic flap up and gently pulling on the ribbon.
-
-
-
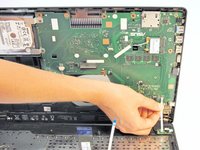
Now that the ribbons have been detached from the bottom cover, carefully remove the keyboard plate cover. Once it has been removed, place it in a safe and moisture free area so it does not get damaged.
Yes and you have to put lotion on
Now, that is a stupid question! Of course! As I am working on 551M, I naturally have to have nails painted orange, with blue accents!
that boy ain't right
-
-
-
Unscrew the three 5.5 mm Phillips #0 screws with the Phillips #0 Screwdriver.
-


To reassemble your device, follow these instructions in reverse order.
To reassemble your device, follow these instructions in reverse order.
Cancelar: No complete esta guía.
48 personas más completaron esta guía.
Equipo

Cal Poly, Team 7-22, Regan Spring 2014 Miembro de Cal Poly, Team 7-22, Regan Spring 2014
CPSU-REGAN-S14S7G22
5 Miembros
15 Guías creadas
8 comentarios
Excellent work !
Same issue as Tony on 09/03/2014
The screw sizings are mixed up. The red screws are 9.5, not 14.3
The yellow screws are 14.3 not 9.5. Please fix the repair guide text
It should be fixed now! Thanks to both of you for the tip. By the way, you can always edit the text yourself. ;)
Thanks for the info!
All went well until it came to replacing the ribbon cables. Tried and tried, and couldn’t get them to stay in place. Had to call in a computer repair chap who fixed them in a couple of minutes. After that, everything was fine.
screw assignments are definitely wrong. I swapped the red and the green, as per comment above, and kept the blue as-is.
jasonbuechler - Contestar
jason is right
starwilson - Contestar
correct, swap the green and red
Josh - Contestar
Jason is correct
Clem Lanoe - Contestar
Thanks everyone. It does seem like someone got their screws mixed up when they wrote this guide. I’ve made some changes as you all suggested, so the screw placements should be more accurate now. If anyone with this laptop could verify the screw measurements with a digital caliper, that’d also be very helpful.
Jeff Suovanen - Contestar