Saltar al contenido principal

Asus Transformer Book T100TAR Speaker Replacement

Qué necesitas

  1. Asus Transformer Book T100TAR Speaker Replacement, Speaker: paso 1, imagen 1 de 2 Asus Transformer Book T100TAR Speaker Replacement, Speaker: paso 1, imagen 2 de 2
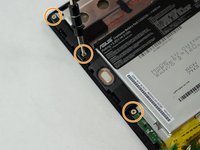
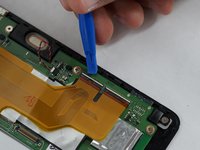
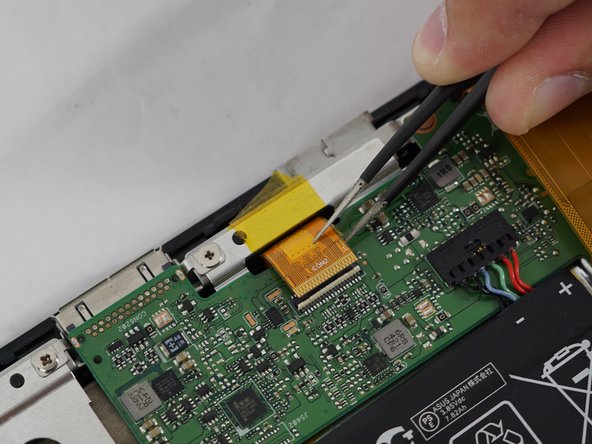
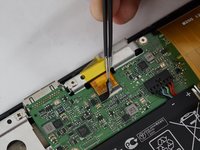
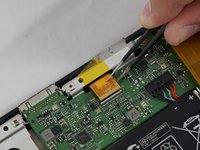
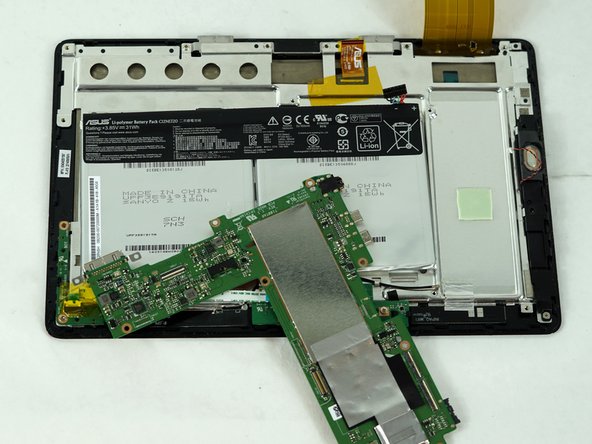
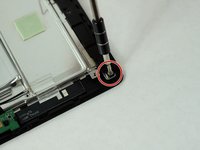
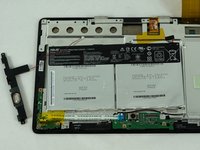
    • Detach and separate the screen from the keyboard by pressing the silver release button at the base of the tablet.

  2. Asus Transformer Book T100TAR Speaker Replacement: paso 2, imagen 1 de 1
    • Take the metal spudger and insert it into the seam of the rear cover casing and gently pry upwards.

    • If done correctly, you should feel the clips release.

    • Ensure that all the clips are released by sliding the metal opening tool along the four edges of the tablet.

    • Do not force the clips to release. This will cause them to break, and if broken, the screen will become loose. Open the rear cover gently and with caution.

  3. Asus Transformer Book T100TAR Speaker Replacement: paso 3, imagen 1 de 1
    • Take off the rear case.

  4. Asus Transformer Book T100TAR Speaker Replacement: paso 4, imagen 1 de 2 Asus Transformer Book T100TAR Speaker Replacement: paso 4, imagen 2 de 2
    • Locate the left speaker, indicated by the image. They should be directly to the left of the battery.

    • Use a Phillips #0 Screwdriver to remove three 5mm screws holding the speaker in place.

  5. Asus Transformer Book T100TAR Speaker Replacement: paso 5, imagen 1 de 2 Asus Transformer Book T100TAR Speaker Replacement: paso 5, imagen 2 de 2
    • Using tweezers, lift up the black tape securing the speaker connection cable.

    • Disconnect the cable from the motherboard by gently tugging on it with the tweezers.

  6. Asus Transformer Book T100TAR Speaker Replacement: paso 6, imagen 1 de 2 Asus Transformer Book T100TAR Speaker Replacement: paso 6, imagen 2 de 2
    • To remove the right speaker, begin by detaching the large black strip connecting from the camera board to the motherboard using a plastic opening tool.

  7. Asus Transformer Book T100TAR Speaker Replacement: paso 7, imagen 1 de 1
    • Using tweezers, detach the small black cable connected to the motherboard by gently tugging on it.

  8. Asus Transformer Book T100TAR Speaker Replacement: paso 8, imagen 1 de 3 Asus Transformer Book T100TAR Speaker Replacement: paso 8, imagen 2 de 3 Asus Transformer Book T100TAR Speaker Replacement: paso 8, imagen 3 de 3
    • Using tweezers, carefully remove the black tape holding the large orange strip.

    • Using a plastic opening tool, lift up the white tabs and pull the orange strip out of place.

  9. Asus Transformer Book T100TAR Speaker Replacement: paso 9, imagen 1 de 2 Asus Transformer Book T100TAR Speaker Replacement: paso 9, imagen 2 de 2
    • Disconnect the LCD connection apparatus by carefully removing the black protective strip with tweezers and gently tugging on the orange ribbon.

  10. Asus Transformer Book T100TAR Speaker Replacement: paso 10, imagen 1 de 1
    • Using the nylon spudger, very carefully disconnect the battery by gently pushing the sharper end against the base.

    • There should be a small dent in the middle; push from there.

  11. Asus Transformer Book T100TAR Speaker Replacement: paso 11, imagen 1 de 1
    • Using a Phillips #0 screwdriver, unscrew six 5mm screws holding the motherboard in place.

    • Also using a Phillips #0 screwdriver, unscrew two additional 4mm screws off the top left ends of the motherboard.

  12. Asus Transformer Book T100TAR Speaker Replacement: paso 12, imagen 1 de 2 Asus Transformer Book T100TAR Speaker Replacement: paso 12, imagen 2 de 2
    • Disconnect the speaker from the motherboard by gently tugging on the cable head with tweezers.

    • Remove the motherboard.

  13. Asus Transformer Book T100TAR Speaker Replacement: paso 13, imagen 1 de 3 Asus Transformer Book T100TAR Speaker Replacement: paso 13, imagen 2 de 3 Asus Transformer Book T100TAR Speaker Replacement: paso 13, imagen 3 de 3
    • Using a Phillips #0 screwdriver, unscrew a single 5mm screw from the bottom of the right speaker apparatus.

    • Remove the speaker.

Conclusión

To reassemble your device, follow these instructions in reverse order.

Alyssa Ballesteros

Miembro Desde 09/07/16

683 Reputación

5 Guías creadas

Equipo

USF Tampa, Team 6-1, Remmell Fall 2016 Miembro de USF Tampa, Team 6-1, Remmell Fall 2016

USFT-REMMELL-F16S6G1

4 Miembros

5 Guías creadas

0 comentarios

Agregar Comentario

Ver Estadísticas:

Ultimas 24 horas: 0

Ultimos 7 días: 1

Ultimos 30 días: 2

Todo El Tiempo: 468