
Acer Chromebook R11 CB5-132T-C1LK Battery Replacement
Introducción
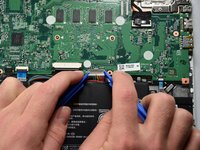
Ir al paso 1Removing the battery may be necessary if the Chromebook experiences power issues or if the user wants to replace an old battery. It is important when removing the battery to unplug your device charger as well as making sure the computer is turned off. Do not place the battery near any liquids or metal devices as they may harm the battery or cause the battery to discharge.
Qué necesitas


-
-
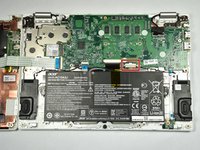
Using a Phillips screwdriver, remove all eleven 7.0 mm screws from the bottom of the Chromebook.
-
-


To reassemble your device, follow these instructions in reverse order.
To reassemble your device, follow these instructions in reverse order.
Cancelar: No complete esta guía.
3 personas más completaron esta guía.
Equipo

Cal Poly, Team S23-G2, Livingston Spring 2017 Miembro de Cal Poly, Team S23-G2, Livingston Spring 2017
CPSU-LIVINGSTON-S17S23G2
Miembros de 4
12 Guías creadas