Saltar al contenido principal

ASUS ROG Zephyrus M15GU205L Fan Cleaning

Qué necesitas

  1. ASUS ROG Zephyrus M15GU205L Fan Cleaning, Battery: paso 1, imagen 1 de 2 ASUS ROG Zephyrus M15GU205L Fan Cleaning, Battery: paso 1, imagen 2 de 2
    • Remove fifteen 10 mm screws from the bottom cover using a Phillips #0 screwdriver.

  2. ASUS ROG Zephyrus M15GU205L Fan Cleaning: paso 2, imagen 1 de 2 ASUS ROG Zephyrus M15GU205L Fan Cleaning: paso 2, imagen 2 de 2
    • Use a plastic opening tool to separate the back cover from the laptop.

    • It is recommended that you separate the laptop cover from the side and run the tool along the edge of the cover to open it.

    • Be careful not to damage the cover when removing it from the laptop.

  3. ASUS ROG Zephyrus M15GU205L Fan Cleaning: paso 3, imagen 1 de 1
    • Remove six 4.8 mm screws that secure the battery using a Phillips #00 screwdriver.

  4. ASUS ROG Zephyrus M15GU205L Fan Cleaning: paso 4, imagen 1 de 2 ASUS ROG Zephyrus M15GU205L Fan Cleaning: paso 4, imagen 2 de 2
    Herramienta utilizada en este paso:
    Tweezers
    $4.99
    Comprar
    • Disconnect the 8-pin battery that secures the battery to the motherboard.

    • Use the nylon tipped reverse tweezers to squeeze the edges, then pull out the connector.

  5. ASUS ROG Zephyrus M15GU205L Fan Cleaning: paso 5, imagen 1 de 1
    • Remove the battery from the computer.

  6. ASUS ROG Zephyrus M15GU205L Fan Cleaning, ASUS ROG Zephyrus M15GU205L Fan Cleaning: paso 6, imagen 1 de 2 ASUS ROG Zephyrus M15GU205L Fan Cleaning, ASUS ROG Zephyrus M15GU205L Fan Cleaning: paso 6, imagen 2 de 2
    Herramienta utilizada en este paso:
    Microfiber Cleaning Cloths
    $3.99
    Comprar
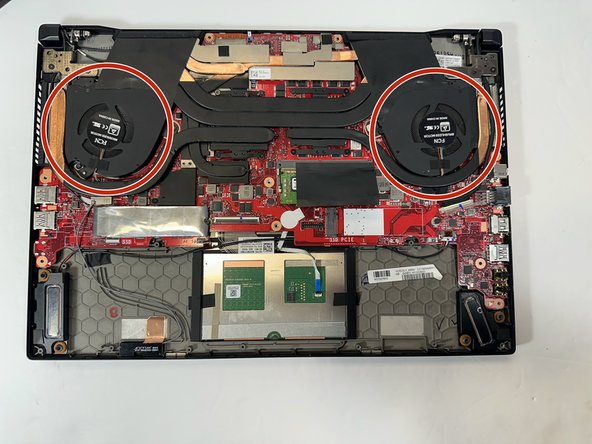
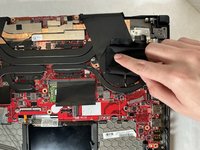
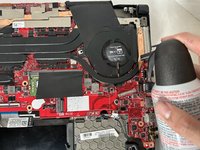
    • Use the microfiber cloth to wipe any surface dust off the fan fins.

    • Wipe lightly as to not push any of the dust inside.

    • Wiping off the dust is optional.

  7. ASUS ROG Zephyrus M15GU205L Fan Cleaning: paso 7, imagen 1 de 2 ASUS ROG Zephyrus M15GU205L Fan Cleaning: paso 7, imagen 2 de 2
    • Use the compressed air to blow out the dust from the fan.

    • Use the information on how to correctly use the product you selected.

    • Use the air until you see the results you are comfortable with.

Conclusión

To reassemble your device, follow these instructions in reverse order.

eli2243977

Miembro Desde 09/07/23

281 Reputación

2 Guías creadas

Equipo

Gateway, Team 69-69, Gonzalez Fall 2023 Miembro de Gateway, Team 69-69, Gonzalez Fall 2023

GCC-GONZALEZ-F23S69G69

4 Miembros

4 Guías creadas

0 comentarios

Agregar Comentario

Ver Estadísticas:

Ultimas 24 horas: 5

Ultimos 7 días: 30

Ultimos 30 días: 103

Todo El Tiempo: 382