Saltar al contenido principal

"The worlds smallest 15.6-inch laptop packs powerhouse performance and a stunning InfinityEdge display all in Dell's most powerful XPS laptop."

Preguntas 56 Ver todo

Display hinge broke from base

Hi,

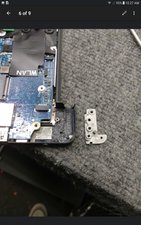
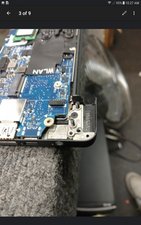
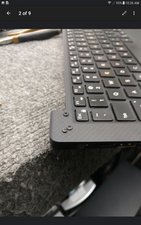
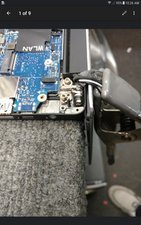
My laptop hit the floor and the post that the laptop base hex screw attaches to snapped off. Not a problem, however the laptop keeps separating every time I close the lid and I have to push the top and bottom together to put the laptop to sleep. It’s now causing more internal damage and when I open it up, the clip has snapped off the laptop base as well as the screw hole to the base is also cracked in half. I’ve attached pics but wanted to know the hinge was attached to that I need to replace, as well as the hinge itself. This is on the same side as the power button. Any info would be very much appreciated. And not sure if the pictures uploaded or not but have those too.

Thanks!

Update (04/09/2019)

Block Image

Block Image

Block Image

Block Image

Contestado! Ver respuesta Yo también tengo este problema

Es esta una buena pregunta?

Puntuación 4
3 comentarios

Hi,

I have a XPS 15 9550 with a broken hinge. I tried to remove the antenna cover but it is really hard and I am unable to slide it. how can I remove the cover so I can access the hinges?

Thanks for your help.

Venkat

- de

I bought a new chassis from eBay and swapped it all over.

I tried using liquid metal glue but it didn't hold so just bought a replacement chassis for £40

- de

Replacement chasis? From where? Link please.

- de

Agregar un comentario

4 Respuestas

Solución Elegida

Hi @frankralfano ,

You need to replace the palmrest assembly.

Here’s a link to the service manual for a Dell XPS 15 9550 laptop taken from this webpage

Scroll to p.87 to view the necessary pre-requisite steps and then the procedure to remove/replace the palmrest assembly.

Replacements are available online. Just search for Dell XPS 15 9550 palmrest assembly to get results for suppliers of the part.

Fue útil esta respuesta?

Puntuación 3

4 comentarios:

Amazing, thank you so much! Lots of steps, wish me luck!

- de

@jayeff , any suggestions on sourcing the palm rest assembly and not paying Dell $230 for it? I can't seem to find it anywhere on line. Part no is 05dy4c. Kills me to spend all of that money because of a broken post! Thanks again for your help.

- de

Hi @frankralfano ,

Search online using the "part number only" in the search box of your browser. Apologies if you've done this already

Here's one that may be cheaper if the shipping doesn't raise the price too much.

- de

Thanks @jayeff, I will take a look. Really appreciate all of your insights!

- de

Agregar un comentario

Have you resolved this yet..? It's what refer to as a “Design Flaw” by Dell.. I've had to engineer a solution for this problem, as I have seen multiple XPS Models with this very same thing happening.. Note: this is on the opposite side of the WLAN Connector, but I would probably handle it the same way… Cheers

Block Image

Block Image

Block Image

Block Image

Fue útil esta respuesta?

Puntuación 1

2 comentarios:

Hi Ruben, I really like your solution looks absolutely solid. Can you tell me which and which size screws and bolts you used for this fix please? Did you use any glue as well? Thanks

- de

I know this is much later than your posting date, regarding screws and bolts, however maybe someone else viewing this post can be assisted by the answer to your question.

Screws are regular laptop Phillips Head - 2.5mm/3mm/3.5mm sizes (referring to width of course). Because I have thousands of these available in a shop environment, I simply searched for and found the longest screws available (1" to 1.5" length).

For the "bolts" parts of the answer, these are not bolts, but rather the Collettes (screw receptacles encased in plastic, gold or bronze colored) that broke off, and were originally fastened to the factory screws (look at the 4th image and zoom in).

If you don't have 100's or 1000's of Laptop screws around, as I conveniently do, I've seen eBay and Amazon sellers offering multi-packs of these type screws that one can acquire in 2-3 days after shipping, maybe sooner depending upon your locale..

This process I've now had to perform on more than just Dells, but HP's, Acers, Sony, Lenovo, etc.. Works great

- de

Agregar un comentario

because it’s a newer model, you may be able to check your warranty. also, because it’s a big hinge, you may need to open it up to re-attach it.

Fue útil esta respuesta?

Puntuación 0

5 comentarios:

Unfortunately it's been out of warranty for over a year. The hinge has broken from whatever it was attached to underneath the keyboard area. Looks like it was also glued down for extra support.

- de

Oh. Since the XPS seiries os newer, I thought you might have your warranty.

- de

Any thoughts on how to re-attach the hinge piece to the palm rest? The hinge plate is glued down and my left one, same side as the power connector, just de-laminated from the body underneath it. Is there a particular glue I could just re-glue it? Thanks

- de

Hi @ Bill Layton,

I would try using something like this - example only and check how that goes.

It's a bit tricky with plastics as not all glues etc will adhere properly and some may even seem to melt them.

Good luck.

- de

Glue won't do the trick, as far as re-attaching display hinges to the laptop base/palmrest assembly. Drill some holes, increase the durability beyond that of the original manufacturer's design (which is quite weak in many cases).

Look at the post where I'm referring to this as a "Hands Down DESIGN FLAW" by many manufacturers..

Display hinge broke from base

- de

Agregar un comentario

I own a Dell XPS 15 too. Due to a swollen battery (If you, like me, never heard about that, Google it) the left hinge was torn loose. I really needed the laptop, so ordering a and receiving a replacement palmrest and swapping everything was probematic. Also my eyes are getting week.

I bought a product called Quiksteel Steel Repair. I did some tests. It appeared strong enough and viscosity was OK. Little problem: Gluing has to be done within 4 minutes.

Important:

1. Roughen up the surfaces. I used a Dremel and a little mill and a rotating steel brush.

2. Degrease both surfaces well.

3. I disassembled the hinge, and glued the non-screen half. Placement has to be done very precisely. Mine was about 0,1 mm off, which made it a bit hard to assemble.

It's been a week now. Opening and closing goes smoothly. And the glue holds.

Fue útil esta respuesta?

Puntuación 0
Agregar un comentario

Añadir tu respuesta

Frank Alfano estará eternamente agradecido.
Ver Estadísticas:

Ultimas 24 horas: 0

Ultimos 7 días: 8

Ultimos 30 días: 64

Todo El Tiempo: 10,135