Introducción
Si quieres reparar una pantalla rota y la parte trasera de tu pantalla nueva incluye además una placa delgada de escudo de metal, debes seguir esta guía más corta para una reparación más fácil. Per si esa placa de escudo LCD no se encuentra, sigue leyendo. Esta guía te mostrará cómo reemplazar y mantener tu anterior placa de escudo LCD.
El conjunto combinado de altavoz y sensor del auricular fijado en la parte posterior de la pantalla está emparejado con tu iPhone de fábrica, por lo que debes transferirlo de la pantalla antigua a la nueva durante la sustitución de la pantalla. Contiene el iluminador de inundación, que forma parte de la característica de seguridad biométrica Face ID. Si está dañado o sustituido, el Face ID no funcionará, por lo que deberás tener especial cuidado de no dañar ninguno de estos componentes durante este procedimiento. Si está dañado, sólo Apple puede restaurar la función del Face ID.
Qué necesitas
-
-
Apaga tu iPhone antes de comenzar a desmontar.
-
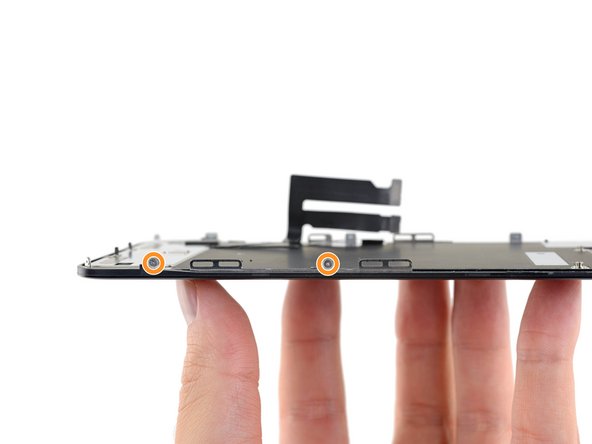
Remueve los dos tornillos pentalobe de 6.7 mm en el borde inferior del iPhone.
-
-
-
Si tu iPhone tiene la pantalla rota, mantén la rotura contenida y evita lastimarte durante la reparación colocando una cinta sobre el vidrio.
-
Coloca tiras superpuestas de cinta de embalaje sobre la pantalla del iPhone hasta cubrir toda la cara.
-
Si los vidrios rotos dificultan que una ventosa se pegue en los siguientes pasos, intenta doblar un trozo de cinta resistente (como una cinta adhesiva) en un asa y levanta la pantalla con eso.
How to detect my Iphone what screen it is, OLED or LCD?
It’s OLED. You can find the specs here, https://support.apple.com/en-us/HT201296
When you find your phone, at the bottom of the description click on, See the tech specs…
mcr4u2 -
The included suction cups were stiff and worthless. They would not lift the screen. Also, I tried every type of tape on the screen to help the suction cups stick without success. Heavy duty suction cups were for my bathroom also failed. However, I had an old GoPro mount with some preapplied double sided 3M VSB tape and stuck that on the screen near the bottom. Magic! This method had the added bonus of being able to use a GoPro attachment as a handle to lift the screen, and propped up the screen like a kickstand in step 12.
Very cool! Thanks
Antonio -
My screen was pretty stuck… would not budge. Heated, super glued the suction cup, tried gorilla tape. Ended up doing the GoPro mount with 3M VSB tape method mentioned. Worked great. That 3M tape is the bomb.
If you have flat feeler gauges (for adjusting engine valve tappet clearance, ignition points … old school) the .003 thick goes right in. Work your way up until you can get the pick or supplied pry tool in.
where can I buy 3M VSB plis!!
3M VHB tape is at auto stores and other big box stores, or online.
nicO -
I used the tweezers that came with the replacement screen and jammed one of them into the glass and that eventually worked. Heating with a blow dryer is also important. The suction cup was helpful in loosening the adhesive for sure, but just not enough to get the display to come out.
-
-
-
Coloca tiras superpuestas de cinta de embalaje transparente sobre la pantalla del iPhone hasta cubrir toda la cara.
-
Si no puedes hacer que la ventosa se adhiera en los próximos pasos, dobla un trozo de cinta resistente (como cinta adhesiva) en un asa y levanta la pantalla con eso.
-
-
-
Tira de la manija azul hacia atrás para desbloquear los brazos del Anti-Clamp.
-
Desliza los brazos sobre el borde izquierdo o derecho de tu iPhone.
-
Coloca las ventosas cerca del borde inferior de la pantalla, una en el frente y otra en la parte posterior.
-
Aprieta las copas para aplicar succión en el área deseada.
-
-
-
Tira de la manija azul hacia delante para bloquear los brazos.
-
Gira el mango en el sentido de las agujas del reloj 360 grados o hasta que las copas comiencen a estirarse.
-
Asegúrate de que las ventosas permanezcan alineadas entre sí. Si comienzan a salirse de la alineación, afloja ligeramente las ventosas y vuelve a alinear los brazos.
-
-
-
Calienta un iOpener y pásalo por los brazos del Anti-Clamp.
-
Dobla el iOpener de forma que quede sobre el borde inferior del iPhone.
-
Espera un minuto para que el adhesivo se despegue y se abra el hueco.
-
Inserta una púa de apertura en el hueco que hay debajo de la pantalla y el bisel de plástico, no en la propia pantalla.
-
Omite los siguientes tres pasos.
Please UPDATE THIS STEP to say 'insert the opening pick underneath the PLASTIC FRAME OF THE SCREEN' and not the screen. Way too many people are taking this as the way to do it then posting their screen looks different when it's open when they've actually removed the screen leaving the frame in place. It's not rocket science.
Thanks for the suggestion! We updated this step to clarify that.
-
-
-
Usa un secador de pelo o pistola de calor, o prepara un iOpener y aplícalo en el borde inferior del iPhone durante un minuto para ablandar el adhesivo.
An alternative to the Iopener or heat gun is to heat water to EXACTLY 80 degrees F (cooking thermometer is great for this) and pour into a reinforced ziplock type bag. Leave the bag on the screen, but be sure that none of the hot water rests on the zipper portion, as the water is hot enough to soften that seal and leak out on to your device! This meat had is my personal favorite as the heat is distributed very equally and precisely as compared to a heat gun, but is more accessible than the Iopener.
-
-
-
Tira hacia arriba de la ventosa con una presión firme y constante para crear un ligero espacio entre el panel frontal y la caja posterior.
-
Inserta una púa de apertura en el espacio debajo de la pantalla y el bisel de plástico, no en la pantalla en sí.
-
-
-
Desliza la púa de apertura alrededor de la esquina inferior izquierda y sube el borde izquierdo del iPhone, cortando a través del adhesivo que sostiene la pantalla en su lugar.
I think it's important to note that depending on how a screen was damaged, make sure to insert the pic under the black bezel directly under the actual screen. This bezel is a frame around the digitizer. I unknowingly inserted the pic between the bezel and the screen, and separated them both. I did this all the way around the phone. So I basically had to struggle to keep together two different sections of the display assembly because of this mishap, until I removed all the ribbon connectors. It made things much more difficult.
-
-
-
Vuelve a insertar su púa en el borde inferior del iPhone y deslízala hacia arriba en el lado derecho para continuar separando el adhesivo.
My replacement screen for the XR has a black rim but it looks pink. Is that normal?
Step 11 says not to insert your pick around the right side to avoid damaging cables, then Step 12 says to insert it on the right side. Help, I'm confused!
Hi there!
Thank you for the feedback! The wording in step 11 was definitely ambiguous, so we have changed it! You only need to avoid the marked spots rather than the right edge.
-
-
-
Abre el iPhone moviendo la pantalla hacia arriba desde el lado izquierdo, como la contraportada de un libro.
-
Apoya la pantalla contra algo para mantenerla apoyada mientras trabajas en el teléfono.
sure looks like the "hinge" is on the right hand side to me.. not left...!
If you leave the suction cup attached to the screen during the “hinging” process, it makes for a very handy holder for the screen until it’s completely detached.
-
-
-
Remueve tres tornillos de 1.2 mm Y000 que sujetan la batería del soporte del conector.
-
Remueve el soporte.
Definitely make sure all three lobes of your tool are aligned before use (it’s a little harder to tell with this style of bit) and apply even and adequate pressure to ensure it grabs as you spin the driver to prevent disfiguring the lobes/slot of the screw head.
Unfortunately my Y000 tool was perhaps not the best fit (tolerance a bit off) in these screws and I ended up stripping out the heads of all three of these. I started to panic but after I sanded the tip of my Y000 bit down a little with super fine grit (1000CW-C) sand paper to flatten the domed tip (visible with macro lens) and give it a bit more bite I was able to remove and reinstall without issue—in fact I had to remove and install them twice since I forgot my adhesive tape during reassembly, so the screws survived and the sanded bit worked.
+1 to above comment. I bought a cheap kit from Amazon and the Y000 screw driver is not good for this job. I’m concerned that I may have disfigured the heads and i type this comment in the midst of my fix :D Be gentle and assess if you can remove at least one screw with your driver before rummaging through all three and other similar screws holding display connector as well.
Update to above comment. I got hold of a Y0.8 screw driver bit (lucky to find an ORIA screw driver kit in my office) and it works like wonders :) Now back to work…
-
-
-
-
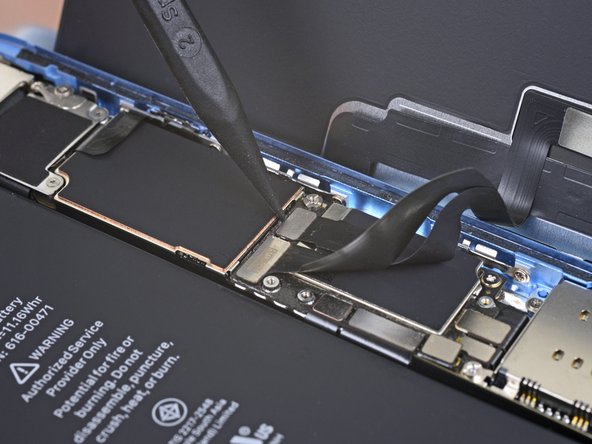
Usa la punta de un spudger para levantar el conector de batería de su zócalo en la placa lógica.
-
Dobla el conector ligeramente hacia afuera de la placa lógica para evitar que haga contacto accidentalmente con el zócalo y proporciona energía al teléfono durante su reparación.
-
-
-
Remueve los dos tornillos Y00 de 1.2 mm que sujetan el soporte de conector de pantalla.
-
Remueve el soporte.
-
-
-
Usa la punta de un spudger para levantar y desconectar le cable del digitalizador.
-
-
-
Usa la punta de un spudger para desconectar el conector de cable de pantalla.
The new display cable isn’t snapping in but I was just able to snap in the old one. Did I break the new one somehow?
Same it is really frustrating, just keeps slipping up and its bound to get damaged
-
-
-
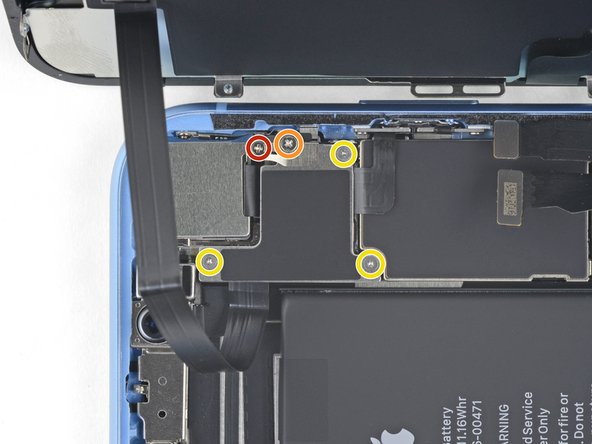
Remueve los cinco tornillos que sujetan el soporte del conector de la placa lógica a la caja trasera:
-
Un tornillo Phillips #000 de 1.3 mm
-
Un tornillo Phillips #000 de 1.5 mm
-
Tres tornillos Y000 de 1.2 mm
-
Quita el soporte.
I’m not sure it makes much if any difference, but we went ahead and swapped the order for you guys. Thanks for your comments!
I just repaired another XR, and you are right! It doesn’t make any differnerce in the order these screws come out. I still damaged this fragile piece. As I work on more of these, I’ll figure out a way to remove this screw without damaging the clip. For now everyone, just use extra caution when removing the 1.3mm phillips screw! Thanks Jeff
I’ve now done at least 6 of these so far and I have fairly consistent good results by taking the 2 Philips head screws out first, then doing the Y screws.
Stow -
Is this piece important for the repair if broken? I have broken it on a home repair. What is it used for? Is it a grounding connection or is it completely unimportant. More information needed please
I’m wondering that too. Is this piece important?
I can confirm that taking out the 1.3 mm screw first then the 1.5 mm screw works the best. If done correctly, you should be able to to remove the rest of the screws and pull the panel off with the clip still attached to the panel. For reassembly, start with the 1.5 mm screw then the 1.3 mm screw.
I don’t remove the small screw at all. I just slide out the metal cover plate and slide back in to reassemble.
this is what i have done as well. Care is still needed to avoid damaging this part. However, it is seemingly far less prone to damage or loss and thus less risky for this repair process.
I too broke this shield. In looking over this problem I believe it’s best to loosen, but not remove, either screw first then the other. To be clear, loosen the red or yellow screw but only just to break it free, then the second screw. Then remove both and the others and the shield should remain in one piece. I put it back with the broken part (on the red screw) and made sure the two are in contact so there’s conductivity as these shields serve a purpose other than just holding in connectors. My phone works fine with this fix.
Is this small bracket important if broken??
Mine is broken
Mine is broken and my apple pay doesn’t work. Something to do with NFC antenna this little clip??
I'm guessing so. I replaced a screen on a phone I bought from a friend. I noticed this bracket was broken when I disassembled the phone but didn't think much of it. When I reassembled it my NFC also does not work. Bummer. A lot of people in these comments have asked if it is crucial that this bracket be connected. Can someone from iFixit or other please reply to those comments?
Kyaw-Zin is right because the shield contains of two tin parts. But there is another option:
1. Unscrew the yellow and orange screws first.
2. Lift the shield gently that it can turn about 20° anticlockwise.
3. Open the red screw and let the shield turn with it the first degrees.
The first time I did this repair, I didn’t see the comments ahead of time and broke the bracket, even removing the 1.3mm screws first. The second time I did the repair, I was prepared and being extra careful, but the simple act of turning the 1.3mm screw head was enough to break it. If I ever have to do this repair again, I’ll just leave the screw in and try to slide the plate out with the screw (and bracket, hopefully) still in tact, as per Kyaw-Zin Win.
None of the screw driver bits I got fits the 1.3mm and 1.5mm screws. How do I remove them?
Same issue as above. The bits provided in the kit do not work with the 1.3mm and 1.5mm screws
Further to above comment about bit not working. Had to go and purchase another PH000 from Home Depot and that worked
I’ve broken that little bracket attached to the red screw. Is it important and can I get a replacement????? Thanks all
Broken the clip. Is this important??
Don't remove the 1.3 Phillips screw! Twisting this screw will break the smaller bracket that is clipped to the larger. Remove all the other screws. Block the smaller bracket from moving as you gently slide the larger bracket horizontally toward the battery until free. The smaller bracket can stay in place while the screen is replaced. When reassembling, support the small bracket by backing with a spudger or similar tool.
I just broke the smaller bracket also :( I didn´t notice these comments until now :(
It looks like part of the antenna for NFC, as all except NFC works on my iPhone now.
It should be repairable using some wire wrap wire, either twisted around the two screws that connected that part of the bracket (or soldered in place). I will try and report back if it works.
Success!! I managed to re-construct the small arm of the bracket by screwing the 1.3mm screw back in with some 0.3mm enamel wire soldered into what was left of the small bracket arm on the screw, then the other end of the enamel wire I wrapped under the 1.5 wire screw's head (enamel exposed to bare metal), then screwed both screws down. also I lifted up the small metal arm with a screw driver (to make sure it reconnects with the display grounding square) ..and NFC worked again (slightly different antenna pattern mind (need to place cards slightly higher up the rear of the phone). Anyway works again :)
-
-
-
Usa la punta de un spudger para levantar el conector de ensamblaje del sensor frontal de su zócalo.
During testing, make sure your proximity sensor is not on upside down, as it’s easy to connect upside down. Your phone will boot loop if it’s on incorrectly.
-
-
-
Remueve el ensamblaje de pantalla.
unclear if this is where screen removal ends
I had the same question, but the answer is yes. Steps 21-30 are removing parts from the original screen that need to be reattached onto the new screen. You are no longer working inside the frame, but on the back of the screen itself.
I apologize for missing these comments initially, but yes that’s correct, the screen is removed now and the rest of the guide goes on to other parts, either in the phone or on the back of the screen. Good luck with the repair!
The alternate method of removing the battery should be highlighted as a standard option. There is so much more work and potential to damage the parts than if you left them in place and carefully with plenty of heat remove the battery. I so wish I had seen this before!
-
-
-
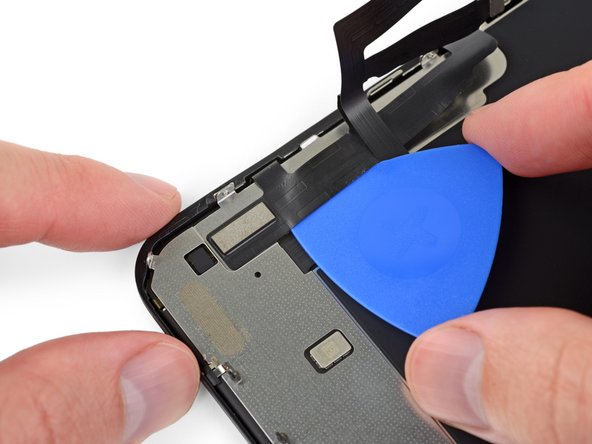
Remueve los cuatro tornillos que sujetan el ensamblaje de altavoz/auricular a la parte trasera de la pantalla.
-
Dos tornillos Phillips de 1.6 mm
-
Un tornillo Phillips de 2.3 mm
-
Un tornillo Y000 de 1.2 mm
Do you really need to do step 21-30, because it says to replace, do it in reverse. Which means you are taking the components off and putting them back on without touching the screen? sorry if this is a dumb question, i’ve never done this before.
Good question! It depends on which guide you are completing. If you are replacing the screen, you do need to complete steps 21-30, in order to remove the front assembly and transfer it to your replacement screen. The front assembly contains the Face ID hardware, which is biometrically linked to the logic board.
Now, if you are completing other guides, you may not need to remove the front assembly. Guides should have the steps slotted in only if they are pertinent to the procedure.
I had the same question, but the answer is yes. Steps 21-30 are removing parts from the original screen that need to be reattached onto the new screen. You are no longer working inside the frame, but on the back of the screen itself.
Im reassembling and notice there are no threaded screw holes to secure the speaker/sensor assembly on the new display. no way to secure it at all. Do i not need to secure it?
Hi Ashley,
There should definitely be screw holes to secure the assembly to the new display. If you purchased the part from iFixit, please contact our customer support, and we will sort things out for you!
Please contact our customer support and we will get the issue resolved!
-
-
-
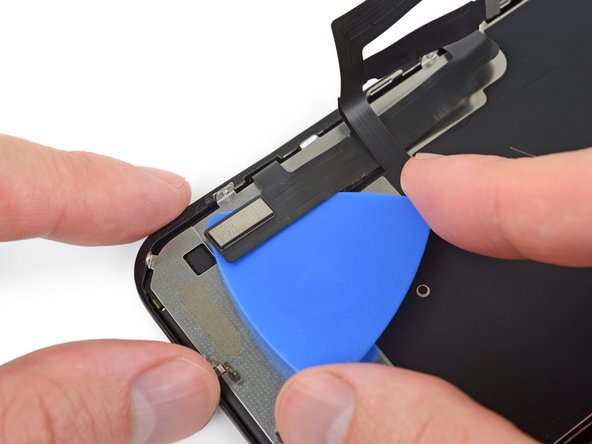
Con pinzas, mueve suavemente el ensamblaje del altavoz hacia arriba y hacia afuera del borde superior de la pantalla.
I don’t understand. It clearly appears that one should stop disassembling after this step. Peeling off the tape here should provide access to the solder connections. Why remove a bunch of other adhered parts? ESD concerns?
Of course, taking care not to transmit heat to the screen assembly below would be prudent. But it’s unlikely much if any heat would conduct even without using any sort of insulating spacer, assuming one’s soldering technique is acceptable. With a thermal mass that small, overheating the connection is the big concern. Especially since it is lead-free solder.
(It has a high melting point. If you didn’t already know that, this is definitely not the best project to develop your soldering skills! You can still do it, but should def practice on similar connections until you feel proficient. Lifting a pad or overheating a nearby component are both dangers. Yet, the cost of the part is low enough you could buy two (just in case) and still come out ahead of Apple’s fee. Use flux or you’ll struggle!)
Hey Ryan,
You are right in that after this step, you could de-solder and replace the earpiece individually, if you choose to do some careful de-soldering and soldering. Alas, not everyone has the background and skill to do so! By instructing users to replace the complete assembly, we bypass the need to solder, and allow a wider audience to successfully complete the repair.
When reassembling or placing the whole sensor module on a replacement screen, make sure to gently rock the speaker back into place. There is a rubber gasket lip around the speaker that must be seated all of the way against the screen and speaker grill to function properly. You should feel a gentle click when is goes in. If is not seated correctly it still easily can be screwed in making it difficult to tell if the speaker is in correctly.
-
-
-
Usa un secador de pelo o una pistola de calor o prepara un iOpener y aplícalo en la parte frontal superior de la pantalla durante 1-2 minutos, para suavizar el adhesivo que sujeta los sensores.
Review steps 24-29 prior to doing this. Step 27 shows removing ambient sensor. It is attached….barely…to the rest of this assembly. I thought I was being overly cautions, and it still broke. Don’t be afraid to use heat. Do not force. Any resistance, do not force it.. Heat it up and then try. Other than that, sound and camera works fine, and it appears that FaceID works. Not my phone, so I can’t test that part without unlocking customer’s phone. No error messages appeared, so Im assuming all is good. With the touch home button on older models, if touch wouldn’t work, you’d receive a message as soon as you booted the phone up. OK.. That’s enough. Just be careful over the next 5 steps..
-
-
-
Desliza con cuidado el borde de tu púa de apertura debajo del cable flexible debajo del micrófono.
-
Gíralo suavemente para separar el micrófono, teniendo cuidado de no forzar o dañar el cable flexible.
-
Si es necesario, usa la punta del spudger para terminar de separar el micrófono de su muesca en el panel frontal. Si el micrófono sigue siendo difícil de separar, aplica más calor.
-
-
-
Trabajando de izquierda a derecha, desliza una púa de apertura debajo del cable flexible y debajo del sensor de proximidad + módulo iluminador de inundación
-
Suavemente mueve y levanta para separar el módulo de la muesca en el panel frontal.
what happens if the metal plate from the sensor separates from the flood illuminator module?
At this point I thought looking at the image that I was lifting the speaker away and tore off the thin cable completely unaware. Please read and view the next two instruction stages before doing this one and then come back and ensure you keep the speaker very close to the screen as you do it.
-
-
-
Usa pinzas para deslizar el reten metalico pequeño, y sacarlo del sensor de luz ambiental.
I tore the ribbon cable that connects to the light sensor, what do I do? will the phone work even if the sensor doesn’t?
I gave up trying to get the clip back on. Appears to function properly without it.
-
-
-
Usa pinzas para mover el sensor de luz ambiental y levántalo de su muesca en la pantalla.
On picture two, the thin transparent thread between the sensor and the display is not the “very thin flex cable” they are talking about but just some glue remains. In my case this thread of glue was sticking onto the sensor in the exact same way which made me suspicious at first.
The top part of the ambient light sensor easily breaks off from the bottom part. In that case do not despair. Pry the stuck part from the old display and transfer it to the new display. Put the assembly back together without glue. It should hold together just fine. Usually the auto brightness feature will still work.
I broke the flex cable from the light sensor that connects to the rest. Anything I can do?
-
-
-
Si has extraído ixitosamente todo el sensor de luz ambiental, como se muestra en la primera foto, continúa con el paso siguiente.
-
Si la tira difusora blanca se desprende y permanece incrustada en la pantalla, como se muestra en la segunda foto, deberá levantarla con cuidado a lo largo del borde superior con una cuchilla delgada o una palanca. Volver a aplicar calor primero puede facilitar un poco esta tarea.
-
-
-
Remueve el altavoz auricular y ensamblaje de sensor frontal.
-
Sensor de proximidad
-
Iluminador infrarrojo
-
El módulo debe colocarse de manera que estos componentes no queden obstruidos por ningún adhesivo.
To replace just the earspeaker, you will have to re-use the the flex assembly which is soldered to the earspeaker…….
the 2 solder connection are hidden under a tiny piece of thin black tape, on the underside of the speaker.
Before attaching the sensor module to your replacement screen, ensure there is nothing blocking the earpiece screen on the new screen part. Mine had a mfg defect or something where there was a black foam like film on the outside of the speaker grill that I couldn’t remove with tape or sticky putty. I had to blow through the back of the grill with a computer duster compressed air can. Otherwise the call volume via the earpiece is extremely low, even when turned to max volume.
Hey there, if I have an iPhone bit damage and I remove the top speaker and sensor and put it on my other iPhone XR. Will it work? It is original iPhone XR and please let me know
The Face ID hardware is paired to the logic board and will not work if you transfer the front sensor assembly. Everything else should work.
super gemacht , danke der olli
The iPhone XR Screen Replacement Kit comes with an adhesive replacement on a blue plastic sheet. I didn’t know what this was and thought it was just protection for the screen during shipping.
Don’t throw it out - At this step 29 remove the old adhesive using this guide -> Reemplazo Adhesivo de Pantalla iPhone
Don’t be dumb like me.
I would definitely add a step at the end –
30) Replace the adhesive seal -> iPhone Display Adhesive Replacement.You need to use an EEPROM programmer. This will read code from the old screen to the new screen (assuming the replacement screen is of decent quality and supports True Tone programming). Check out YouTube and you will find plenty of information on how to do this. It really should be mentioned in screen replacement guides/videos, that if you just replace the screen without this specialist equipment, the True Tone function is not available. This is the same for all iPhones that have True Tone.
Add a comment: remove blue protective covers from back of screen when installing
-
-
-
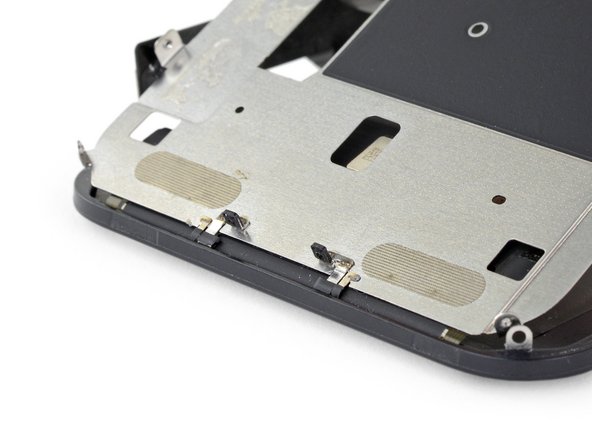
Usa un destornillador Y000 para remover los tornillos de 1.1 mm que sujetan el escudo LCD.
-
Tres tornillos en el lado más cerca de los cables de la pantalla.
-
Dos tornillos más en el lado opuesto.
L’appui sur les vis est réellement important, au risque de foirer celles-ci. N’hésitez donc pas à appuyer, en faisant contre-poids du côté opposé bien évidemment.
This is the bit that was difficult. The tri'point screwdriver y0000 barely fits this tricky size. It could have been the cheap screwdriver that came with the screen replacement kit. Stripped 2 screws, drilled out with an appropriate size drill bit ' frame still intact. I had more success using a size 0.7mm flathead screwdriver.
-
-
-
Aplica un poco de calor de un iOpener (o secador de pelo/pistola de calor) en la parte posterior de la pantalla, para suavizar el adhesivo que fija los cables de la pantalla a la pantalla LCD.
-
-
-
Inserta una púa de apertura entre los cables de pantalla y el escudo LCD.
-
Deslízala hacia el borde inferior de la pantalla para comenzar a separar los cables.
-
Deténte cuando llegues al extremo del primer cable.
-
-
-
Vuelve a insertar tu púa de apertura, esta vez entre dos cables.
-
Desliza la púa al borde inferior de la pantalla para separar los cables.
-
-
-
Despega el cable entero del digitalizador del escudo LCD y apártalo a un lado.
IPhone XS copy phone ka folder
-
-
-
Inserta una púa de apertura debajo del borde superior del escudo LCD y dóblala para separarlo de la pantalla.
-
-
-
Levanta el escudo de LCD en un ángulo mayor, hasta que pueda ver el resto del cable de la pantalla pegado a la parte posterior.
-
Desliza un spudger entre el escudo de LCD y el cable de la pantalla, y sepáralos completamente.
-
-
-
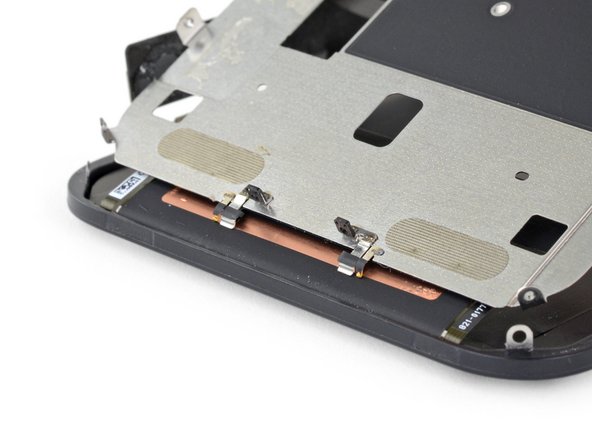
Al levantar la pantalla LCD, observa las puntas metálicas en el borde inferior.
hello whaty if one of the golden contact pins ( i guess it is) to be exact right one has freyed up a bit and looks messy. could it cause harm or it is not very important?
On reassembly leave the adhesive cover on the digitizer cable so that it doesn’t get caught on the LCD shield while working the other cable in place and positioning the shield on the frame. When you are ready to stick the digitizer cable to the shield remove the protective plastic.
-
-
-
Solo quedan el LCD y el digitalizador
-


Para volver a ensamblar tu dispositivo, sigue estos pasos de arriba en orden inverso.
Lleva tus desechos electrónicos a un centro de reciclaje certificado.
¿La reparación no salió según lo planeado? Prueba algunos solución de problemas o busca ayuda en nuestro [enlace|https://www.ifixit.com/Answers/Device/iP...|Foro de respuestas].
Cancelar: No complete esta guía.
88 personas más completaron esta guía.
Un agradecimiento especial a estos traductores:
100%


Estos traductores nos están ayudando a reparar el mundo! ¿Quieres contribuir?
Empezar a traducir ›


15 comentarios
So it’s like the X had a baby with an 8
Hello everyone! Hoping I can get some feedbacks on a problem I’m having. I’m doing a screen replacement on an XR but the bottom half of the screen is unresponsive to touch. The replacement screen is from another XR with original Apple screen. When I put the replacement screen back, it works fine so it can’t be anything that’s damaged on the replacement screen. Also this replacement screen does the same thing to any iphone XR I put in so I know it means there’s no problems with the logic board. The replacement screen only works with its original but not on any other XR.
i have same problem. Need Help
RNS -
Did you find a way Around this ??im experiencing the same thing
What if I just needed to replace the front outer glass only, what steps are needed? Do you have to disassemble the phone?
@emika491 Glass-only repairs are possible for pros, but it’s not a DIY. It takes practice to perfect, and the equipment alone costs about as much as a new phone. I’d stick to replacing the whole display. ;)
Hi
The last 2 cables connected to the LCD digitizer is cut and is there a way to remove then?
Hallo, i have same problem, Can you help me, please?
These instructions are amazing! I followed them and they worked to a T. Every detail was good, the pictures were good. My iPhone XR has a new screen, reused the old LCD metal panel, and put in a new waterproof seal. Thank you for posting this.
Hi,
So I did a screen replacement on an xr and I wanted to activate true tone, but the flex cable broke on the original screen. Now I think if I use the cover board number for activation that could work too., but I noticed that the number printed on the back of the old lcd looks very similar to it, now is that the screens serial and could I use that number too?
Finito senza alcun problema. Il display funziona alla perfezione. Grazie.
There are 3 types of LCD screen manufacturers that Apple use for their mobile devices – Sharp, Toshiba and LG. The Sharp and Toshiba LCD screens are cross-compatible and you can use either of these screens on each handset, however, when you have an iPhone with an LG screen then you would only be able to use an LG screen replacement for these LG coded devices. Again, you might be wondering why. Well, if you fit a Toshiba or Sharp LCD to an iPhone that had an LG screen previously then the chances are you will either have no touch function or intermittent touch issues, so you must identify the screen manufacturer of your iPhone before ordering a premium replacement.
See more at: https://www.iparts-4u.co.uk/blog/how-to-...
@jeffsu With all due respect, responding to someone’s post inquiring different options for repairing their iPhone XR screen with rebuttal about how hard it is and not at least pointing them in the direction of resources should they still want to try is unproductive and seemingly maligned with ifixit’s philosophy regarding user’s retaining the right to fix their own devices, unless I’m misunderstanding something here?
Isn’t it possible to advice of the technical difficulty/ potential issues AND celebrate their desire to take on such a project by equipping them with some info and pointing them in the direction of a great tool kit to get them started , whatever they decide?
Wether it should be left to a Pro or not is ultimately the consumer’s decision and border’s the same rhetoric Apple uses to justify all of its proprietary tech guides and components. And before we refute the premise of what I’m saying with the “liability” argument, remember that this is what disclosures are for.
Happy Fixing!
Thanks for your concern. I’m sorry if my comment came across as flippant or dismissive. By way of background: There are a lot of companies deceiving customers by selling “glass-only” screen repair kits for $10-20 that are in reality a waste of money—the repair requires expensive equipment and a fair bit of practice/skill. Most professional repair shops won’t attempt it, and those that do usually destroy quite a few displays getting the hang of it, even after investing in all the equipment. Few can do it consistently and with good results. Meanwhile, we’ve seen plenty of readers fall for the “glass-only” repair kit scam and then complain after being ripped off because we didn’t warn them away strongly enough. Bottom line, it doesn’t make any sense to attempt this unless you’re planning to make a business out of it. Just bite the bullet and replace the whole display. It’s cheaper, faster, and the only approach with a reasonable chance of success for a DIYer.
One of my gaskets was as shown in your second photo, the other had been worked into the threads (as if smeared) probably from the factory and was completely unusable.
In place of replacements (unsure of where to purchase) I just used a clear silicone caulking on both screws upon reassembly to offer at least some water seal. I wish these gaskets were included with the gasket waterproofing sealant kit!
Erica - Contestar
Is there any place to buy these screw gaskets? I haven’t seen it mentioned anywhere but one of mine was pretty much chewed up. Silicone should work but I’d prefer the oem solution.
Chilinh Nguyen - Contestar
I found a place on Amazon that sells them. It's cheapest to get a full set of screws than to get just these. $5-$6 USD.
J Olin -
Can it be dead?
Lulu navarro - Contestar
If I transfer the data from the old to the new battery with an icopy, don't I get an error message?
David Julian Krause - Contestar
how am i supposed to know if the battery is below 25% if the screen won't turn on?
Beth Jackson - Contestar