Introducción
Esta guía de reparación ha sido elaborada por el personal de iFixit y no ha sido avalada por Google. Más información sobre nuestras guías de reparación aquí.
Utiliza esta guía para extraer o sustituir la pantalla de tu Google Pixel 5a.
Por tu seguridad, descarga la batería por debajo del 25% antes de desmontar el teléfono. Esto reduce el riesgo de incendio si la batería se daña accidentalmente durante la reparación. Si tu batería está hinchada, toma las precauciones adecuadas
Qué necesitas
-
-
Fíjate en las dos costuras del borde del teléfono:
-
Costura de la pantalla: Esta costura separa la pantalla del resto del teléfono. No hagas palanca en esta costura.
-
Costura del bisel: Aquí es donde el bisel de plástico diseñado para proteger la pantalla se une al marco. Se mantiene en su lugar por medio de clips de plástico. Aquí es donde debes hacer palanca.
-
-
-
Aplique un iOpener calentado en el borde derecho de la pantalla durante un minuto para ablandar el adhesivo
-
-
-
Coloque la chupa de succión lo mas cerca al borde derecho de la pantalla.
-
Levante la chupa de succión con una fuerza moderada hasta que se note la apertura entre el bisel y marco.
-
-
-
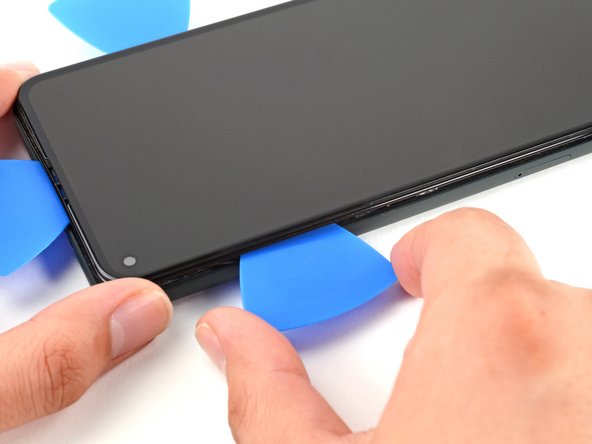
Inserte las cuñas cerca a esos puntos del bisel mas o menos a 4-5 cm de la parte baja del teléfono .
-
-
-
-
Use las pinzas para quitar el protector del conector de la pantalla.
-
-
-
Use la punta de plástico para levantar el cable de la pantalla y desconectarlo.
-
-
-
Quita la pantalla del teléfono.
-
Si reemplazaste la pantalla, revisa el orificio de la cámara frontal de la pantalla y retira los revestimientos protectores que la cubren.
-
Si estás usando un adhesivo personalizado, sigue esta guía para aplicar correctamente el nuevo adhesivo de la pantalla.
-
Si estás usando cinta Tesa para reunir la pantalla, sigue esta guía.
-
Durante el proceso de instalación, la pantalla debe hacer un proceso de calibración. No toque la pantalla durante este proceso pues puede resultar en una mala calibración de la parte táctil.
-


Para volver a montar el dispositivo, siga estas instrucciones en orden inverso.
Lleva tus residuos electrónicos a un centro de reciclaje certificado.
¿La reparación no ha ido según lo previsto? Intenta con algunas soluciones de problemas básicos, o pide ayuda a nuestra comunidad de respuestasGoogle Pixel 5a.
Compara tu nueva pieza de repuesto con la pieza original: es posible que tengas que transferir los componentes restantes o retirar las partes adhesivas de la nueva pieza antes de instalarla.
Cancelar: No complete esta guía.
76 personas más completaron esta guía.
Un agradecimiento especial a estos traductores:
100%


Estos traductores nos están ayudando a reparar el mundo! ¿Quieres contribuir?
Empezar a traducir ›

40 comentarios
Thank you, this was useful for removing the screen from my device without damaging it further! With the invisible fasteners, a guide like this is invaluable for knowing where the latches are and how to get to them.
As a guide for replacing a screen, there are a few other things worth mentioning:
• Is it necessary to remove the old gasket ("adhesive film")?
• How do you apply the new display adhesive, the one that comes on a blue card? Do you need to do that before re-attaching the new screen cable? Why are there cut-outs in the blue card that mostly match the positions of contacts on my device, but not entirely? Do I remove it before closing the device?
• In addition to a couple pieces of tape, the replacement screen also comes with a small piece of film protecting the camera area. Do pull it out by the small red tab before re-assembly.
• Any other tips for reattaching that press-fit board-to-board connector? Should I really expect it to click into place? It took me many tries to get that aligned and secured!
1. Depends on what you mean by "Necessary," but it is recommended
2. In Step 15, there is a guide linked for custom-cut adhesive; follow that one.
Yes, before you reconnect cable.
I don't know what the cutouts are for, but you will remove the blue card anyway after applying the adhesive to the frame. The important part to line up is the adhesive to the frame; the blue card doesn't matter beyond that.
And yes, you will remove it before closing the device.
3. Didn't see that. I hope my device's camera works. I'll check that now.
4. Reconnecting this was the most tedious part for me. I used the gold colored corners on the board to line up the connector(you can see these in the picture for step 15. Also, I used my finger and not the spudger for pressing down when reattaching (and I don't have small hands); this helps you feel the slight click when it's in place.
Also, you can use the suction cup as a sort of kickstand so you have enough ribbon cable to work with (because there's not a lot of it.)
Lol No -
Literally went step by step by this guide and repaired my own Google pixel 5A phone. If you purchase the entire repair kit for the Google Pixel 5A you have essential every tool you'll need. I will recommend ordering screens for this phone here from this website.
Good guide but agree with keturn that it would be great to have more tips and reminders for replacing the screen.
I mostly figured it out, heres how I did it:
- I removed the old adhesive, and tried to scrape and clear it all.
- next I attached the new adhesive before connecting the screen cable since I figured it would be hard when its attached. I did try to make sure to press all along the adhesive with tweezers to set it. I left the next set of backing on to minimize the time the adhesive is exposed (avoid dust or me touching it)
- then I attached the connector. This was a little difficult, but also not very experienced with this.
- then I removed the adhesive backing and closed it up right after. I used rubber bands (3 across and 1 down the middle) to clamp the screen and put some books on it as much as I could over the next day.