Esta traducción podría no reflejar los cambios más recientes añadidos a la guía de referencia. Ayúdanos a actualizar la traducción o revisa la guía original.
Introducción
Usa esta guía para retirar y sustituir de forma segura una batería gastada o muerta en un Steam Deck LCD.
Para tu seguridad, enciende tu Steam Deck y deja que la batería se descargue por completo antes de iniciar este procedimiento. Una batería de iones de litio cargada puede ser muy peligrosa si se pincha accidentalmente. Si se calienta una batería cargada, existe el riesgo de incendio. Si tu batería parece hinchada o inflamada, toma precauciones adicionales.
Nota: La batería está fuertemente adherida a la Cubierta de Vapor, lo que requiere repetidos ciclos de calentamiento y palanca. El calor producido por un iOpener puede no ser suficiente para aflojar el adhesivo, por lo que se recomienda una pistola de calor (o, alternativamente, un secador de pelo) para este procedimiento.
Recuerda: sigue los procedimientos generales de seguridad sobredescarga electrostática (ESD) mientras reparas tu dispositivo.
No reutilices la batería después de haberla quitado, ya que hacerlo es un peligro potencial para la seguridad. Reemplázala con una batería nueva.
Nota: Valve comenzó a enviar Steam Deck LCDs con diseños internos renovados a principios de 2023. Tu Steam Deck puede tener un aspecto diferente al que se muestra en las fotos, pero el procedimiento es muy similar. Consulta Remove the back cover para comprobar qué versión tienes. Un Steam Deck original tendrá un escudo metálico en la placa base y un ventilador con lados cuadrados, como seen here. Una Steam Deck renovada tendrá una placa base negra y un ventilador con lados curvos, como seen here. Encuentra guías de Steam Deck OLED aquí.
Qué necesitas
Resumen del Video
-
-
Usa un destornillador Phillips para quitar los ocho tornillos que sujetan la tapa trasera:
-
Cuatro tornillos de 9,5 mm
-
Cuatro tornillos de 5,8 mm
-
-
-
Inserta una púa de apertura en el espacio delgado entre la tapa trasera y la carcasa delantera, a lo largo del borde de una de las empuñaduras.
-
Haz palanca en la tapa trasera para liberarla de los clips de bloqueo.
-
-
-
Sujeta la tapa trasera por la abertura que acaba de crear y tire de ella hacia arriba y hacia afuera del dispositivo para soltar los bordes largos.
-
Retira la tapa trasera.
-
-
-
Utiliza unas pinzas para retirar el trozo de cinta adhesiva que cubre el tornillo oculto del escudo de la placa.
Use some heat here from a hairdryer to make this part easier.
If you screw up here you can replace the little aluminium square with some aluminium tape from Amazon. No less than 50 microns thick, slightly thicker is fine. and the square is 13mm both ways.
Thanks for that Matt, i destroyed the original tape and i had no solution since i read your comment.
You should not. This is EM shielding to protect your processor and ram from radio waves in the air
I found out my 3 Weeks new Steam Deck is a old Version... gg. Valve...
wenn ich aluminium foile benutze, womit soll ich sie dann verkleben?
If we have the new version with the black shield, how do we access the SSD?
I need this part, does anyone know where to get it?
-
-
-
Usa el destornillador Phillips para retirar los tres tornillos que sujetan el escudo de la placa.
-
Un tornillo de 3.4 mm
-
Dos tornillos de 3.7 mm
The procedure ended here for me, used an ifixit PH 00 bit on the screw behind the aluminium tape, bit wouldnt bite too great, one wrong twist and the screw was stripped. Not sure who or what initially screwed in that particular screw as the rest of the screws on the shield were fine, but boy is it in there tight. So now i have a stripped screw and a botched ssd replacement, don't think valve will let me RMA for this, but i'll give it a try and update accordingly.
Any updates? Did they let you RMA?
I found one screw to be ridiculously tight too, managed to undo it without stripping thanks to reading your comment beforehand and going extra careful. Not going to lie, it was a tense moment :D
Andy HL -
I think the tendency is to go too small on the screwdriver bits because you're working on small electronics.
I used the PH1 bit on the screw under the foil and the PH0 bit for the two remaining screws without any problems.
What does this shield actually do? Some kind of magnetic protection?
if I had to replace the key (R2) and that's it, can I directly remove it or do I have to act here on the motherboard too?
have you gotten an answer yet? trying to change mines as well but dont wanna do too much to the deck
briaNN -
button Not key, i’m sorry
FYI there is a little pin on the cover that slots into the board. It is located near the top screw. I needed that to be inserted for the cover to go back down properly.
For anyone who may have stripped a 3.7mm screw, Steam Support states it's M1.6 diameter with a 0.35 thread pitch and a 3mm length. Hopefully that'll help anyone trying to locate a replacement screw. Hoping iFixIt can make an internal screws kit as they're kinda hard to find the right one online.
Did valve change the shield recently as my new 64gb deck has a black shield with no hidden screw.
Yes there's a new hardware revision out there that some people are getting. Consider stopping at this point and putting your deck back together if you have one of these new hardware revisions (the fan is quite different as well to the pictures) until iFixit has an updated repair guide.
There are only 2 screws now, but be careful taking the shield off, because there are still thermal pads under it sticking it to a heat pipe.
I need this piece, can someone help me where can I find it please?
-
-
-
Retira el escudo de la placa.
During reassembly, ensure that the fan cable lays on the side of the board shield and isn't pinched underneath.
Are you saying that the fan cable should be positioned above the board shield instead of being pressed down by it? Just like the image shows, where it 'lays on the side of the board shield'?
Necesito esta pieza la mía no la traía se ve que se la quitaro
-
-
-
-
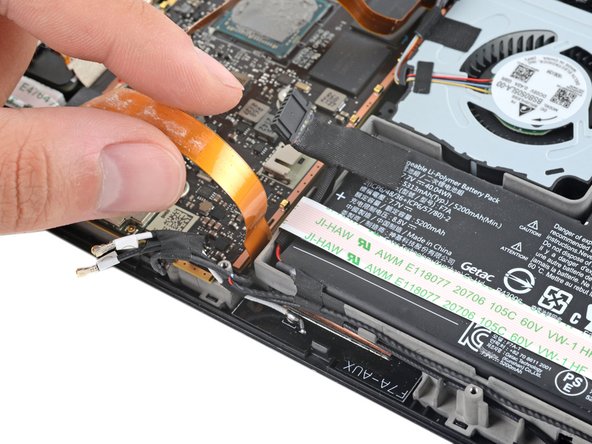
Agarra el cable de la batería por su lengüeta y tira de él directamente hacia fuera de la placa madre para desconectarlo.
After fully reassembling my device I found that my battery was not showing any stats anymore. I couldn't start the device without being plugged in, however if I restarted it would stay on even if my power cable was detached. Battery showed 0%. It turns out I had not fully reinserted the battery cable at this stage during reassembly. MAKE SURE YOU PUSH IT ALL THE WAY BACK IN!
Awesome thanks for this tip!
It is helpful to lift up gently with a the tapered end of a spudger underneath the tucked-in portion of the battery cable, creating a bit of flex in the cable before pulling on the pull tab. I found that without doing so, the fabric pull-tab simply tore off of the cable under light-to-moderate force (the fabric itself ripped cleanly across, like a paper towel). Careful, gentle pressure with a spudger can be used to remove the plug by prying gently on the rear ridge of the plastic plug (not the wire!) if this happens.
This is exactly what happened to me. Maybe it was a pull tab previously, mine was a ribbon cable that tore - captured the image here: https://www.ianwootten.co.uk/2022/11/22/...
This was the best approach (and I feel safest for the wiring) for me. Mostly push pressure on the plastic ridge with some minor pull tension on the fabric.
Victor -
I found it less scary and easier to remove the battery connection by using a fingernail on the ridge and pushing it off the connector. I felt like pulling on the battery cable was too harsh.
Yeah, pulling cables like these is usually ill advice. They might be fine if it's a new device, but for old devices that have been sitting there for years, there's a good chance the connector has grown brittle and the cable might just come off separately (something I learnt the hard way).
skzm -
I second this approach. For me, the cable felt way to flimsy and the connector wouldn't budge even under moderate force. Except I used the flat end of a spudger to "scrape" it out.
Misza -
Upon plugging the battery back in, I found it easy to use two spudgers- one on each side- to pull/push the connector back into it's port. Be careful to not put any pressure on the battery wires themselves.
When reconnecting the battery cable, you'll know when it's inserted and power is restored, because the white LED will illuminate at the top of the Deck near the power button. You should be able to see it while you're reconnecting the battery cable
This is only true if you haven't put the deck into battery storage mode as directed.
Why not just let the battery discharge completely and then not have to disconnect it?
Completely discharging a battery reduces its lifespan. It's completely unnecessary.
Because no lipo battery is ever completely discharged -- you would not be able to recharge it if it was. There will always be enough power left in it to cause damage if shorted even if it isn't charged enough to power up the device it's connected to.
I would personally not recommend pulling the tab. It doesn’t apply force at the correct angle. You should revise these instructions to advise using a combination of pulling on the tab, and careful pressure on the connector towards the right of the mainboard to carefully work it out.
Using the pull tab alone could cause problems if not done extremely carefully.
This part was wayyyyy easier than I anticipated and I worried for nothing because I used the ifixit spudger to push it out a bit and then I literally used my finger nail and was able to slide it right off. Dont be afraid, its not that difficult and its not that delicate to break if you do it patiently
I inserted the cable very firmly with a spunger, being careful not to press down too hard on the cables, and even tried redoing it, but I don't see any LED illumination. I am now unable to boot the deck into the boot manager. Any additional tips?
What is the risk of not unplugging the battery? Just curious!
Once I was changing termal paste on my Windows based expensive tablet PC... And I was so scared to disconnect any cables (there was many of them), so I did it all with battery connected (I didn't even knew where is battery cable). When I tried to put board shield back... it didn't go right into needed place... and short circuit some small component. It flashed. That was the end of my repair. Dudies from repair service later told me that multiple components fried including CPU, so repairing is too hard. That's what can happen if you don't disconnect battery.
To pull the battery out I used my spunger, but the batter had actually not space to be pulled out completely. I needed to lift the cable up with the spunger to get the cable fully out. When plugging it in again I had to press the battery down kinda hard so it would fit again. This was really scary and I recommand using two spunger as someone said above.
Does it have to be a clean fingernail?
-
-
-
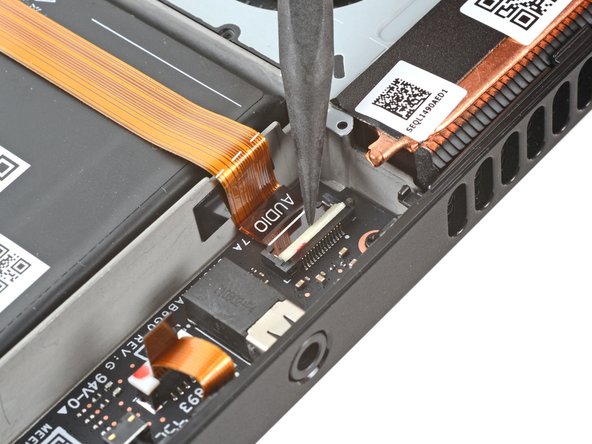
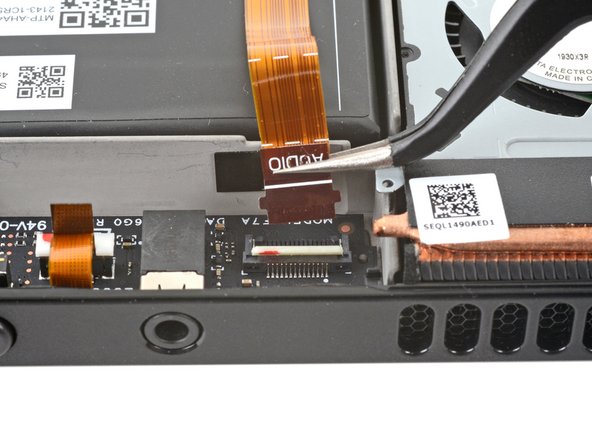
Utiliza el extremo puntiagudo de un spudger para levantar la pequeña solapa de cierre del conector ZIF del cable de audio.
-
-
-
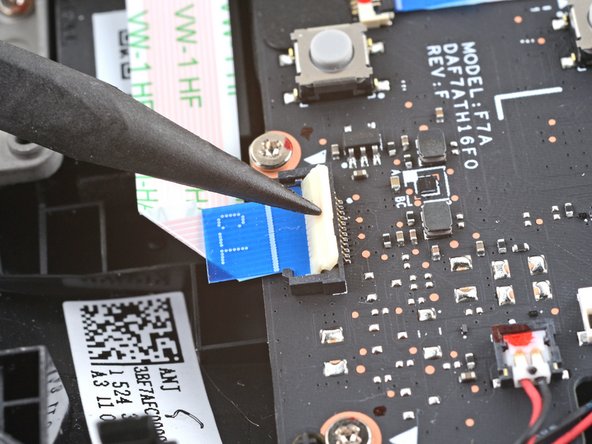
Utiliza el extremo puntiagudo de un spudger para levantar la pequeña solapa de cierre del conector ZIF del cable de la botonera.
-
Usa un par de pinzas para deslizar el cable fuera de su conector.
-
-
-
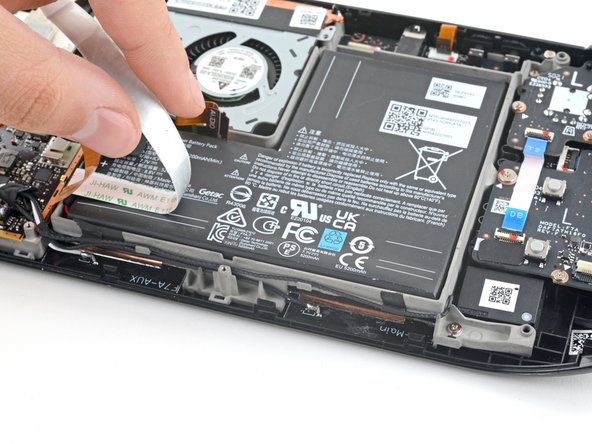
Retira con cuidado el cable de la placa de botón de la batería.
-
-
-
Utiliza unas tijeras para cortar una tarjeta de plástico por la mitad, a lo largo.
-
Redondea las esquinas afiladas, ya que podrían raspar o perforar la batería.
-
-
-
No reutilices la batería después de haberla quitado, ya que hacerlo es un peligro potencial para la seguridad. Reemplázala con una batería nueva.
-
Usa una pistola de calor para calentar el adhesivo debajo de la batería durante 1-2 minutos.
-
Aunque el alcohol isopropílico de alta concentración (>90%) puede ser un método eficaz para aflojar este adhesivo, existe un alto riesgo de que el exceso se derrame sobre o dentro de la pantalla u otros componentes a través de los recortes de la bandeja de la batería.
-
-
-
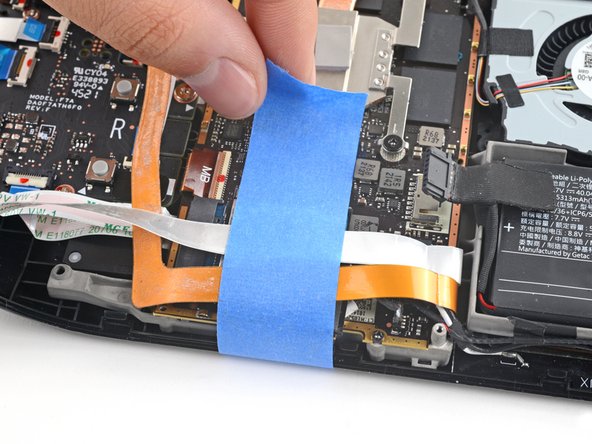
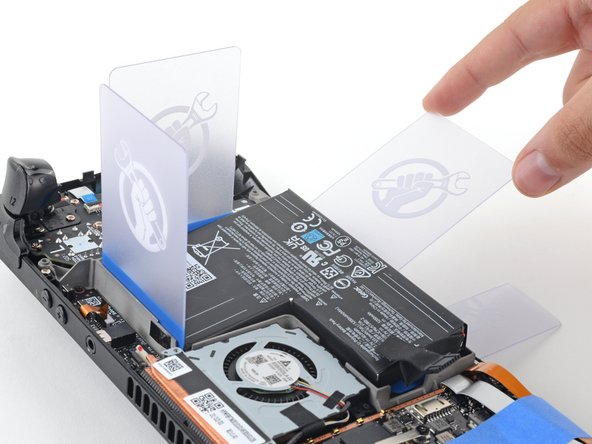
Inserta una tarjeta de plástico sin cortar entre el borde superior de la batería y el marco.
-
Inserta una segunda tarjeta de plástico entre el borde derecho de la batería y el marco.
-
-
-
Introduce una de las tarjetas de plástico cortadas bajo la batería, cerca de su borde inferior derecho.
-
Empuja la tarjeta para cortar el adhesivo de la batería, moviéndola de lado a lado mientras avanzas.
-
-
-
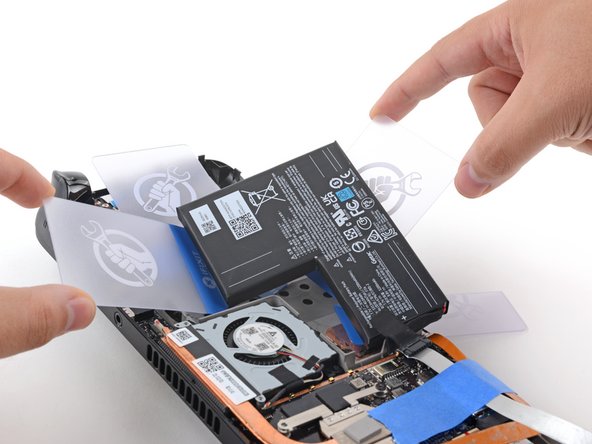
Inserta una tarjeta de plástico a lo largo del borde inferior de la batería para hacer palanca y separar la batería del marco.
-
Levanta la batería hacia arriba, alejándola del Steam Deck para separarla completamente de todo el adhesivo.
-
Si tienes problemas, repite el proceso de calentar y hacer palanca alrededor de todos los bordes hasta que la batería se afloje.
-
-
-
Retira la batería
-
Humedece un paño sin pelusas con un poco de alcohol isopropílico (>90%) y utilízalo para eliminar cualquier resto de adhesivo del compartimento de la batería. No utilices demasiado, evita que gotee a través de los recortes del marco.
-
Despega y desecha un lado de los revestimientos protectores de los nuevos adhesivos y aplíquelos a la nueva batería, utilizando tu antigua batería como referencia para saber dónde deben adherirse.
-
Pela y desecha el lado restante de los revestimientos adhesivos. Coloca la batería en su lugar y presiónala firmemente.
-


Para volver a montar el dispositivo, sigue estas instrucciones en orden inverso.
Lleva tus residuos electrónicos a un centro de reciclaje certificado.
¿La reparación no ha ido como estaba previsto? Intenta con algunas soluciones básica de problemas, o pide ayuda a nuestra Comunidad de respuestas de Steam Deck.
Cancelar: No complete esta guía.
26 personas más completaron esta guía.
Un agradecimiento especial a estos traductores:
96%


Estos traductores nos están ayudando a reparar el mundo! ¿Quieres contribuir?
Empezar a traducir ›


10 comentarios
Is it safe to apply small amounts of >90% isopropyl alcohol under the battery to loosen the adhesive bond? Or would that drip into the screen or other components and potentially cause damage?
Your mileage may vary. Isopropyl alcohol may be an effective method to loosen the adhesive, but you run the risk of excess leaking onto or into the display or other components, due to the cutouts on the battery tray. Your second sentence is spot-on, hence the recommendation to carefully use heat instead.
Why couldn’t they of used pull tabs for the adhesive so this process would not be so difficult and tedious. It would also be less risk of over heating the battery/steam deck or puncturing the battery. This is really the only design choice I can criticize of the steam deck. Pull tabs would of made this a repair the average person could achieve.
I feel like patience is everything in this scenario I mean. Just take your time and relax & it will all be ok ! When dealing with particular situations like this just take you're time simple as that I promise. Especially, since Ifixit.com has some of the best guides EVER!!
It seems crazy to me that they made this process so difficult, surely battery is one of (if not THE) most common things that you'll need to eventually replace? I suppose they must have been limited by what they could achieve?
Having just done a Battery Replacement on the Steam Deck the amount of adhesive is a bit high the use of Pull Tabs would have been wonderful. Thanks iFixit and Valve for making the process easier.
I have a question if battery health is a 22%. Will a new battery fix it or is there something wrong with the board.
Most probably battery replacement will fix it. Especially if you really see short battery time and you could observe that it shrink after heavy using of Steam Deck.
However, it's possible that it's some false error, so if battery works fine for you, I wouldn't bother. Also, if battery health dropped quickly, it might indicate overheating
Why they made this so difficult? We are in 2023, this device uses a very small battery in my opinion, it should be more or lesse the double of current size, and it's very difficult to replace it.
10/10 not too bad a job at all.
For me I found the original adhesive was to the left and right of the gaps you jam the cards in, so going in diagonally was the way to do it easily.
Only used a heat gun for 2 minutes and was eventually successful with gentle prying.
Everything was as expected.
Directions that come with the new battery direct to charge to 100% and leave on charge for 2h, then fully discharge until off, finally charge once more to 100%.
If your Steam Deck won't charge or turn on, you might need to disconnect your battery and then plug it back in.
I thought my battery had gone completely dead but when I plugged the battery back in, the Steam Deck would then accept a charge.
My Deck wouldn't accept at charge or respond at all prior to disconnecting the battery.
Make sure to try this trick before completely removing your battery.
Thanks iFixit for making these guides.
Duane Degn - Contestar