Introducción
Usa esta guía para quitar y reemplazar la pantalla de tu Huawei P10 Lite.
Para proteger tus ojos de los fragmentos de vidrio y obtener un mejor agarre para abrir el teléfono, es posible que debas colocar un poco de cinta en la pantalla.
Cuando vuelvas a montarlo, aplica nuevos adhesivos donde sea necesario.
Qué necesitas
-
-
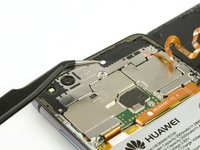
Introduce la punta de una púa de apertura entre la tapa trasera y el marco medio y deslízala alrededor del teléfono para cortar el adhesivo.
-
Usar un mango de succión para levantar la carcasa trasera podría ayudarte a generar un poco de espacio donde insertar la púa de apertura.
-
-
Herramienta utilizada en este paso:Tweezers$4.99
-
Usa un par de pinzas para remover el sticker.
-
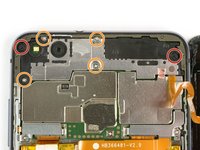
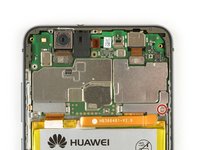
Remueve los dos tornillos Phillips #00
-
Remueve los cuatro tornillos Phillips de 2.5 mm.
Schritt 3 und 4 kann man sich komplett sparen. Wozu auch. Kann gleich mit Schritt 5 weitergemacht werden, zuvor einfach das Flachbandkabel vom Fingerabdrucksensor an der Rückabdeckung abklemmen und fertig.
Translate what Bobby mcgee said:
Step 3 and 4 can be completely ignored. What for? You can continue with step 5, just disconnect the ribbon cable from the fingerprint sensor on the back cover and you're done.
However, the reason step 3 and 4 should not be skipped is Step 6 — Use an iOpener to loosen the adhesive beneath the battery. I.e., the adhesive cannot be easily removed without heat, however, that heat might damage the electric chips. Thus they’d better be removed first.
-
-
-
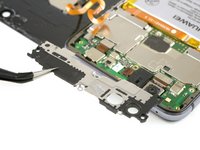
Usa una pinza para remover el escudo de la placa madre.
-
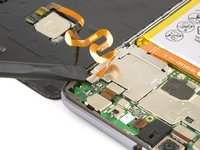
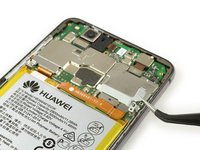
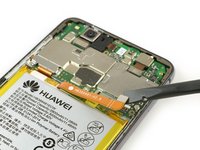
Usa un extremo plano de un spudger para desconectar el cable flexible de sensor de huella digital.
Welchen Klebstoff soll man verwenden?
Hallo Josef,
sollte bei deinem Ersatzteil kein Klebstoff oder Klebeband dabei gewesen sein, kannst du dünne Streifen Doppelseitiges Klebeband verwenden. Es gibt für das Huawei P10 Lite auch schon zugeschnittene Klebestreifen zu erwerben, hierbei gilt aber je nach Händler Rezessionen zu lesen, ob die Klebestreifen auch wirklich halten.
Hi darren,
pre-cut adhesive would be the best solution if you can source it. Otherwise a two-sided adhesive tape or carefully used E6000 adhesive glue will be your friend. -
-
-
-
Remueve el tornillo Phillips #00 .
-
Remueve la placa del conector de la batería.
-
Usa un extremo plano de un spudger para desconectar el cable flexible de batería.
-
-
-
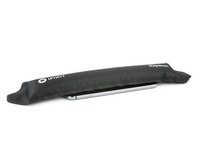
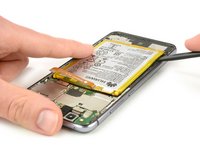
Usa un iOpener para ablandar el adhesivo debajo de la batería.
-
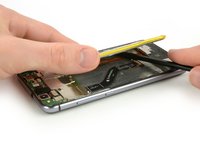
Inserta un spudger entre la batería y el marco medio para crear un espacio libre.
-
Introduce una púa de apertura o usa un spudger en el espacio para cortar el adhesivo por debajo de la batería.
Ohne eine Erwärmung des Klebers ist die Entfernung des Akkus wirklich sehr hakelig und zeitintensiv!
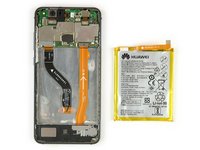
You must heat the battery two or more times with the iOpener in order to remove it because if you don’t (and even if you do) the battery will certainly bend. So the battery removal has to be done delicately. Lift each corner a very tad bit and the sides to finally lift out as shown.
Is it possible to soften the adhesive using isopropyl alcohol?
Hi Michele,
yes, the use of isopropyl alcohol is a common technique when removing a battery in a smartphone. Especially when the adhesive is very strong. Try to apply the alcohol to every corner of the battery and let it penetrate the adhesive for several minutes. Start the prying procedure with the spudger afterwards. In case the adhesive isn’t loose enough you can reapply isopropyl alcohol any time during the removal. Keep in mind, that there’s a gap in the midframe for the display flex cable. It can happen that the isopropyl alcohol runs trough that gap and loosens the adhesive of the display as well. When the display adhesive gets loose you’ll need replacement adhesive for the display. To avoid that, apply as less alcohol as possible at a time and take especially care during prying to avoid damage to the flex cables underneath the battery. The adhesive of the cables will get loose as well.
The battery was very hard to remove. Please note: it is glued everywhere around the ribbon cables at the bottom. The battery is not glued with little strips like the back cover. The spudger and the blue cutting triangles were not very strong and the plastic tip bent upon removal of the battery. I eventually got the battery out with a metallic spatula. Be careful not to rip the shining lining of the battery while cutting the adhesive. I don’t know how people get the battery out without bending it, also every YT video I watched had - slightly - bent batteries. The glue is so strong snd sticky I did not need to apply new adhesive strips.
If you are operating on aged ones:
The Old double sided tape doesn’t really much care about the heat from the iOpener.
Use a metal spudger (round edges) instead but use it with care. Slowly and evenly lift the battery and go around it in a circle. Stay close to the edges to not damage cables under the battery (seen in step 7). Start pushing closer towards the middle only when you can see the cables yet and are sure not to damage them.
If this still doesn’t bring you closer to lifting the battery safely:
Two Options:
1. Try to use some small drops of adhesive remover . Best to use not to much is use Q-Tips or Cotton Swabs to evenly apply the remover through a little crack under the battery.
2. Use unwaxed dental floss push it under the battery. Then gently move it upwards with a pulling-side-to-side motion. To accelerate the process you can also use ***adhesive remover***. The dental floss will soak it up (only works with unwaxed dental floss) and assure that it will only be where it’s needed.
-
-
-
Remueve el tornillo Phillips que sujeta el soporte de conexión de la pantalla en su lugar.
-
Remueve el soporte de conexión de la pantalla.
-
Usa el extremo plano de un spudger para desconectar el cable flexible de la pantalla.
-
-
-
Usa un iOpener para ablandar el adhesivo debajo de la pantalla.
-
Inserta la punta de una púa de apertrua entre la pantalla y el marco medio.
-
Inserta una segunda púa de apertura al lado de la otra púa.
-
-
-
Luego de deslizar la púa de apertura completamente alrededor del teléfono, tuércela en la parte superior del teléfono para separar la pantalla del marco medio.
-
Sujeta el teléfono en la parte superior y separa la pantalla del marco mientras manipulas el cable flexible a través de la grieta.
-


Para volver a ensamblar tu dispositivo, sigue los pasos mencionados arriba en orden inverso.
Para volver a ensamblar tu dispositivo, sigue los pasos mencionados arriba en orden inverso.
Cancelar: No complete esta guía.
39 personas más completaron esta guía.
Un agradecimiento especial a estos traductores:
100%

Estos traductores nos están ayudando a reparar el mundo! ¿Quieres contribuir?
Empezar a traducir ›


2Guía Comentarios
hey bam ich habe ein glück wegend euch ifixit danke dafür die anleitung hat mich zu glück gebracht dank ifixit ist mein
huawei p10 lite heile danke für alles lg der besitzer des huawei p10 lite
Hallo,
soweit ich sehe, ist die Klebefolie nicht im Ersatzteil enthalten, und die vorgestanzte Klebefolie ist nicht (mehr) erhältlich. Statt dessen verweist ihr auf das doppelseitige Klebeband von tesa, das als Rolle erhältlich ist - aber in verschiedenen Breiten.
Welche Breite ist für diese Reparatur hier denn die passendste?
Und wird das phone damit wieder genauso staubdicht wie zuvor (man wird ja puzzlen müssen, und an den Übergangsstellen hat man Stöße statt durchgehende Verklebung…)?
Mit dem Saugnapf die Rückseite anheben hilft ungemein…
Matthias Eberle - Contestar
Had to use blue wedge tool to wedge open bottom plate from the rim part in order to then use the tip of the blue opening pick under the back plate to then cut the glue. It’s like placing a pie server or knife under the plate once there’s a gap between the rim and the back plate.
Jane - Contestar
Be careful, there’s a cable to fingerprint sensor, very close to the edge (see pictures below)… It’s very easy to cut it through with the pick, as I just learned :)
dambig - Contestar