Introducción
This repair guide was authored by the iFixit staff and hasn’t been endorsed by Google. Learn more about our repair guides here.
Use this guide to replace the fingerprint reader in your Google Pixel 6 Pro.
If you replace the fingerprint reader in the Pixel 6 Pro or switch it between two different displays, you need to recalibrate it to maintain its functionality.
Warning: The replacement of the fingerprint reader in the Google Pixel 6 Pro is not super complicated however, the screen gets damaged very easily during the removal procedure.
Caution: The Pixel 6 Pro contains class 1 lasers. Disassembly could result in exposure to invisible infrared laser emissions.
Retaining water resistance after the repair will depend on how well you reapply the adhesive, but your device will lose its IP (Ingress Protection) rating.
You’ll need replacement adhesive to reattach components when reassembling the device.
Note: Replacement fingerprint sensors are not available for sale on iFixit or from Google.
Qué necesitas
-
-
Pull the blue handle backwards to unlock the Anti-Clamp's arms.
-
Slide the arms over either the left or right edge of your phone.
-
Position the suction cups near the bottom edge of the phone—one on the front, and one on the back.
-
Squeeze the cups together to apply suction.
-
-
-
Heat an iOpener and thread it through the arms of the Anti-Clamp.
-
Fold the iOpener so it lays on the bottom edge of the phone.
-
Wait one minute to give the adhesive a chance to release and present an opening gap.
-
Insert an opening pick under the screen frame when the Anti-Clamp creates a large enough gap.
-
Skip the next two steps.
-
-
-
Apply a heated iOpener to the screen to loosen the adhesive underneath. Apply the iOpener for at least 3 minutes.
Do you think that removing the SIM card, also will be a wise step? I'm pretty sure that heating the SIM card is not a good idea.
The SIM is probably no more sensitive than the rest of the phone.
What does "be sure to have replacement adhesives for both the rear glass and the screen." I only had one it didn't mention another one?
I didn't have the replacement adhesive for rear glass nor the 2 sided tape they talk about when putting it back together. It's Sunday, so I don't expect an answer. I decided to go ahead and work up until that point
StlrFan -
-
-
-
Once the screen is warm to the touch, apply a suction handle to the bottom edge of the screen.
-
Lift the screen including its safety frame with the suction handle to create a small gap between the screen and the phone assembly.
-
Insert an opening pick into the gap between the screen frame and the phone assembly.
-
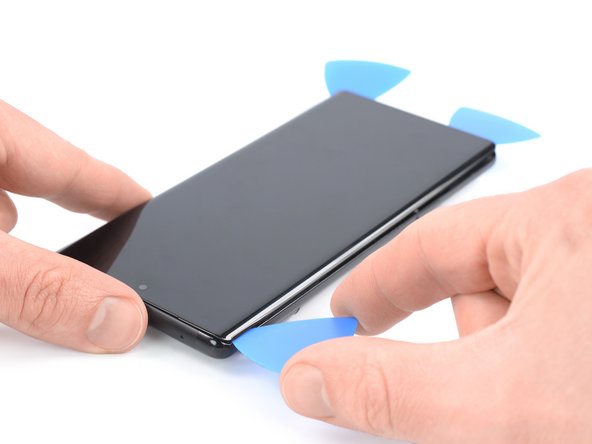
Slide the opening pick to the bottom left corner of the screen to slice its adhesive.
-
Leave the opening pick in place to prevent the adhesive from resealing.
-
-
-
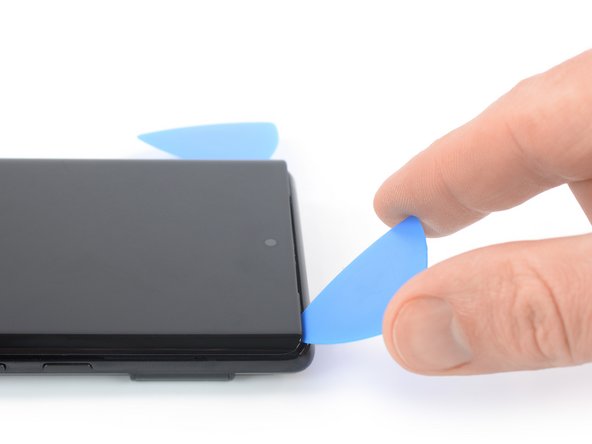
Insert a second opening pick at the bottom edge and slide it to the bottom right corner of the screen to slice the adhesive.
-
Leave the opening pick in place to prevent the adhesive from resealing.
-
-
-
-
Carefully fold the screen to the left side of the phone assembly like you would open the front cover of a book.
I don't know if it's an earlier or later design, but I am combining 2 phones (1 crushed glass but operational into the casing of one that quit functioning but has good glass) and on both, the ribbon cable for the LCD is a tiny bit too short to fold out flat like this. If you are working on one like mine, extreme care must be taken while holding the LCD up while simultaneously trying to plug the cable back into that very small recessed socket. Almost like you need 3 hands or robot fingers...
I also felt that the cable was too short to fully open like a book, however it is possible that the hinge side of my screen was still pressed in to the adhesive and I did not properly open the screen or I was being overly cautious. Be careful on first approach either way.
-
-
-
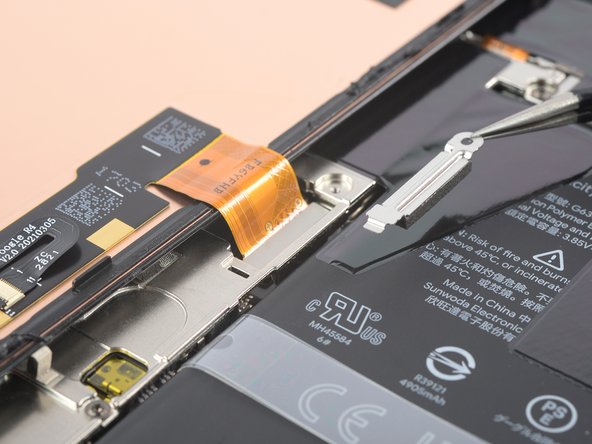
Use a Torx T3 screwdriver to remove the 2.0 mm-long 3IP Torx Plus screw securing the display cable metal bracket.
I don't know if it's an earlier or later design, but I am combining 2 phones (1 crushed glass but operational into the casing of one that quit functioning but has good glass), and on both, the metal holder plate shown here is simply spring connected and that 2mm screw is instead slightly off to the side as part of the aluminum bracket's screws.
-
-
-
Use a pair of tweezers to remove the metal bracket sitting on top of the display cable connector.
-
-
-
Use a spudger to disconnect the display flex cable by prying the connector straight up from its socket.
Reconnecting the display port cable was the longest part of my first repair. It helped when I carefully folded the ribbon connector at each end to get the most length out of it and bent it into the proper shape to hover just right over the small port. I lightly bent the cable back at the base and at the connector end.
This connector feels delicate, so it definitely made me take my time and be cautious. The snap is unmistakable, but be careful afterward as you're on a short leash again. I folded the new screen closed like a book and snapped it into place easily.
-
-
-
Remove the screen.
-
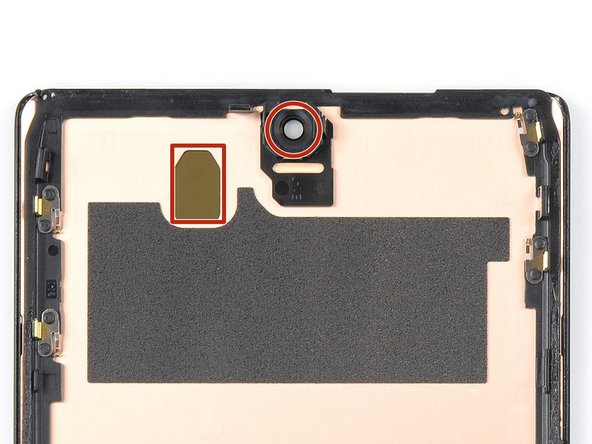
If you replaced the screen, check the screen's front-facing camera hole and sensor cutout for any protective liners. Remove these liners before you close the phone up.
-
This is a good point to test your phone before sealing it up. Temporarily connect your screen, power on your phone, and make sure it works as expected. Before continuing with reassembly, power off your phone and disconnect the screen.
-
Follow this guide if you're using custom-cut adhesives for your device.
-
Follow this guide in case you're using a pre-cut adhesive card.
-
If you're installing a new screen, follow this guide to calibrate the fingerprint sensor.
Before reassembly, clean around the edge of where the screen was, to remove any debris that may have been captured.
After reassembly, the fingerprint sensor appears to be a common issue with new screens:
* Go to https://pixelrepair.withgoogle.com/udfps on a computer.
* If using Windows, click the help link to install the USB software. After installing, restart the computer and return to https://pixelrepair.withgoogle.com/udfps.
* Follow the steps given to install the fingerprint calibration software.
* Restart the phone.
"Be sure to remove all adhesive liners from your replacement screen. Check the selfie camera recess and make sure you've removed the liner there."
A photo with blue highlight square would've been helpful here...also it's very easy to miss this instruction as you'd be on the adhesive page...
I did take the selfie camera liner this is a bad problem
This is very true. I only realized after turning on my phone the next day that the film blocking the front camera is still there. I had to re-open the screen to remove that black film, which was not obvious at all. I only opened the upper half to remove the film, hopefully the adhesive is not compromised too much...
All went well except for the adhesive. It was simply too small so when Iaid it down it was fine on one side as well as the top and bottom, but the other side required me to pull it over. As it is quite sticky, it bunched up. I cut out part of it and used my own double-sided tape to secure part of it. Otherwise, it was great. Thanks to those who made special note of the cover on the selfie camera window, and the procedure to set up the new fingerprint scanner.
They do not highlight the part that needs to be removed from the new screen, this should be added as the part looks and feels like it is a part of the new screen and removing it could break the new screen. So make sure you remove the selfie screen camera cover even if it looks and feels like there is not one there, it's there.
I ordered Google Pixel 6 pro- fix kit in IFIXIT. I followed the steps mentioned in the repair guide. During repair the finger print symbol is blinking in the screen. I thought it would get set when i do re calibration as mentioned in repair guide but it did not worked. It displays " Can´t use finger print sensor Visit a repair provider or g.co/pixel/fingerprintunlock". Does anyone have same problem??
You have to go to that link and you can re calibrate the new finger print scanner by logging into your account and approving it.
New Finger Print Reader
Boot into fast boot and connect your pixel to your pc
On your PC go to pixelrepair.withgoogle.com/udfps
Follow the PromptsReplacement process went smoothly. I reattached the screen after seating the connector. No sign its working. Just black blank screen. However text and notification sounds still coming through. Even receiving calls. etc on que. I know the phone works, just not the screen.
I figure maybe I didnt seat the connector all the way so I break the adhesive liner (figuring I'll buy another and apply again) and this time I clip in the connector for sure. Still nothing on the screen.
What can I do? Is the screen defective?
If phone is working should I see the display after the connector is seated but the phone still open? Or does the screen need to be seated all the way in the case to turn on? The screen does not display anything in either state by the way...
As an aside, your instructions are so detailed until the point where the screen needs to connect and seat. It would helpful to get more pointers for this final step...It's so frustrating that paper instructions are not included considering I'm about to pull the screen off my phone. It's also very frustrating that I have to load and read multiple sub instructions in the middle of the main instructions, just include all instructions in one booklet and include the booklet in the kit.
-
-
-
Use one arm of a pair of tweezers to carefully open the ZIF connector at the rear side of the screen.
-
-
-
Use a pair of tweezers to disconnect the fingerprint reader by pulling its cable out of the ZIF connector.
-
-
-
Apply a heated iOpener to the screen where the fingerprint reader is located to loosen the adhesive underneath. Apply the iOpener for at least 3 minutes.
-
-
-
Carefully slide an opening pick underneath the fingerprint reader to slice its adhesive.
-
Use your opening pick to separate the fingerprint reader from the screen.
-
-
-
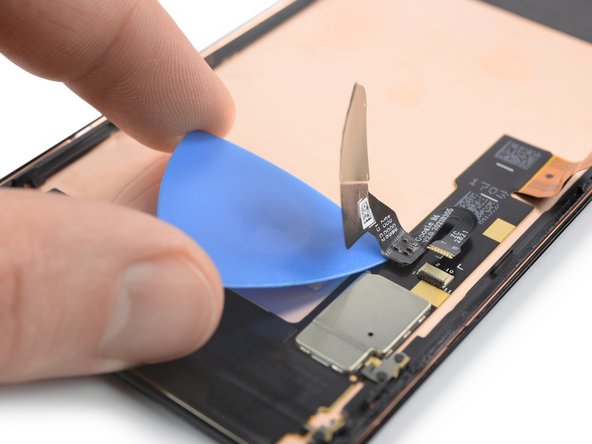
Use a pair of tweezers or your fingers to carefully remove the fingerprint reader.
Ok. So I asked about getting all the stuff off the old screen before finding this article and now I know what the IFR looks like and that it can be removed. So... Once removed, if extra special careful doing so, (asks this bull in a china shop) can that very same IFR be installed on the glass of the new screen? Or once removed is it just junk at that point?
Also, upon further reading on the site, it occurs to me that I do not use the Fingerprint deal or any other biometrics and I never will. The passcode is more than sufficient for me. So do I even NEED that IFR to be removed and placed on the new piece of glass that will be my screen? Or can I just disconnect it when removing my old screen and leave it at that? Thanks again.
-


If possible, turn on your device and test your repair before installing new adhesive and resealing.
To reassemble your device, follow these instructions in reverse order. During reassembly apply new adhesive where necessary after cleaning the relevant areas with isopropyl alcohol (>90%).
To run a diagnostics test with the built-in Pixel Diagnostic tool, click here.
Take your e-waste to an R2 or e-Stewards certified recycler.
Repair didn’t go as planned? Try some basic troubleshooting, or ask our Answers community for help.
Cancelar: No complete esta guía.
6 personas más completaron esta guía.


9 comentarios
The new screen did not come with the plastic frame. This would be helpful to discuss.
Yeah, that depends on what the screen comes with when you buy it. Some places sell replacement displays with nothing else and also an option with the frame, shieldings and fingerprint reader attached
Hi my name is Greg is there a way to just get a fingerprint reader for a pixel 6 pro separately I broke mine replacing my screen???
I need to reapply my fingerprint do a new screen. Where is the other half of the guide?
Hallo ich habe den fingerabdrucksensor beim demontieren kaputt gemacht und finde keinen Ersatz im Internet wo kann ich den Sensor neu kaufen??
I have seen sensors on Mobilesentrix however I am not sure about the quality or originality of the part
Please, how can I turn it off when screen is broken?
Thubbe - Contestar