Saltar al contenido principal
Únete a la Comunidad de Reparación - Crear Cuenta

Microsoft Surface Pro 7+ Screen Replacement

Qué necesitas

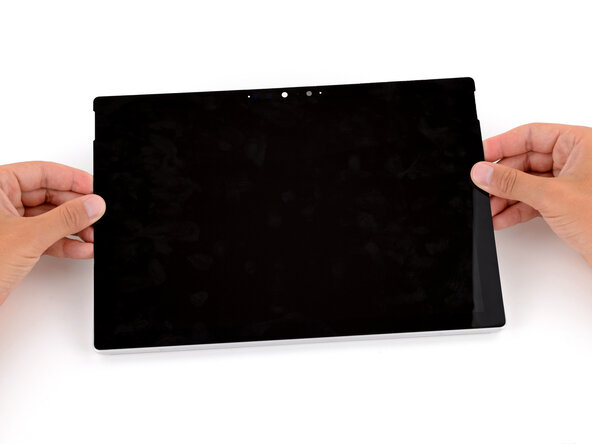
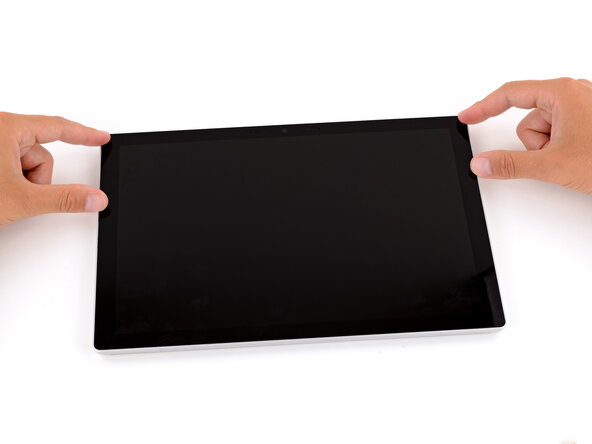
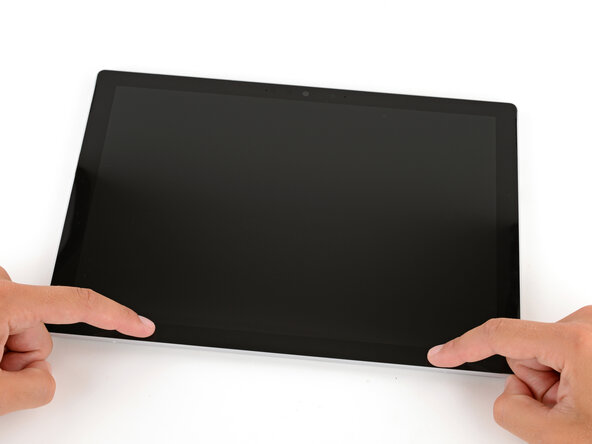
    1. Microsoft Surface Pro 7+ Screen Replacement, Before you begin: paso 1, imagen 1 de 3 Microsoft Surface Pro 7+ Screen Replacement, Before you begin: paso 1, imagen 2 de 3 Microsoft Surface Pro 7+ Screen Replacement, Before you begin: paso 1, imagen 3 de 3
      • Before starting this repair, allow your Surface Pro's battery to drain below 25%. A charged battery may catch fire if damaged.

      • Unplug all cables and fully shut down your tablet.

      • If you have a keyboard attached, remove it.

      Pregunta a FixBot

      Agregar Comentario

    1. Microsoft Surface Pro 7+ Screen Replacement, Open the kickstand: paso 2, imagen 1 de 2 Microsoft Surface Pro 7+ Screen Replacement, Open the kickstand: paso 2, imagen 2 de 2
      • Open the kickstand to about 90 degrees.

      Pregunta a FixBot

      Agregar Comentario

    1. Microsoft Surface Pro 7+ Screen Replacement, Remove the SSD door: paso 3, imagen 1 de 3 Microsoft Surface Pro 7+ Screen Replacement, Remove the SSD door: paso 3, imagen 2 de 3 Microsoft Surface Pro 7+ Screen Replacement, Remove the SSD door: paso 3, imagen 3 de 3
      • Firmly press a SIM eject tool into the small hole in the corner of the SSD door until it pops up.

      • Alternatively, you can also use a small, straightened paper clip.

      • Remove the SSD door.

      Pregunta a FixBot

      Agregar Comentario

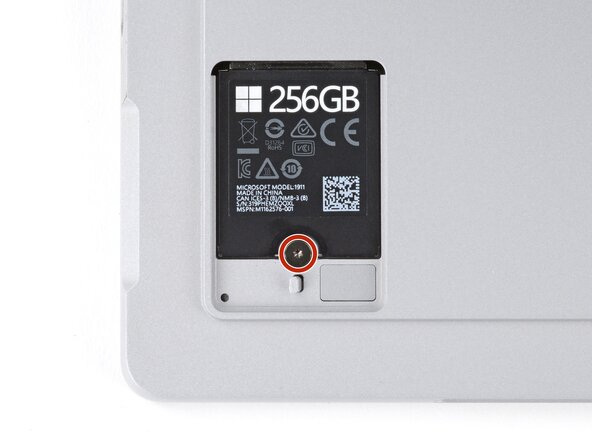
    1. Microsoft Surface Pro 7+ Screen Replacement, Remove the SSD screw: paso 4, imagen 1 de 2 Microsoft Surface Pro 7+ Screen Replacement, Remove the SSD screw: paso 4, imagen 2 de 2
      • Removing the SSD also functions as a battery disconnect and should be done before all major repairs.

      • Use a Torx Plus 3IP screwdriver to remove the 2.2 mm‑long screw securing the SSD.

      Pregunta a FixBot

      Agregar Comentario

    2. Microsoft Surface Pro 7+ Screen Replacement, Remove the SSD: paso 5, imagen 1 de 2 Microsoft Surface Pro 7+ Screen Replacement, Remove the SSD: paso 5, imagen 2 de 2
      • Don't pull up at a sharp angle, or you may damage the SSD and its socket.

      • Use your fingers to pull the SSD out of its socket at a shallow angle.

      Pregunta a FixBot

      Agregar Comentario

    1. Microsoft Surface Pro 7+ Screen Replacement, Reinstall the SSD door: paso 6, imagen 1 de 2 Microsoft Surface Pro 7+ Screen Replacement, Reinstall the SSD door: paso 6, imagen 2 de 2
      • Leave the SSD removed to keep the battery disconnected.

      • Slide the SSD door back into its recess and press down on the bottom edge until it clicks into place.

      Pregunta a FixBot

      Agregar Comentario

    2. Microsoft Surface Pro 7+ Screen Replacement, Close the kickstand: paso 7, imagen 1 de 3 Microsoft Surface Pro 7+ Screen Replacement, Close the kickstand: paso 7, imagen 2 de 3 Microsoft Surface Pro 7+ Screen Replacement, Close the kickstand: paso 7, imagen 3 de 3
      • Close the kickstand and flip your device over so the screen is facing up.

      Pregunta a FixBot

      Agregar Comentario

    3. Microsoft Surface Pro 7+ Screen Replacement, Heat the right edge: paso 8, imagen 1 de 1
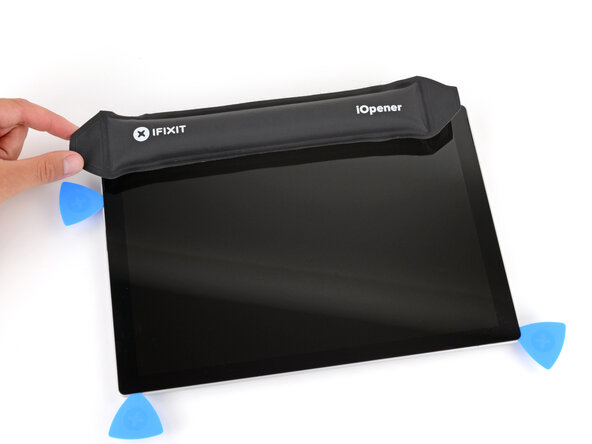
      • Heating the screen helps soften the adhesive securing it, making it easier to open.

      • Heat an iOpener and lay it on the right edge of the screen for two minutes to soften the adhesive.

      • Alternatively, you can use a hair dryer or heat gun to soften the adhesive. For a more detailed look at best practices for using a hair dryer, check out this guide. For information on heat gun use, check out this guide.

      Pregunta a FixBot

      Agregar Comentario

    4. Microsoft Surface Pro 7+ Screen Replacement, Adhesive information: paso 9, imagen 1 de 3 Microsoft Surface Pro 7+ Screen Replacement, Adhesive information: paso 9, imagen 2 de 3 Microsoft Surface Pro 7+ Screen Replacement, Adhesive information: paso 9, imagen 3 de 3
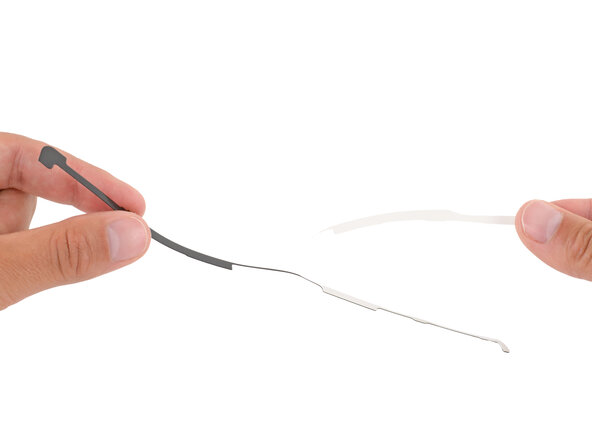
      • Don't insert your pick more than 8 mm when separating the screen adhesive. Otherwise, you may damage your device's internals.

      • When separating the top edge adhesive, follow instructions carefully to avoid damaging the front camera.

      • To prevent inserting your pick too far, measure 8 mm from the tip and mark the opening pick with a permanent marker.

      • Alternatively, tape a coin to a pick 8 mm from the tip.

      • If you're having trouble separating the adhesive, use the third photo as a reference for the adhesive location.

      Pregunta a FixBot

      Agregar Comentario

    5. Microsoft Surface Pro 7+ Screen Replacement, Insert an opening pick: paso 10, imagen 1 de 3 Microsoft Surface Pro 7+ Screen Replacement, Insert an opening pick: paso 10, imagen 2 de 3 Microsoft Surface Pro 7+ Screen Replacement, Insert an opening pick: paso 10, imagen 3 de 3
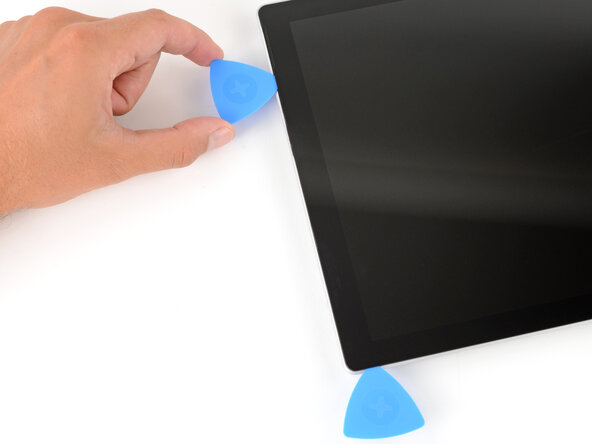
      • Insert the tip of an opening pick under the screen near the bottom of the right speaker cutout.

      • Be careful not to damage the speaker mesh, or you'll need to replace it.

      • Slide your pick towards the bottom edge so the tip goes under the notch in the screen.

      Pregunta a FixBot

      Agregar Comentario

    6. Microsoft Surface Pro 7+ Screen Replacement, Separate the right edge adhesive: paso 11, imagen 1 de 3 Microsoft Surface Pro 7+ Screen Replacement, Separate the right edge adhesive: paso 11, imagen 2 de 3 Microsoft Surface Pro 7+ Screen Replacement, Separate the right edge adhesive: paso 11, imagen 3 de 3
      • Remember not to insert your pick more than 8 mm.

      • Slide the pick down the right edge to separate the adhesive securing it.

      • Leave the pick inserted under the bottom right corner to prevent the adhesive from re‑sealing.

      Pregunta a FixBot

      Agregar Comentario

    7. Microsoft Surface Pro 7+ Screen Replacement, Heat the bottom edge: paso 12, imagen 1 de 1
      • Heat the bottom edge of the screen with an iOpener, hair dryer, or heat gun.

      Pregunta a FixBot

      Agregar Comentario

    8. Microsoft Surface Pro 7+ Screen Replacement, Separate the bottom edge adhesive: paso 13, imagen 1 de 3 Microsoft Surface Pro 7+ Screen Replacement, Separate the bottom edge adhesive: paso 13, imagen 2 de 3 Microsoft Surface Pro 7+ Screen Replacement, Separate the bottom edge adhesive: paso 13, imagen 3 de 3
      • Remember not to insert your pick more than 8 mm.

      • Insert a second pick under the bottom right corner of the screen and slide it along the bottom edge to separate the adhesive.

      • Leave the second pick inserted under the bottom left corner to prevent the adhesive from re‑sealing.

      Pregunta a FixBot

      Agregar Comentario

    9. Microsoft Surface Pro 7+ Screen Replacement, Heat the left edge: paso 14, imagen 1 de 1
      • Heat the left edge of the screen with an iOpener, hair dryer, or heat gun.

      Pregunta a FixBot

      Agregar Comentario

    10. Microsoft Surface Pro 7+ Screen Replacement, Separate the left edge adhesive: paso 15, imagen 1 de 2 Microsoft Surface Pro 7+ Screen Replacement, Separate the left edge adhesive: paso 15, imagen 2 de 2
      • Remember not to insert your pick more than 8 mm.

      • Insert a third pick under the bottom left corner of the screen and slide it up the left edge, stopping when you get to the bottom of the left speaker cutout.

      • Leave the pick inserted under the screen to prevent the adhesive from re-sealing.

      Pregunta a FixBot

      Agregar Comentario

    11. Microsoft Surface Pro 7+ Screen Replacement, Heat the top edge: paso 16, imagen 1 de 1
      • Heat the top edge of the screen with an iOpener, hair dryer, or heat gun.

      Pregunta a FixBot

      Agregar Comentario

    12. Microsoft Surface Pro 7+ Screen Replacement, Insert an opening pick: paso 17, imagen 1 de 3 Microsoft Surface Pro 7+ Screen Replacement, Insert an opening pick: paso 17, imagen 2 de 3 Microsoft Surface Pro 7+ Screen Replacement, Insert an opening pick: paso 17, imagen 3 de 3
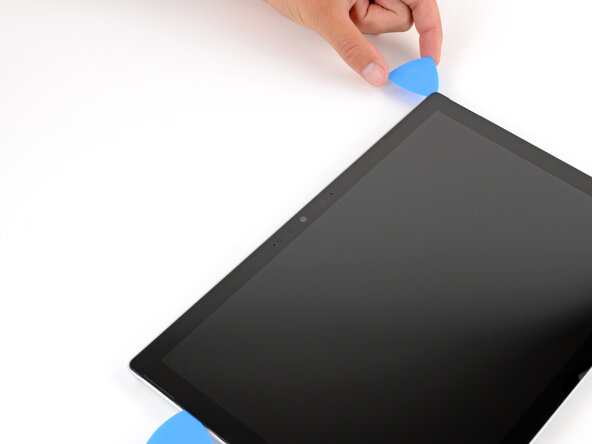
      • Insert a fourth pick under the screen near the top of the left speaker cutout.

      • Slide your pick towards the top edge so the tip goes under the notch in the screen.

      Pregunta a FixBot

      Agregar Comentario

    13. Microsoft Surface Pro 7+ Screen Replacement, Separate the top edge adhesive: paso 18, imagen 1 de 3 Microsoft Surface Pro 7+ Screen Replacement, Separate the top edge adhesive: paso 18, imagen 2 de 3 Microsoft Surface Pro 7+ Screen Replacement, Separate the top edge adhesive: paso 18, imagen 3 de 3
      • Don't slide the pick over the front facing camera. Remove the pick enough that it can slide past the camera without touching it.

      • Slide the pick along the top edge to separate the adhesive.

      • You'll likely need to slide the pick around the perimeter a second time to fully separate all the screen adhesive.

      Pregunta a FixBot

      Agregar Comentario

    14. Microsoft Surface Pro 7+ Screen Replacement, Flip the screen over: paso 19, imagen 1 de 3 Microsoft Surface Pro 7+ Screen Replacement, Flip the screen over: paso 19, imagen 2 de 3 Microsoft Surface Pro 7+ Screen Replacement, Flip the screen over: paso 19, imagen 3 de 3
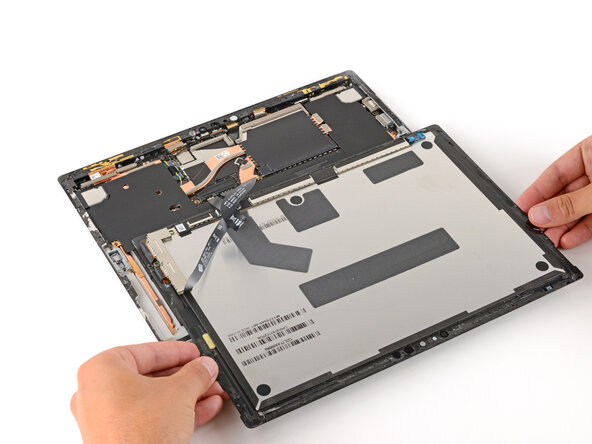
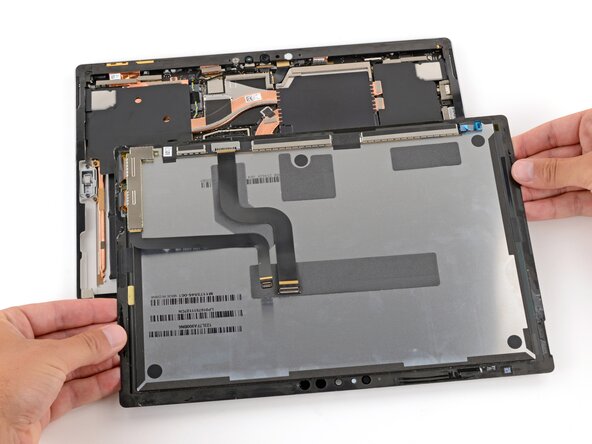
      • Once the screen is fully separated, slightly lift the top edge and flip the screen so it can lay flat.

      • Be careful not to strain the screen cables.

      Pregunta a FixBot

      Agregar Comentario

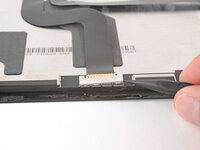
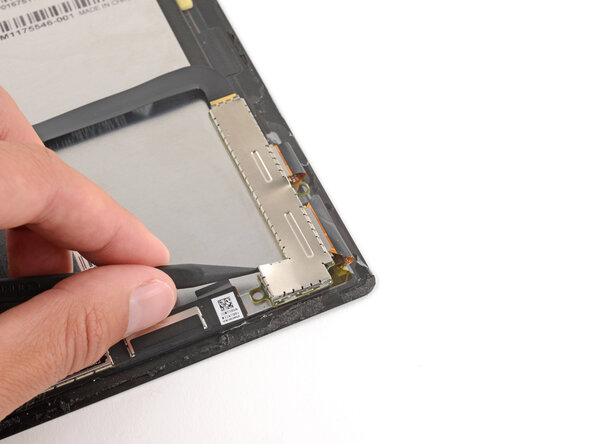
    15. Microsoft Surface Pro 7+ Screen Replacement, Remove the screen cable cover: paso 20, imagen 1 de 3 Microsoft Surface Pro 7+ Screen Replacement, Remove the screen cable cover: paso 20, imagen 2 de 3 Microsoft Surface Pro 7+ Screen Replacement, Remove the screen cable cover: paso 20, imagen 3 de 3
      • Use the flat end of a spudger to gently lift the edges of the metal screen cable cover to unclip it.

      • Be careful not to deform the cover too much, as you'll need to reinstall it during reassembly.

      • Remove the cable cover.

      Pregunta a FixBot

      Agregar Comentario

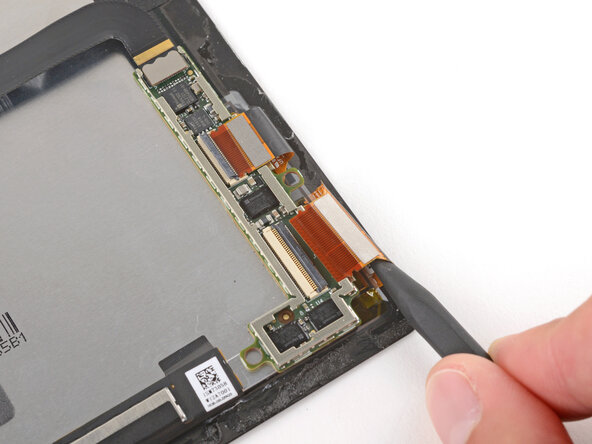
    16. Microsoft Surface Pro 7+ Screen Replacement, Disconnect the screen cables: paso 21, imagen 1 de 2 Microsoft Surface Pro 7+ Screen Replacement, Disconnect the screen cables: paso 21, imagen 2 de 2
      • Use a spudger to pry up and disconnect the smaller screen cable press connector.

      Pregunta a FixBot

      Agregar Comentario

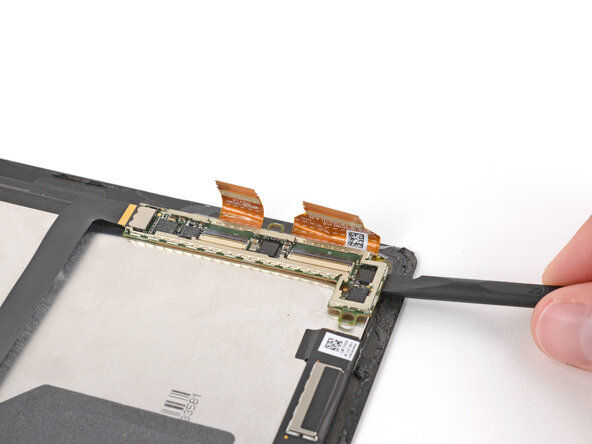
    17. Microsoft Surface Pro 7+ Screen Replacement: paso 22, imagen 1 de 3 Microsoft Surface Pro 7+ Screen Replacement: paso 22, imagen 2 de 3 Microsoft Surface Pro 7+ Screen Replacement: paso 22, imagen 3 de 3
      • Use a spudger to pry up and disconnect the wide screen cable press connector, starting on one of the short sides and moving to the other.

      Pregunta a FixBot

      Agregar Comentario

    18. Microsoft Surface Pro 7+ Screen Replacement, Remove the screen: paso 23, imagen 1 de 1
      • Remove the screen.

      Pregunta a FixBot

      Agregar Comentario

    1. Microsoft Surface Pro 7+ Screen Replacement, Transfer screen parts: paso 24, imagen 1 de 3 Microsoft Surface Pro 7+ Screen Replacement, Transfer screen parts: paso 24, imagen 2 de 3 Microsoft Surface Pro 7+ Screen Replacement, Transfer screen parts: paso 24, imagen 3 de 3
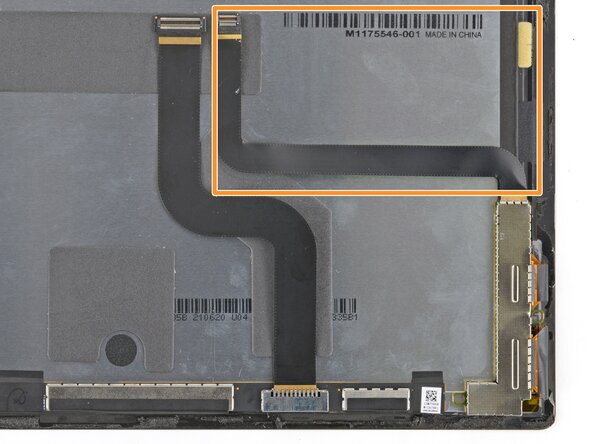
      • Compare your replacement screen to the original. You may need to transfer the following parts:

      • The skinny board located near the bottom right of the screen.

      • Two S shaped screen cables attached to the original screen.

      • If your replacement screen comes with these parts installed, you can skip down to the adhesive removal step.

      Pregunta a FixBot

      Agregar Comentario

    2. Microsoft Surface Pro 7+ Screen Replacement, Remove the screen cable cover: paso 25, imagen 1 de 3 Microsoft Surface Pro 7+ Screen Replacement, Remove the screen cable cover: paso 25, imagen 2 de 3 Microsoft Surface Pro 7+ Screen Replacement, Remove the screen cable cover: paso 25, imagen 3 de 3
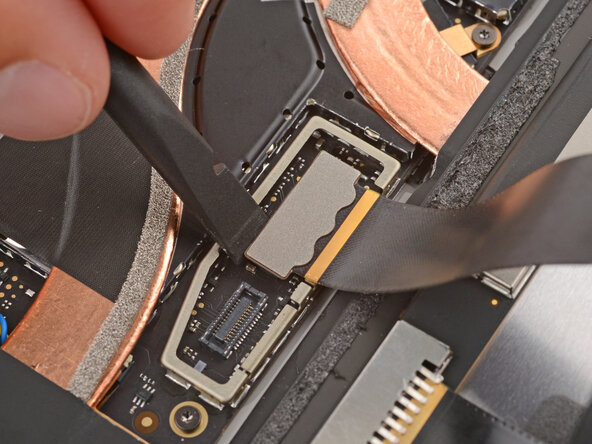
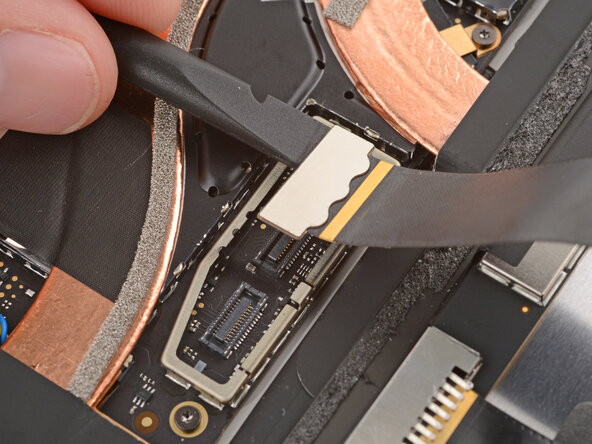
      • Use the point of a spudger to pry up and unclip the screen cable's metal cover.

      • Be careful not to deform the cover too much, as you'll need to reinstall it during reassembly.

      • Remove the cover.

      Pregunta a FixBot

      Agregar Comentario

    3. Microsoft Surface Pro 7+ Screen Replacement, Disconnect the screen cable: paso 26, imagen 1 de 3 Microsoft Surface Pro 7+ Screen Replacement, Disconnect the screen cable: paso 26, imagen 2 de 3 Microsoft Surface Pro 7+ Screen Replacement, Disconnect the screen cable: paso 26, imagen 3 de 3
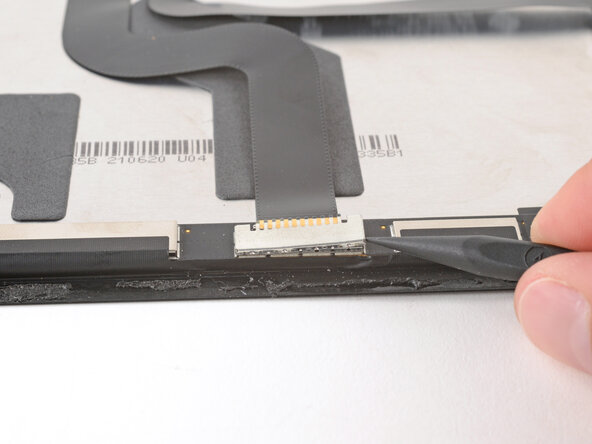
      • Use a spudger to pry up and disconnect the screen cable press connector, starting on one of the short sides and moving to the other.

      Pregunta a FixBot

      Agregar Comentario

    4. Microsoft Surface Pro 7+ Screen Replacement: paso 27, imagen 1 de 1
      • Remove the cable and set it aside—you'll install it on your new screen later.

      Pregunta a FixBot

      Agregar Comentario

    5. Microsoft Surface Pro 7+ Screen Replacement, Remove the board cover: paso 28, imagen 1 de 3 Microsoft Surface Pro 7+ Screen Replacement, Remove the board cover: paso 28, imagen 2 de 3 Microsoft Surface Pro 7+ Screen Replacement, Remove the board cover: paso 28, imagen 3 de 3
      • Use the point of a spudger to pry up and unclip the edges of the metal cover on the board (near the bottom right of the screen).

      • Be careful not to deform the cover too much, as you'll need to reinstall it during reassembly.

      • Remove the cover.

      Pregunta a FixBot

      Agregar Comentario

    6. Microsoft Surface Pro 7+ Screen Replacement, Disconnect the board: paso 29, imagen 1 de 3 Microsoft Surface Pro 7+ Screen Replacement, Disconnect the board: paso 29, imagen 2 de 3 Microsoft Surface Pro 7+ Screen Replacement, Disconnect the board: paso 29, imagen 3 de 3
      • Use the flat end of a spudger to lift the hinged, locking flaps on the board's two ZIF connectors.

      Pregunta a FixBot

      Agregar Comentario

    7. Microsoft Surface Pro 7+ Screen Replacement: paso 30, imagen 1 de 3 Microsoft Surface Pro 7+ Screen Replacement: paso 30, imagen 2 de 3 Microsoft Surface Pro 7+ Screen Replacement: paso 30, imagen 3 de 3
      • Use the point of a spudger to slide both cables completely out of their sockets.

      • You can leave the ribbon cable connected to the top edge of the board, since you're going to be transferring it.

      Pregunta a FixBot

      Agregar Comentario

    8. Microsoft Surface Pro 7+ Screen Replacement, Remove the board: paso 31, imagen 1 de 3 Microsoft Surface Pro 7+ Screen Replacement, Remove the board: paso 31, imagen 2 de 3 Microsoft Surface Pro 7+ Screen Replacement, Remove the board: paso 31, imagen 3 de 3
      • Mild adhesive secures the board to the screen.

      • Slide the flat end of a spudger under the board and lift to remove it.

      Pregunta a FixBot

      Agregar Comentario

    1. Microsoft Surface Pro 7+ Screen Replacement, Disassembly complete: paso 32, imagen 1 de 1
      • Congratulations on completing disassembly! The remaining steps will show how to reassemble your Surface Pro.

      Pregunta a FixBot

      Agregar Comentario

    1. Microsoft Surface Pro 7+ Screen Replacement, Install the screen board: paso 33, imagen 1 de 3 Microsoft Surface Pro 7+ Screen Replacement, Install the screen board: paso 33, imagen 2 de 3 Microsoft Surface Pro 7+ Screen Replacement, Install the screen board: paso 33, imagen 3 de 3
      Herramienta utilizada en este paso:
      Tesa 61395 Tape
      $2.95
      • Before installing the screen board, make sure you know how it will be oriented. The cables need to line up with their sockets.

      • Gently press the board into place on the replacement screen.

      • The residual adhesive should be sticky enough to reuse. If the board isn't staying in place, use thin double-sided tape to secure it.

      Pregunta a FixBot

      Agregar Comentario

    2. Microsoft Surface Pro 7+ Screen Replacement, Connect the board cables: paso 34, imagen 1 de 3 Microsoft Surface Pro 7+ Screen Replacement, Connect the board cables: paso 34, imagen 2 de 3 Microsoft Surface Pro 7+ Screen Replacement, Connect the board cables: paso 34, imagen 3 de 3
      • Use your finger to slide one of the screen board cables fully into its socket.

      • If the cable isn't sliding in, make sure the locking flap is flipped up.

      • Hold the cable in place, and flip the locking flap down to secure the cable.

      Pregunta a FixBot

      Agregar Comentario

    3. Microsoft Surface Pro 7+ Screen Replacement: paso 35, imagen 1 de 3 Microsoft Surface Pro 7+ Screen Replacement: paso 35, imagen 2 de 3 Microsoft Surface Pro 7+ Screen Replacement: paso 35, imagen 3 de 3
      • Repeat the process to reconnect the other cable to the screen board.

      Pregunta a FixBot

      Agregar Comentario

    4. Microsoft Surface Pro 7+ Screen Replacement: paso 36, imagen 1 de 3 Microsoft Surface Pro 7+ Screen Replacement: paso 36, imagen 2 de 3 Microsoft Surface Pro 7+ Screen Replacement: paso 36, imagen 3 de 3
      • Set the board's metal cover in place and press down around the perimeter to secure it.

      Pregunta a FixBot

      Agregar Comentario

    5. Microsoft Surface Pro 7+ Screen Replacement, Reconnect the cable: paso 37, imagen 1 de 1
      • Lay the screen cable in place so the bend lines up with the other screen cable.

      • If the cable is positioned the wrong way, you won't be able to reconnect the screen.

      Pregunta a FixBot

      Agregar Comentario

    6. Microsoft Surface Pro 7+ Screen Replacement: paso 38, imagen 1 de 3 Microsoft Surface Pro 7+ Screen Replacement: paso 38, imagen 2 de 3 Microsoft Surface Pro 7+ Screen Replacement: paso 38, imagen 3 de 3
      • Use your finger to press down and reconnect the screen cable press connector, starting on one side and moving to the other.

      Pregunta a FixBot

      Agregar Comentario

    7. Microsoft Surface Pro 7+ Screen Replacement, Install the cable cover: paso 39, imagen 1 de 2 Microsoft Surface Pro 7+ Screen Replacement, Install the cable cover: paso 39, imagen 2 de 2
      • Set the cable's metal cover in place and press down around the perimeter to secure it.

      Pregunta a FixBot

      Agregar Comentario

    1. Microsoft Surface Pro 7+ Screen Replacement, Remove the old screen adhesive: paso 40, imagen 1 de 3 Microsoft Surface Pro 7+ Screen Replacement, Remove the old screen adhesive: paso 40, imagen 2 de 3 Microsoft Surface Pro 7+ Screen Replacement, Remove the old screen adhesive: paso 40, imagen 3 de 3
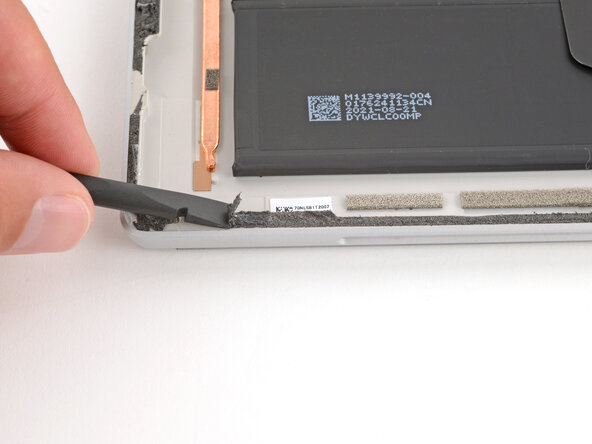
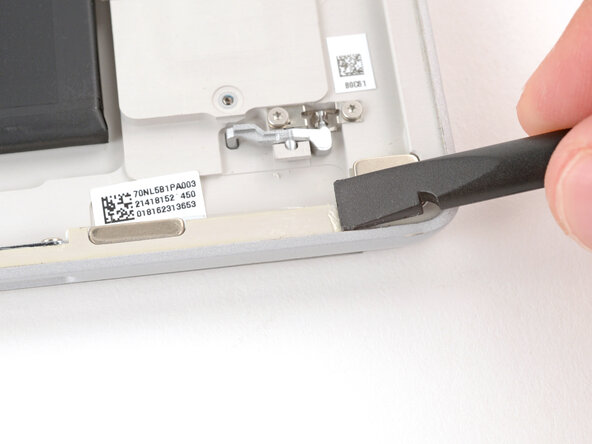
      • Use a spudger and your fingers (or tweezers) to scrape up and remove all the old screen adhesive from the perimeter of the frame.

      • If you're reusing your screen, repeat the process to remove any of the old screen adhesive from it.

      • To prevent damaging your screen, press gently with the spudger and make sure nothing is under the screen while you work.

      Pregunta a FixBot

      Agregar Comentario

    2. Microsoft Surface Pro 7+ Screen Replacement: paso 41, imagen 1 de 3 Microsoft Surface Pro 7+ Screen Replacement: paso 41, imagen 2 de 3 Microsoft Surface Pro 7+ Screen Replacement: paso 41, imagen 3 de 3
      • Take your time and be very thorough during the next two steps. A clean frame allows replacement adhesive to lay evenly, ensuring a better bond.

      • The old adhesive likely left behind a thin, clear film on the frame. Use a spudger and tweezers to peel any traces of the film from the frame.

      • If you're reusing your screen, repeat the process to remove any of the adhesive film left on the screen.

      Pregunta a FixBot

      Agregar Comentario

    3. Microsoft Surface Pro 7+ Screen Replacement, Clean the frame: paso 42, imagen 1 de 2 Microsoft Surface Pro 7+ Screen Replacement, Clean the frame: paso 42, imagen 2 de 2
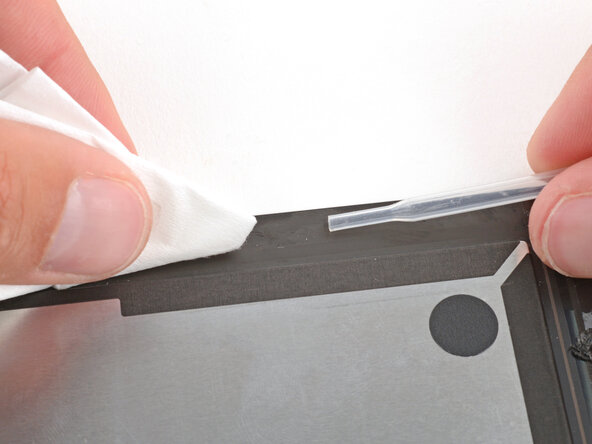
      • Use a lint‑free cloth (or coffee filter) and some high‑concentration (>90%) isopropyl alcohol to thoroughly clean the frame where you removed the old screen adhesive.

      • If you're reusing the screen, repeat the process to clean its perimeter.

      Pregunta a FixBot

      Agregar Comentario

    4. Microsoft Surface Pro 7+ Screen Replacement, Adhesive strips information: paso 43, imagen 1 de 1
      • Before applying any screen adhesives, find their proper orientation on the frame. Use cutouts and notches in the adhesive to match each strip to its spot on the perimeter.

      • The top strip has lots of circular cutouts for the cameras and sensors.

      Pregunta a FixBot

      Agregar Comentario

    5. Microsoft Surface Pro 7+ Screen Replacement, Apply the short edge adhesive strips: paso 44, imagen 1 de 3 Microsoft Surface Pro 7+ Screen Replacement, Apply the short edge adhesive strips: paso 44, imagen 2 de 3 Microsoft Surface Pro 7+ Screen Replacement, Apply the short edge adhesive strips: paso 44, imagen 3 de 3
      • Take your time when applying the adhesive strips. Once the adhesive sticks to the frame, it can't be repositioned—you'll need to start over with a new strip.

      • Apply the shorter strips (left and right) first, as it makes it much easier to properly align the top and bottom ones.

      • Remove the white, paperlike liner (not the clear one) from one of the shorter strips.

      • Line up the strip and use your finger to secure one end to the frame.

      • With one end secured, gently lay the strip onto the frame and use your finger to lightly press down as you go.

      • Don't remove the remaining clear liner on top of the strip yet.

      Pregunta a FixBot

      Agregar Comentario

    6. Microsoft Surface Pro 7+ Screen Replacement: paso 45, imagen 1 de 1
      • Use the same process to apply the other short strip.

      Pregunta a FixBot

      Agregar Comentario

    7. Microsoft Surface Pro 7+ Screen Replacement, Apply the long edge adhesive strips: paso 46, imagen 1 de 3 Microsoft Surface Pro 7+ Screen Replacement, Apply the long edge adhesive strips: paso 46, imagen 2 de 3 Microsoft Surface Pro 7+ Screen Replacement, Apply the long edge adhesive strips: paso 46, imagen 3 de 3
      • To apply the top strip, align the middle cutouts over the front camera and lay the strip down starting in the center and working out to both sides.

      • Use the same process to apply the bottom strip.

      Pregunta a FixBot

      Agregar Comentario

    8. Microsoft Surface Pro 7+ Screen Replacement: paso 47, imagen 1 de 3 Microsoft Surface Pro 7+ Screen Replacement: paso 47, imagen 2 de 3 Microsoft Surface Pro 7+ Screen Replacement: paso 47, imagen 3 de 3
      • Press down on the strips with the flat end of a spudger and slide it along the length of the strips to secure them to the frame.

      • To secure the strips further, you can press down firmly with your finger.

      Pregunta a FixBot

      Agregar Comentario

    9. Microsoft Surface Pro 7+ Screen Replacement: paso 48, imagen 1 de 1
      • Lay the screen display-side-down on the device so you can reconnect the two cables.

      • The screen should be oriented so when you flip it over, the top edge of the screen is lined up with the top edge of the frame.

      Pregunta a FixBot

      Agregar Comentario

    10. Microsoft Surface Pro 7+ Screen Replacement, Connect the screen: paso 49, imagen 1 de 3 Microsoft Surface Pro 7+ Screen Replacement, Connect the screen: paso 49, imagen 2 de 3 Microsoft Surface Pro 7+ Screen Replacement, Connect the screen: paso 49, imagen 3 de 3
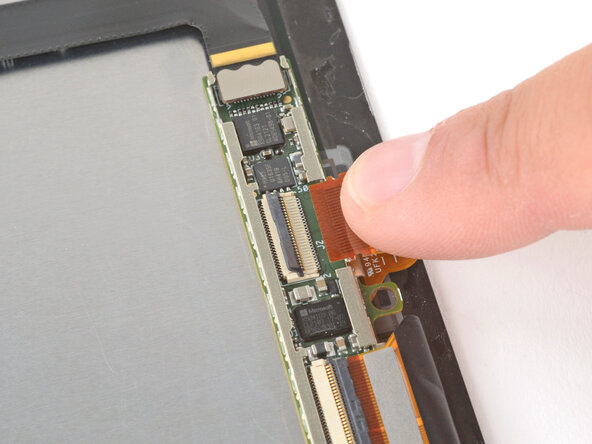
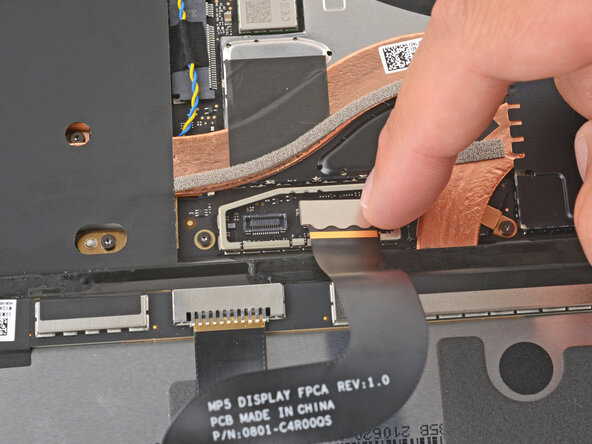
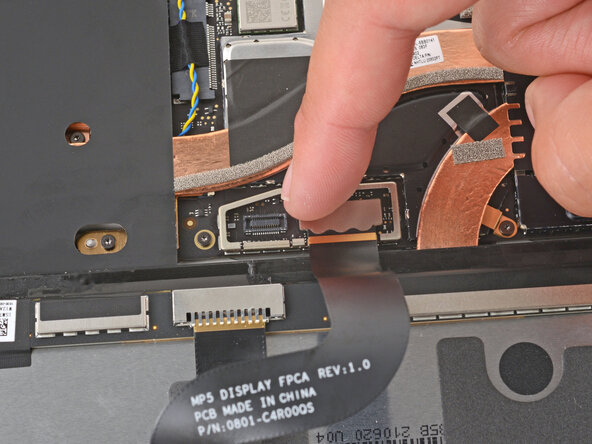
      • Use your finger to press down and reconnect both of the screen cable press connectors.

      • For the larger connector, press first on one short side, then the other, until it clicks into place.

      Pregunta a FixBot

      Agregar Comentario

    11. Microsoft Surface Pro 7+ Screen Replacement: paso 50, imagen 1 de 3 Microsoft Surface Pro 7+ Screen Replacement: paso 50, imagen 2 de 3 Microsoft Surface Pro 7+ Screen Replacement: paso 50, imagen 3 de 3
      • Lay the screen cable cover into place and press down firmly around the entire perimeter to secure it.

      Pregunta a FixBot

      Agregar Comentario

    12. Microsoft Surface Pro 7+ Screen Replacement, Remove the adhesive liners: paso 51, imagen 1 de 3 Microsoft Surface Pro 7+ Screen Replacement, Remove the adhesive liners: paso 51, imagen 2 de 3 Microsoft Surface Pro 7+ Screen Replacement, Remove the adhesive liners: paso 51, imagen 3 de 3
      • Remove all the remaining adhesive liners, carefully holding the screen above your device as necessary.

      Pregunta a FixBot

      Agregar Comentario

    13. Microsoft Surface Pro 7+ Screen Replacement, Install the screen: paso 52, imagen 1 de 3 Microsoft Surface Pro 7+ Screen Replacement, Install the screen: paso 52, imagen 2 de 3 Microsoft Surface Pro 7+ Screen Replacement, Install the screen: paso 52, imagen 3 de 3
      • Flip the screen over and align the bottom edge, using the frame's lip to properly orient it.

      Pregunta a FixBot

      Agregar Comentario

    14. Microsoft Surface Pro 7+ Screen Replacement: paso 53, imagen 1 de 2 Microsoft Surface Pro 7+ Screen Replacement: paso 53, imagen 2 de 2
      • Once the bottom edge is properly aligned, lay the screen onto the frame.

      Pregunta a FixBot

      Agregar Comentario

    15. Microsoft Surface Pro 7+ Screen Replacement: paso 54, imagen 1 de 3 Microsoft Surface Pro 7+ Screen Replacement: paso 54, imagen 2 de 3 Microsoft Surface Pro 7+ Screen Replacement: paso 54, imagen 3 de 3
      • Use your fingers to press down on the entire perimeter of the screen to secure it in the frame.

      • Check the edges of the screen and make sure they're sitting flush in the frame—there should be no gaps.

      Pregunta a FixBot

      Agregar Comentario

    16. Microsoft Surface Pro 7+ Screen Replacement: paso 55, imagen 1 de 2 Microsoft Surface Pro 7+ Screen Replacement: paso 55, imagen 2 de 2
      Herramienta utilizada en este paso:
      Surface Display Bonding Frame (M1178723-001)
      $29.99
      • Lay your Surface Pro screen down on a clean, flat surface.

      • If you're using a display bonding frame, lay the device down with the screen facing up.

      • Place 4–5 heavy books squarely on top of your device.

      • Leave the books in place for at least thirty minutes. The lighter the books, the longer they should be left. Ideally, leave them stacked overnight.

      • The pressure will help activate the adhesive, creating a stronger bond.

      Pregunta a FixBot

      Agregar Comentario

    17. Microsoft Surface Pro 7+ Screen Replacement, Reinstall the SSD: paso 56, imagen 1 de 3 Microsoft Surface Pro 7+ Screen Replacement, Reinstall the SSD: paso 56, imagen 2 de 3 Microsoft Surface Pro 7+ Screen Replacement, Reinstall the SSD: paso 56, imagen 3 de 3
      • Open the kickstand and remove the SSD door using a SIM eject tool.

      • Use your fingers to slide the SSD fully into its socket.

      Pregunta a FixBot

      Agregar Comentario

    18. Microsoft Surface Pro 7+ Screen Replacement: paso 57, imagen 1 de 2 Microsoft Surface Pro 7+ Screen Replacement: paso 57, imagen 2 de 2
      • Use a Torx Plus 3IP screwdriver to install the 2.2 mm‑long SSD screw.

      Pregunta a FixBot

      Agregar Comentario

    19. Microsoft Surface Pro 7+ Screen Replacement: paso 58, imagen 1 de 3 Microsoft Surface Pro 7+ Screen Replacement: paso 58, imagen 2 de 3 Microsoft Surface Pro 7+ Screen Replacement: paso 58, imagen 3 de 3
      • Slide the SSD door into place and use your finger to press down on the bottom edge until it clicks into place.

      Pregunta a FixBot

      Agregar Comentario

Conclusión

Take your e-waste to an R2 or e-Stewards certified recycler.

Repair didn’t go as planned? Try some basic troubleshooting, or ask our Answers community for help.

Cancelar: No complete esta guía.

Una persona más ha completado esta guía.

Spencer Day

Miembro Desde 09/14/22

197,661 Reputación

1,243 Guías creadas

0Guía Comentarios

Agregar Comentario

Ver Estadísticas:

Ultimas 24 horas: 5

Ultimos 7 días: 45

Ultimos 30 días: 153

Todo El Tiempo: 472