Introducción
Solo de prerrequisito.
Qué necesitas
-
-
Si tu pantalla de cristal está rota, evita que se produzcan más roturas y evita daños corporales durante la reparación encintando el cristal
-
Coloca tiras superpuestas de cinta de embalaje transparente sobre el display de la iPad hasta que la caratula este completamente cubierta.
-
Haz lo mejor para seguir el resto de la guía como se describe. Aun así, una vez que el vidrio esta roto, este continuará rompiéndose conforme trabajas, y puede que necesites una herramienta de palanca de metal para sacar el cristal.
-
-
-
Sujétalo por la lengüeta y coloca el iOpener caliente en el lateral del iPad, a la izquierda del conjunto del botón de inicio.
-
Deja el iOpener reposar por alrededor de 5 minutos para aflojar el adhesivo bajo el cristal.
Can you explain how using the iOpener ? That's can be great !
The iOpener used is essentially a bag of gel, which you put in the microwave for 30 seconds. You lay this against the screen edges to transfer heat and loosen up the glue.
You could also use a hot-air blower with a re-work station but that's up to you. Mine worked well up to 150°C
what about heating a cloth bag filled with rice in the microwave? Would that work?
That might work! Rice is less likely to get, and stay, hot enough. But it can't hurt to try! Just be sure you're being patient and letting it really warm up before you pry. People have had luck double bagging a washcloth dipped in very hot water, too.
-
-
-
Con cuidado coloca e una ventosa en la mitad del lado calentado.
-
Asegúrate que la ventosa este completamente plana en la pantalla para conseguir un cierre hermético.
-
Mientras sostengas el iPad con una mano, jala con la ventosa para separar un poco el cristal del panel frontal de la cubierta trasera.
I'm having trouble getting the suction cup to stay connected to the screen to pull it. It just isn't creating a seal no matter how flat I make it. I thought maybe the crack was causing it, so I tried tape. I originally didn't put tape on it because it wasn't losing glass. The tape made it worse of creating a seal. Any advice?
After following instructions to cover cracked glass with packing tape, the suction cup won’t adhere at all. Not even a little bit. Any suggestions?
I had that exact problem when I fixed an Iphone 8. What I did was that I put some ducktape where the suction cup would be placed. That worked for me. That’s of course is if you where doing to replace the glass anyway.
I had a screen on an iPad 4 that was so shattered that I literally had to spend 2.5 hours picking every single piece of glass out with tweezers after pulling the few larger pieces off with tape on them. Sometimes you need a lot of patience to be successful. The final cleaning out of the sticky tape along the sides is also very important once the glass is removed. Or the new screen will stick out an/or not go in neatly.
-
-
-
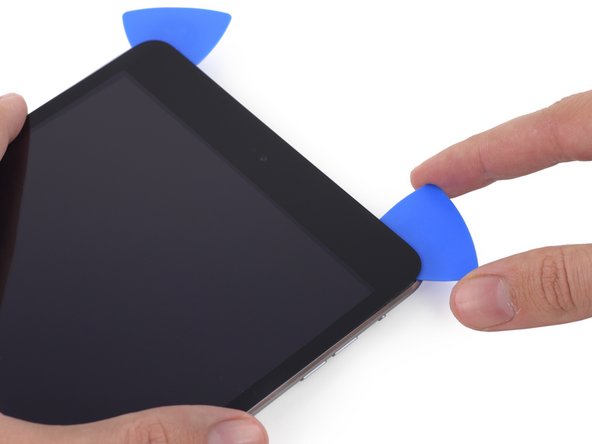
Mientras estés sosteniendo el cristal con la ventosa, desliza la punta de una púa de apertura entre el espacio del cristal y el cuerpo del iPad.
-
Jala la protuberancia de plástico de la ventosa para soltar el sellado en vacío y remover la ventosa del conjunto del display.
Could I use some guitar picks? If so, what gauge (thickness) of a picks should I get?
I'm not sure what the correct balance of thickness to strength you'd need, maybe try a couple different types. The idea is to be thin and fit into the smallest gap, but if it gets bogged down in adhesive, it needs to be strong enough to push through. Be sure to use heat and be patient!
i have to use a blow dryer and pack that came with the replacement is there anything i could do to make the adhesive more hot?
-
-
-
Calienta nuevamente y reaplica el iOpener.
-
Déjalo descansar por unos minutos para recalentar el borde izquierdo de la iPad.
Well if you want to save some time and your screen is shattered just pry up one corner either left or right side at the top and tear the whole screen off going down towards the home button but do not completely remove the screen there is a wire connecting the digitizer to the board inside but tearing off the screen will skip you down to step 29 :-) i seen this in a video and saved me about an hour after the fact because my screen was cracking as i was inserting the blue picks so i ripped the whole screen off and used some adhesive remover to get off all the extra goo leftover
-
-
-
Coloca una segunda púa de apertura a lado de la primera y deslízala a lo largo del borde del iPad, soltando el adhsivo sobre la marcha.
I found that all the following step were much easier for me using a heat gun while keeping the pull on the screen with the suction cup. Basically heat up a section, put the suction cup on, keep pulling the screen upwards on that side, while using the heat gun to continuously heat along the side. It came nicely off, one or two inches at a time. Once I had a whole side up, I just put some of the picks in to keep it up and continued along the side, heating, pulling, heating pulling. This obviously only works if the screen is not totally shattered. Mine only had two cracks.
-
-
-
Toma la primer púa que insertaste y deslízala hacia la esquina superior de la iPad.
-
Si puedes ver la punta de la púa de apertura a través del cristal frontal, no te asustes-solo jala la púa hacia afuera un poco. Lo mas probable es que todo este bien, pero trata de evitar esto ya que puede colocar adhesivo en el frontal del LCD el cual es difícil de limpiar.
-
-
-
-
Deja la púa de apertura en el iPad ligeramente pasando la cámara frontal,
-
Toma una segunda púa e insértala a la izquierda de la cámara; donde la primer púa estaba. Deslízala hacia la esquina para quitar por completo el adhesivo restante.
-
Deja la segunda púa en este lugar para prevenir que el adhesivo de la esquina vuelva a sellar mientras se enfría.
-
-
-
Inserta la púa anterior un poco más dentro en el iPad y deslízala lejos de la cámara hacia la esquina.
If you have the LTE there is a cable on the right upper side! There’s no mention of this in this guide even though it’s for the LTE. I found out after the fact when I saw I cut the cable with the pick.
Will Lyon, you may want to look again. This is the guide for the WiFi version.
mcr4u2 -
-
-
-
Inserta una nueva púa de apertura y deslízala hacia el medio del borde superior en el iPad, despegando el adhesivo sobre la marcha,
-
-
-
Deja las púas de apertura en su lugar y re calienta el iOpener.
-
Ajusta el recalentador iOpener en el botón Home del iPad, y déjalo reposar por unos minutos para aflojar el adhesivo debajo del cristal.
For those who are replacing a severely shattered front panel, be aware that there are two smart cover magnets attached to the interior side of the front panel that you will need later. Keep an eye out for them (see steps 49 and 50 below for pictures of what these tiny magnets look like) so that you don't have to go digging through the debris later.
-
-
-
Desliza la púa del lado inferior izquierdo hacia la esquina inferior izquierda para cortar el adhesivo en esa esquina.
-
Deja la púa en la esquina. No palanquees más, y no remuevas la púa del iPad.
-
Antenas
-
Cavidad del botón de inicio
-
Cable digitalizador
-
Los siguientes pasos te indicarán donde hacer palanca para evitar hacer daño a estos componentes. Solo aplica calor y has palanca donde se indique.
-
-
-
Inserta la punta de una de las últimas púas a lado de la púa del paso anterior, y deslízala por debajo del botón de inicio.
-
Inserta la púa mas profundo y trabájala de nuevo hacia el botón de inicio.
Be very careful in the vicinity and to the right of the home button. Only insert the very tip of the pick (similar to the instructions earlier for by the camera). Do not try to go beneath the home but as suggested here, just along the glass edge. I damaged the small metal clip under the button and detached the IC tape from the button, meaning I had to replace the glass touch screen with digitiser and home button.
-
-
-
Una vez que todo el adhesivo se halla separado, abre el cristal frontal como una página de un libro y colócala en tu espacio de trabajo.
-
Si se reutiliza el conjunto del panel frontal durante el montaje, necesitarás reemplazar el adhesivo de tu display. Usa nuestra guia de aplicación de adhesivo de display para reaplicar el adhesivo al display y sellar tu dispositivo.
This picture and several others that follow are not for the "LTE" model.
Some of the steps, including the comments, are replicated between guides. Be aware! This can render them somewhat generic, and possibly non-optimal. For instance, this step is replicated between at least the mini 2 LTE, mini 2 Wi-Fi, mini 3 LTE, & mini 3 Wi-Fi.
ciradrak -
Maybe that’s because this is for the WiFi model.
mcr4u2 -
Remember to remove the old black adhesive from the digitizer and iPad frame. Some can be pulled out and some needs a sharp blade to remove. This will give you room to apply your new adhesive strips when reassembling.
-
-
-
Remueve los siguientes tornillos Phillips #00 que aseguran el LCD:
-
Tres tornillos de 3.3 mm
-
Un tornillo de 4.5 mm
This is VERY IMPORTANT please be sure to put the screws EXACTLY how they were when you removed them otherwise your screen will not rotate when you put the new digitizer on. i closed my ipad thinking everything was ok but now the screen does not automatically rotate, but lucky i jailbroke my ipad first and have an activator gesture to rotate for me :-)
stripped the screws at the home button side of the ipad and the precision screw extractor set is too big to work. help?! paramedic064@gmail.com
We have some great posts on Answers about getting stripped screws out, you can refer to What are your tips/tricks for removing or extracting stripped screws? for advice, or ask a new one and see if someone can come up with new ideas. We also have a stripped screw removal guide for you to check out. Good luck!
This is a tip:
I have a terrible time cleaning the lcd because no matter how hard I try not to touch it, I always get smudges! So take my advice…remove the front film from the new digitizer and place it over the lcd. It is bigger so you can cut it down or just lift it to get to the screws. Now no fingerprints and also less chance for scratches. The front side is easy to clean once it’s installed so need to have that covered while working-the insides are what needs protecting.
-
-
-
Inserta la punta plana de un spudger debajo del LCD, entre este y la placa protectora del LCD y levante gentilmente.
-
Corre una cuerda delgada (como hilo dental o hilo de pesca) bajo la pantalla, comenzando desde la parte superior y luego trabajando hacia abajo
-
Usa una delgada, tarjeta flexible o dinero en plástico para cortar a través del adhesivo empezando desde arriba.
Be very careful not to get the spudger under the shield plate, but between the LCD and the shield. Also, not that on the LTE models, the antennas are at this end and there is a bit of adhesive holding this end of the LCD down.
I have seen countless comments about the LCD breaking when trying to remove it from the LCD shield with adhesive. I have found a simple solution. Once the 4 screws have been removed take a piece of fishing line (longer than the iPad) and simply run it beneath the top of the LCD from one side to the other. Once it's in place, gently pull it down applying equal pressure from both sides. The fishing line will break the adhesive in the process, freeing the LCD. It has worked for me every time.
Thanks for the fishing line suggestion. It certainly worked for me (used 6lb test line). With using the fishing line, one is a lot less likely to break the LCD compared to using a spudger.
rgstout -
awesome tip thanks
Pa Du -
The tutorial procedure should be edited once and for all to instruct to detach the adhesive strip from the top of the LCD prior to attempting to lift it. Failure to do so will invariably result in a broken LCD!!!
The simplest way to do that is to first gently remove the foam strip running around the top of the LCD with a pair of tweezers. Only then will the shiny metallic adhesive tape be visible and accessible.
The LCD is extremely fragile, DO NOT allow it to bend or you will break it. The adhesive near the speakers that connect to the LCD are a danger spot and if you pull wrong you could break the LCD. Be careful.
Yeah, I broke my LCD because the guide did not specify the glue on the top portion if you have an LTE model. I didn’t even try hard at all. I tried to lift it with the plastic spudger and saw that it did not move. Came to check the comments and when I looked back the top corner was already broken.
Thanks iFixit! Awesome guide
Another LCD broken victim. Getting it loose from the adhesive was easy. However, it would not fold over like a book. Something had it bound at the bottom. Heard the dreaded crack. First iFixit fail for me.
-
-
-
Inserte una espátula entre el LCD y la placa protectora del LCD y deslícela al borde mas lejano del iPad.
Hi. I noticed that the tutorial is for an LTE iPad mini 2. However, these pictures do not show and LTE device. I'm having issues removing the LCD from the iPad due to the antenna. Any suggestions? (How to remove antenna?)
This step needs extra detail on how the LCD adhesive should be loosened. I've now got stress marks on the LCD which show up when solid backgrounds are displayed on screen as the LCD flexed when trying to pry it out.
I have seen countless comments about the LCD breaking when trying to remove it from the LCD shield with adhesive. I have found a simple solution. Once the 4 screws have been removed take a piece of fishing line (longer than the iPad) and simply run it beneath the top of the LCD from one side to the other. Once it's in place, gently pull it down applying equal pressure from both sides. The fishing line will break the adhesive in the process, freeing the LCD. It has worked for me every time.
thanks you very much!
ind w -
Great tip about the fishing wire because you will most certainly crack the LCD just yanking it out. Thank you and hit em with the hein
The LCD is extremely fragile, DO NOT allow it to bend or you will break it. The adhesive near the speakers that connect to the LCD are a danger spot and if you pull wrong you could break the LCD. Be careful.
"mild adhesive" is really an understatement.
The LCD is firmly attached to the metal plate below it.
Especially if you try to repair an older ipad, the adhesive gets hard.
Do not attempt to lift the LCD with spudgers in an attempt to get it out.
You will break it.
Use fishing line or some other strong wire to cut loose this adhesive.
Even a strong sewing wire will do (it will take 5~6 wires because sharp edges of the housing will cut the wire easily). -
-
-
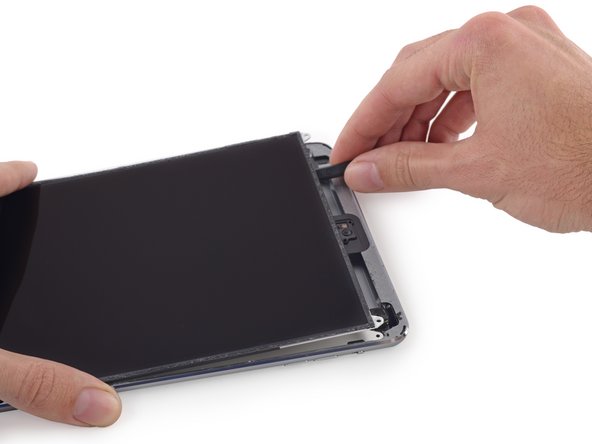
Sostén el LCD con una mano, y la parte trasera del LCD con la otra.
-
Gentilmente jala el LCD de las bocinas para separar la cinta, ten cuidado de no jalar el cable digitalizador.
this was a pain to remove but the two pieces of tape should be separated using your spudger so that you can remove the lcd.
absolutely. lift the screen 45 degrees before pulling it too
The screen was a tight fit in the recess. Whilst maneouvering it out, it flexed a little. Once reassembled, there are now feint stress marks visible when the screen displays a uniform background. With photos it's not noticeable, but on solid backgrounds, it is very noticeable. :-(
Be careful when pulling the LCD out. Any hints for pulling it out safely should be added to this step.
This step is bad advise. Once you get the LCD unglued top and sides, drop those plastic tools behind it to keep it up and apply heat to the front bottom of the LCD where the tape is applied on either side, use your spudger to push the tape away before you attempt to pull or flip the LCD over. It is very easy to break if you don't get the tape loose enough, so do yourself a favor and free the LCD from the tape before you attempt to maneuver it.
I have seen countless comments about the LCD breaking when trying to remove it from the LCD shield with adhesive. I have found a simple solution. Once the 4 screws have been removed take a piece of fishing line (longer than the iPad) and simply run it beneath the top of the LCD from one side to the other. Once it's in place, gently pull it down applying equal pressure from both sides. The fishing line will break the adhesive in the process, freeing the LCD. It has worked for me every time.
As others have said this step is rather problematic and following the tuturial instructions will most definitely lead to damaging the LCD. One problem is that the two adhesive tapes are not indicated in the photo: they are large and black and they are partly covered by long strips of thicker material that looks like padding. To remove them it helps to heat a little with the opener and then one can slowly peel them away by alternating the sharp and flat tips of the spudger.
This must be the most difficult part. I took the advice of using fishing line and it worked a treat. However, due to lack of knowledge - I managed to slice straight through the LCD ribbons (all of them). I figure it was glue so kept going! Please take not that fishing line is only good for the sides, not the top where the LCD is attached! New LCD on order for round 2.
Well. I cracked the LCD during this process, so another $100. But, it’s the journey that counts, right? There is adhesive keeping the LCD attached to the aluminum shield. As I was prying the LCD up (I didn't know about the adhesive), I did hear feint cracking. Also it is too tight to try to flip the LCD over as shown. I did heat the bottom strips, but still tried to do it as shown, more cracking. It seems best to heat it and push the adhesive strips back and separate them prior to lifting. As well as the sides of the LCD for lifting!!
I separated the small tape in the middle (5mm), and the large upper tape (20mm), but left the lower tape at the connector in place. That way, the LCD was much easier to pull away gently and to tilt over.
I used a needle nosed tweezers to remove the tape on the bottom left and right. I then used the plastic spudger and went between the LCD and the metal piece. I gently went down the left side about half way and then the right and slowly and gently worked both sides until they separated.
This step is unclear and should be revised, but Abbot’s comment has the right idea. The tape holding the LCD in place should be highlighted in the image. This tape wraps around the lower edge of the panel and extends onto the front face, then a piece of cushion is attached on top. Heat that tape to soften the adhesive then peal it up. The connector for the LCD is on the back side of the panel in the lower right hand corner, it is not near the tape you are pealing away from the panel. Once the tape is separated very little force is required to shift the panel toward the top of the device as depicted. If you attempt to ‘pull the LCD away from the speakers’ with two hands as shown, it will almost certainly be broken. Also, all the youtube explanations (at least the ones I could find) of how to remove the LCD make it look like you lift up on the top which would only cause the LCD to break. So youtube failed this step as well. It’s not easy, be careful.
P.S. as these steps are replicated between more than one device –– I’m working on an iPad mini 3 LTE, the tape may be in different places on other devices?
ciradrak -
The LCD is extremely fragile, DO NOT allow it to bend or you will break it. The adhesive near the speakers that connect to the LCD are a danger spot and if you pull wrong you could break the LCD. Be careful.
It is MANDATORY to loosen the 3 tapes as well (step 36), don’t even try to lift it without loosening them first!!!! After you did it you can turn the screen without any resistance! Should be added in this guide!!!!
Like other commenters I found this step inadequately treated. The LCD didn't want to fold over like it ought to and It took me a while to decide how to proceed. I would suggest that one first identify the plastic hinge strips. Zoom in on the pics: there's a lot going on at that edge, it's all black, and you don't want to mess with any of the cable strips, etc. I used a hair dryer to loosen the hinges (I suspect one could heat up a small piece of metal bar and place it on the hinges to loosen) and gradually stretched it. I also think that using gloves instead of holding the LCD with bare fingers would help avoid smudging (I spent a bunch of time getting rid of finger marks.)
-
-
-
Desliza la punta de la herramienta plana entre el LCD y la lengüeta de adhesivo para liberar la pantalla.
-
Presiona con cuidado entre las dos lengüetas de adhesivo; ten cuidado de no dañar ninguno de los cables cercanos.
This was harder than it looks. The adhesive tape covers a lot of area and has stuck to it tiny wires that go to the speaker. I had to use the tweezers to very carefully separate the wire from the adhesive, and to then pull the adhesive off the circuit board area in one spot before it would finally come away.
-
-
-
Remueve los 7 tornillos de 1.8 mm Phillips #00 de la placa de protección del LCD.
My LCD shield plate had many more screws than this. You have to remove them all.
My plate had 8 on the upper line, 6 + 2 at bottom. 16 total.
There are strong magnets on the sides and they keep catching the screws as you take them out. Tweezers are helpful to fish them.
At the assembly stage I found it is easier to use Philips PH000 screw driver bit than PH00. It helped me to get these minuscule screws in place, catch the head holes and drive them into their tight position. While using PH00 the driver would not catch the holes in their head and I was risking scratching the display since the screws refused to settle in the openings.
-


Para reemplazar tu dispositivo, sigue estas instrucciones en orden inverso.
Para reemplazar tu dispositivo, sigue estas instrucciones en orden inverso.
Cancelar: No complete esta guía.
2 personas más completaron esta guía.
Un agradecimiento especial a estos traductores:
100%


Estos traductores nos están ayudando a reparar el mundo! ¿Quieres contribuir?
Empezar a traducir ›


Need some extra instruction on how to handle a truly shattered glass. There was only one spot that the suction cup would even hold on the whole screen - top right, and even with tape there is very little structure to drive a pick under. how do you handle that?
Greg Crawford - Contestar