Introducción
Sigue esta guía para sustituir la placa lógica de un iMac 2020 27" 5K.
Algunas fotos de esta guía son de un modelo diferente y pueden contener ligeras discrepancias visuales, pero no afectarán al procedimiento de la guía.
Para quitar la pantalla de la iMac Intel 27" Retina 5K Display 2020 es necesario cortar el adhesivo con una herramienta de apertura especializada para iMac. Una vez que hayas completado la reparación, deberás seguir nuestra guia de adhesivo de pantalla para raspar el adhesivo antiguo y reemplázalo con nuevas tiras adhesivas de doble cara.
Antes de empezar a trabajar en el iMac: Desenchufa el ordenador y mantén pulsado el botón de encendido durante diez segundos para descargar los condensadores de la fuente de alimentación.
Ten mucho cuidado de no tocar los cables de los condensadores ni las soldaduras de la parte posterior de la fuente de alimentación.
Qué necesitas
-
-
Con la bisagra libre para moverse, la iMac estará desequilibrada y será difícil trabajar en ella. Coloca una cuña de servicio en el soporte para estabilizar la iMac.
-
Si utilizas la cuña de servicio de cartón iFixit, sigue estas instrucciones de montaje para armarla.
-
-
-
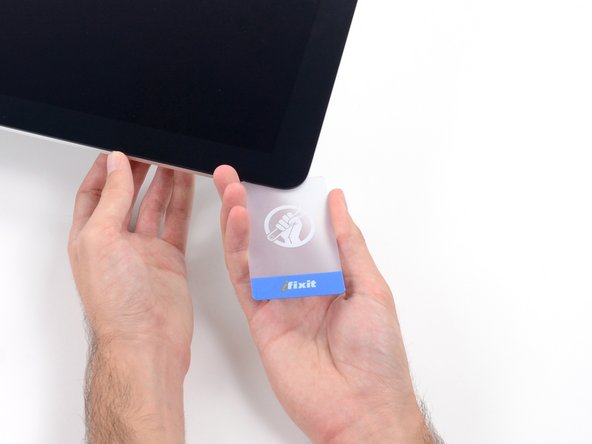
Desde la la izquierda de la pantalla, cerca del botón de encendido, inserta la herramienta de apertura de la iMac en el hueco entre el panel de cristal y la carcasa posterior.
-
-
-
Usa la herramienta como un cortador de pizza, pásala por el hueco y cortará el adhesivo de espuma por el centro.
-
Pasa la herramienta por el lado izquierdo de la pantalla.
-
-
-
Continúa pasando la rueda alrededor de la esquina superior izquierda.
-
-
-
Con las tarjetas insertadas como se muestra cerca de las esquinas, gira suavemente las tarjetas para aumentar el espacio entre la pantalla y la caja.
-
Si hay alguna sección que parece pegarse y no se separa, deje de retorcer y use una de las tarjetas para cortar el adhesivo en el área del problema.
-
Comienza a levantar la parte superior de la pantalla del marco.
-
-
-
-
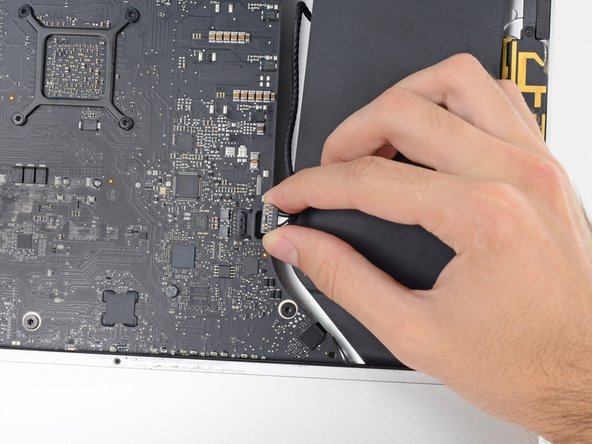
Mientras sostienes la pantalla con una mano, usa la otra para desenchufar el cable de alimentación de la pantalla.
This is not a picture of the 2019 model. On the 2019, the cable is angled and very close to a metal part that looks like it could be a wireless card. This makes it difficult to squeeze in the edges required to release the cable. I was able to unfasten it using my fingernail, doing one side at a time.
Same issue. You can't just pull it out. I used a plastic "spudger" to push the clips in. The photo here shows where to press
https://www.icloud.com/sharedalbum/#B0qG...
See also my comment in step 20
-
-
-
Levanta el soporte metálico de retención del cable de datos de la pantalla.
-
Desconecta el cable de datos de la pantalla.
on the 2020 model there is also a connector from the camera that is connected ted to the screen.
This isn't the photo of my IMac 27 2019.
To remove this clip, lift up the plastic tag sticking down & the metal clip will lift too
-
-
-
Agarra la pequeña pestaña al final de una de las tiras adhesivas de la pantalla del borde inferior y tira del adhesivo hacia la parte superior de la iMac para quitarlo
-
Repita este paso con la otra tira adhesiva y quítala.
-
-
-
Levanta la pantalla del marco y sácala del iMac. Coloca la pantalla boca abajo sobre una superficie plana y suave.
-
Puede que sea necesario levantarla lentamente por un lado, para despegar el adhesivo restante.
-
-
-
Utiliza un destornillador Phillips para quitar los nueve tornillos de 3,2 mm que sujetan el brazo de soporte.
-
Es posible que tengas que despegar el adhesivo de la pantalla que recubre el borde inferior de la carcasa del iMac para acceder a los tornillos.
I did not find it necessary to remove these screws and this bar
-
-
-
Retira el brazo de soporte inferior (también conocido como "correa para la barbilla") de la carcasa del iMac.
No comments on this ?
It's quite possibly the most difficult part to put back in the entire process
The screws are tiny and the there is no easy way to line up the holes on the bracket with the screws
Having got this far - it wasn't even all that necessary to remove this part in the first place
Severe pain in the neck
With the right tools and technique, the bracket can easily be replaced in under a couple of minutes.
Use a screwdriver with a magnetized tip which frees up one hand and place a screw on the tip first.
Then line up the screw hole on just one end of the bracket and using a pair of tweezers from the side, hold the bracket in place while you put in the screw.
Next, do the same on the other end of the bracket. After that, all of the screws in the middle are quick to replace. I didn't really have to touch the bracket again after the end screws were in place.
Hope that helps someone else since removing this bracket does make later steps a bit easier.
-
-
-
Quita los dos tornillos T10 de 10 mm.
I found i didn’t need to remove the speaker nor the hard drive. In fact I managed to remove the old PSU without even removing the chin strap. However, to install the replacement PSU, I had to remove the chin strap. So I would say, remove the chin strap, but you can optionally leave the speaker and hard drive in.
While you do not need to fully remove the screws as once you loosen them a few turns the speaker becomes free. I found that after the removal of the speaker, I turned it over and popped the screws out as this made it easier to replace it later as I could see the alignment before putting the screws back in. If not you may be off a little and you do not want to force the screw back in.
I used a pill container that I got from Walgreens to hold all of the fasteners I removed during the disassembly process. The container has 14 compartments (individual compartments for each morning and evening of the week). I put a small piece of paper in the compartment with the fasteners to note the name and step of the procedure and the size of the tool I used. Hopefully this will be useful when I go to put it back together again.
-
-
-
Desconecta el cable del altavoz izquierdo tirando de él hacia arriba y sacándolo de su zócalo en la placa base.
-
Retire el cable a través del espacio entre el disco duro y la placa base.
I didn’t unplug and de-route this cable. Later, Step 29, has you remove the left speaker. This isn’t necessary. If you can just move the speaker over to expose the hard drive mounting screws, so if you’re not going to remove the speaker, you don’t need to unplug it.
-
-
-
Usa un spudger para desconectar la conexión del botón de encendido de su ranura en la placa base.
there is no need to disconnect the speaker, just unscrew it and move aside slightly to reach the HDD screws (about 5mm) - if you want to replace just the main HDD
Take note of exactly what direction this tiny little wire was.
The connector has a plain black side and the other side you can see the 2 silver connectors.. the side you can see the 2 silver connectors faces the front.. the plain side is to the back/against the logic board.
If I leave my iMac unplugged for an extended period, say 24 or 48 hours, is it still possible to get an electric shock from the PSU? Do the capacitors eventually discharge?
you can do this method, or just wear latex gloves.
make sure you’ve actually unplugged the mac when running this cable, and not had it plugged in to test the diagnostic LEDs, because one of those wee silver spots is carrying 230v, and its 6mm away from the place the cable runs, So if you have fat fingers like mine, that’s a free wake up zap
-
-
-
Levanta el altavoz izquierdo, hasta que puedas ver el cable del botón de encendido (unos 1.2 cm).
This is MUCH easier to do if the support bracket along the bottom is removed first. See Reemplazo de Placa Lógica del iMac Intel 21.5" Retina 4K Display (2017) step 25.
Use a P00.
To replace it, introduce it like in the photo at the link to be able to hold the right most holes of the chassis and bracket. Replace the first screw, align the bracket to the horizontal and add the screws from right to left. Each one will bring up the next hole in the bracket close enough to screw through. Reverse those directions if you are a leftie.
-
-
-
Desconecta con cuidado el cable del botón de encendido de su muesca en el altavoz izquierdo.
Pay attention: if pulling out the loudspeaker tear off the wire of the power button, Apple have not any service parts except for the whole rear housing!
This is MUCH easier to do if the support bracket along the bottom is removed first. See Reemplazo de Placa Lógica del iMac Intel 21.5" Retina 4K Display (2017) step 25.
Use a P00.
To replace it, introduce it like in the photo at the link to be able to hold the right most holes of the chassis and bracket. Replace the first screw, align the bracket to the horizontal and add the screws from right to left. Each one will bring up the next hole in the bracket close enough to screw through. Reverse those directions if you are a leftie.
-
-
-
Levanta el altavoz izquierdo y sepáralo del iMac.
-
Empuja desde el terminal del conector, a la vez que tiras desde el terminal del altavoz, para ajustar el cable bajo la ranura de sujeción correcta del disco duro.
I found it wasn't necessary to remove the speaker from the left side to remove the hard drive. You can remove the screws, and then slide it over to the left — giving more than enough room to access the hard drive.
me too. don't need to remove it if you only want to change the hd
Agreed, wast of time to fully remove the speaker.
easier to remove the speakers if you unscrew the front ‘chin strap’ - 6/9 phillips screws that you can see in the picture hold that aluminum piece in place
Agree. This is MUCH easier to do if the support bracket along the bottom is removed first. See Reemplazo de Placa Lógica del iMac Intel 21.5" Retina 4K Display (2017) step 25.
Use a P00.
To replace it, introduce it like in the photo at the link to be able to hold the right most holes of the chassis and bracket. Replace the first screw, align the bracket to the horizontal and add the screws from right to left. Each one will bring up the next hole in the bracket close enough to screw through. Reverse those directions if you are a leftie.
-
-
-
Desconecta el cable de control de la fuente de alimentación de la propia fuente.
I found this cable very difficult to disconnect, be very careful because the cable is between a black tape and it's stuck very hard to the logic board and the cable is very short and you don't have space to move and separate it from the connection! Be patient and take the time you need
I found than putting the flat end of the spudger at the center of the cable, and tilting it got the cable out without an issue.
I was able to use the flat end of the spudger on the sides. You can see a tiny little clip on each side. Be very gentle!
These connectors seem pretty tough to remove until one understands the latch. Each side of the plug are two little sprung tabs (the tab is part of the spring clip which runs down the side of the plug on each side - makes sense once you see the removed plug!). Squeeze them in towards each other and then gently pull the plug from the socket. No great force, or even the spudger, needed once that is done.
One more tip, has worked on other cables for me. Fish the skinniest spudger tip you have under the cable, and with a finger of your other hand put opposite pressure on the cable against the spudger and gently work it out
If u are right handed, i can recomend to use your index left nail to press de bottom sprung, and a flat spudger on the right hand, came off so easy
If you have a insulated long nose pliers along with a splugger and can get underneath the cable WITH the long nose pliers on the RIGHT side of the cable, towards the logic board, with the splugger on the LEFT Side of the cable doing the same, you can get the leverage to GENTLY pull this cable out very easily.
-
-
-
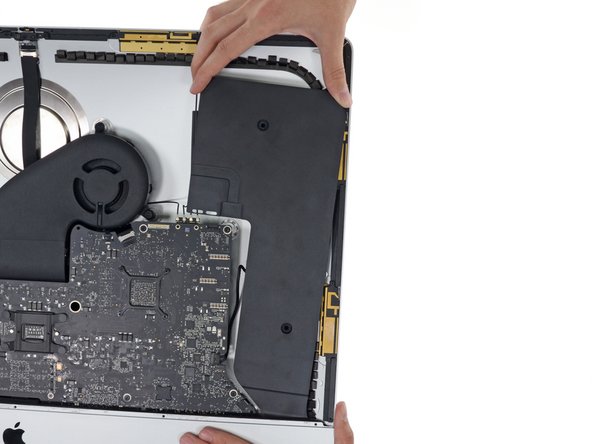
Mueve la placa de la fuente de alimentación hacia el borde izquierdo de la caja y hacia arriba para liberarla de la muesca en la placa lógica.
This is MUCH easier to do if the support bracket along the bottom is removed first. See Reemplazo de Placa Lógica del iMac Intel 21.5" Retina 4K Display (2017) step 25.
Use a P00.
To replace it, introduce it like in the photo at the link to be able to hold the right most holes of the chassis and bracket. Replace the first screw, align the bracket to the horizontal and add the screws from right to left. Each one will bring up the next hole in the bracket close enough to screw through. Reverse those directions if you are a leftie.
The top right screw on the power supply actually screws into a stand-off screw connected to the back of the iMac case. Once you have removed the 4 x Torx 8 or 10 screws you can move the power supply enough to see the upper face of it.
It has a Torx 25 slot in it and comes out easily. This will give you a lot more room for your fingers in Step 40, depressing the tab on the DC power cable connector to pull it out, and when replacing it on reassembly. You may find it won’t require you removing the support bracket as in the suggestion above.
-
-
-
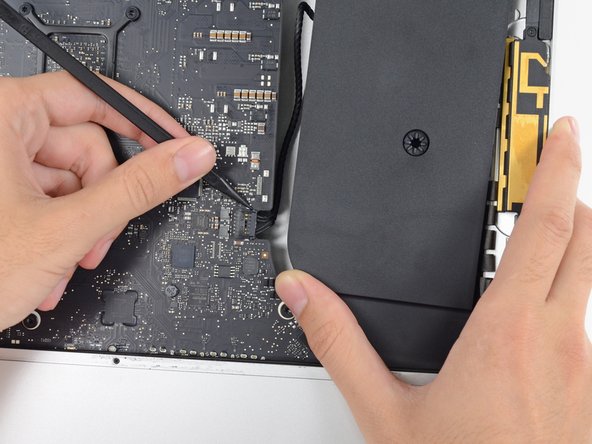
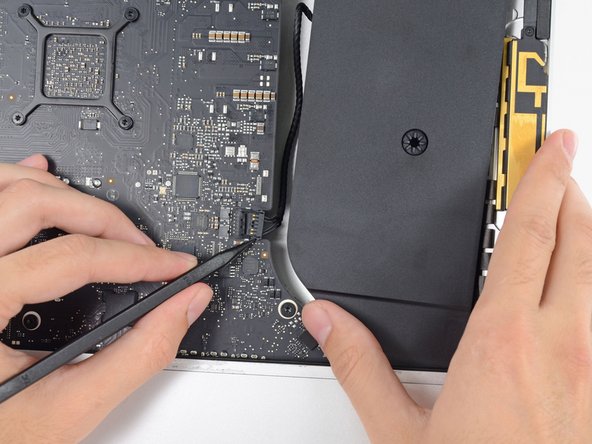
Presiona la pestaña del conector del cable de alimentación de CC, luego extráela de su zócalo en la parte posterior de la placa lógica.
-
Si el cable es demasiado difícil de desconectar, puedes quitar la placa de fuente de alimentación y la placa base juntas.
Remember to push in the disconnect tab on the large connector. Carefully insert your finger and push on the tab before you pull on the connector.
Thank you Manuel, this was a tricky one.
Yes, I pulled the whole socket out because I didn’t know about the tab. Fortunately I was able to place it back in. Not sure if it was glued or how it was anchored but it seems to have a solid connection and I can’t easily pull it out by hand. Once I plug the power cable back in should be ok.
This connector was very difficult for me to remove (even after pushing the disconnect tab). Eventually I had to use a pair of needle nose pliers to wiggle it back and forth out of the socket. A lot of the cables on the my late 2015 model were very tight and a struggle to get out.
I'm struggling with this step. I presume that the tab to which you are referring is behind the connector. I can see a plastic protrusion there but it does not move when I push it. Just to get my finger behind it requires the power board to be moved quite a bit btw.
i could not get it out by the force of my fingers, so what i did was slightly turn the imac 90 degrees so i could reach the area better, push up (so, vertically) the power control board, push in the tab on the bottom of the connector with my right hand, and slightly wiggle the connector out of its socket with a plier
Left index finger pushing on the tab from behind the connector, using needle pliers in right hand to rock up & down did the trick thanks @starfleet_tone
Just be careful! I’ve seen two systems where the socket was pulled fully off! So the logic board then needs repairs or replacing being just a bit too aggressive!
Dan -
Needle nose and wiggling worked for us too. We were stuggling like heck with it when just using hands!
This is MUCH easier to do if the support bracket along the bottom is removed first - more space to angle the board upwards. See Reemplazo de Placa Lógica del iMac Intel 21.5" Retina 4K Display (2017) step 25.
Use a P00.
To replace it, introduce it like in the photo at the link to be able to hold the right most holes of the chassis and bracket. Replace the first screw, align the bracket to the horizontal and add the screws from right to left. Each one will bring up the next hole in the bracket close enough to screw through. Reverse those directions if you are a leftie.
I did as Andrew Gough did, per other videos reviewed. Removed it right away. Just makes things easier, more space for just a few screws :)
The top right screw on the power supply actually screws into a stand-off screw connected to the back of the iMac case. Once you have removed the 4 x Torx 8 or 10 screws you can move the power supply enough to see the upper face of it.
It has a Torx 25 slot in it and comes out easily. This will give you a lot more room for your fingers in Step 40, depressing the tab on the DC power cable connector to pull it out, and when replacing it on reassembly. You may find it won’t require you removing the support bracket as in the suggestion above.
I used your suggestion to remove the stand-off and then used my left hand index finger to press the tab while rocking the connector side to side with a needle nose pliers. Plug came out easily.
The tab is a pain in the a$$$ to get your finger in there. I was so horrified at the size of the capacitors that I put on gloves to reduce any amount of shock :-) . To get it loose I would pull out carefully the power board as far as I could than I wedge my index finger under and press the tab and slowly pull until I saw a slight gap between the end of the socket and the plug. I than place the flat part of the black spudger or blue one into the gap and use as it as a wedge to help move the plug forward as I kept the tab pressed.
-
-
-
Voltea la parte superior de la fuente de alimentación hacia ti, como abrir un buzón, para revelar el conector del cable de entrada de CA.
-
Desconecta el conector del cable de entrada de CA.
To reassemble, do the same in reverse but keep power supply board more upright than slanted down when re-inserting it in to the lower right corner. The lower right screw post has an protrusion under/behind it and the Power Supply's small 2 wire plug must fit between the front of your Mac and the obstruction. Then it just slides right in and then screw it down.
Wear gloves when doing this to reduce any shock. The size of those capacitors are very unnerving and scary. Also those solder joints.
-
-
-
Retira dos tornillos T8 de 9,8 mm.
I had one shorter one screw, and one screw shorter than the other two equal size speaker screws, but longer than the stubby screw. :) And I can confirm that these are T10s.
-
-
-
Usa la punta de un spudger para desconectar el conector del cable del ventilador de su zócalo en la placa lógica.
-
-
-
Quita el ventilador del iMac.
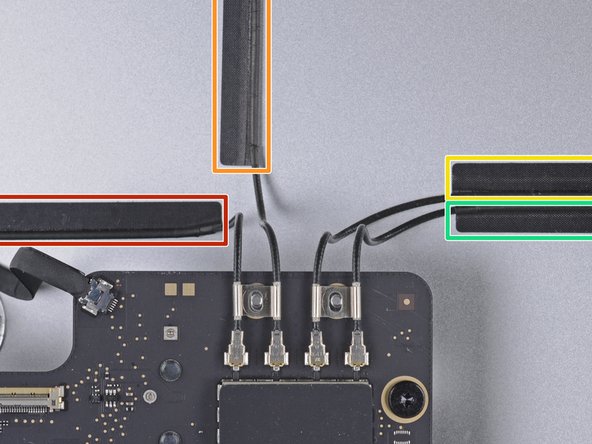
Use a piece of tape around the antenna cables to keep them in the same order, makes reassembly a little easier.
-
-
-
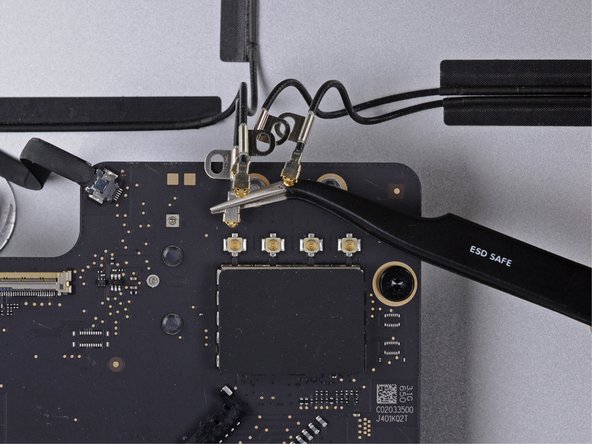
Utiliza un destornillador Torx T5 para quitar los dos tornillos de 4 mm que sujetan los cables de la antena AirPort/Bluetooth.
-
-
-
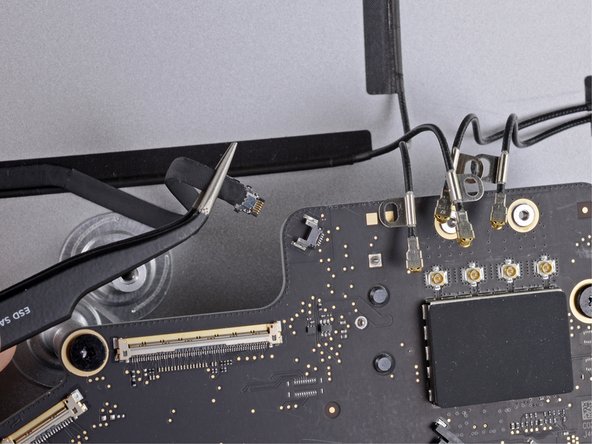
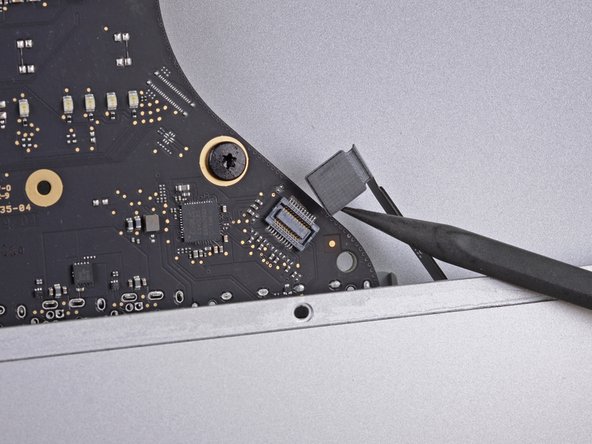
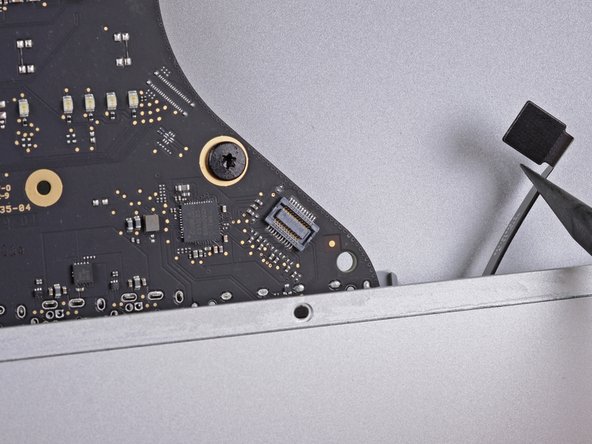
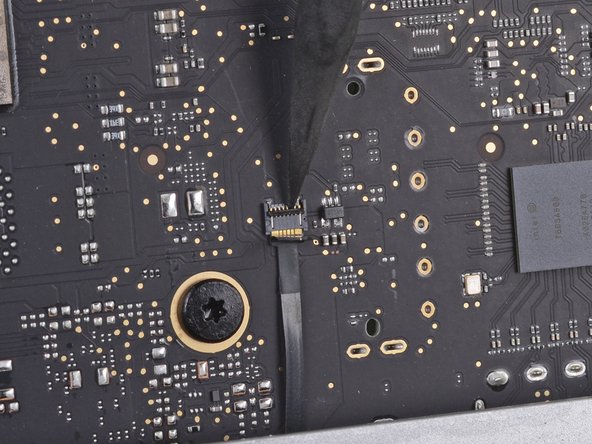
Utiliza la punta de un spudger para abrir la solapa de sujeción del zócalo ZIF del cable de cinta del micrófono.
-
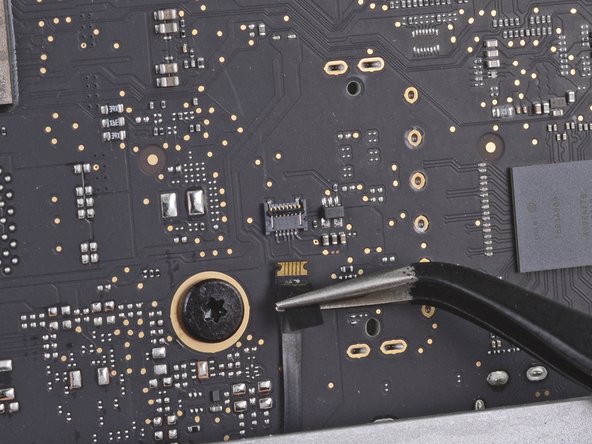
Utiliza unas pinzas para tirar suavemente del cable de cinta del micrófono y sacarlo recto de su conector.
-
-
-
Retira los siguientes tornillos que sujetan la placa lógica:
-
Dos tornillos T8 de 23,7 mm
-
Un tornillo separador T25 de 20,1 mm
-
Un tornillo T8 de 17,6 mm
-
Un tornillo T8 de 7,2 mm
-
Tres tornillos T8 de 7,1 mm
-
Un tornillo cautivo T8
-


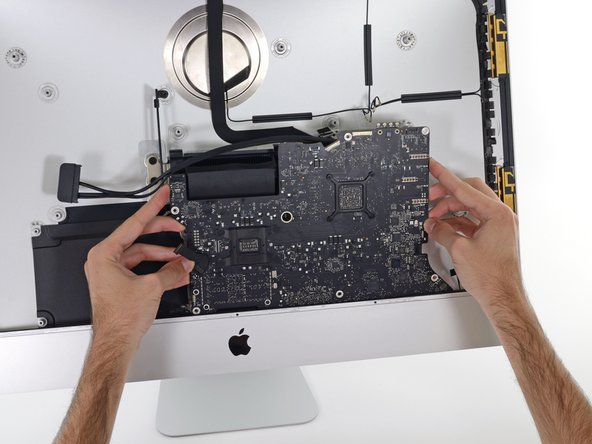
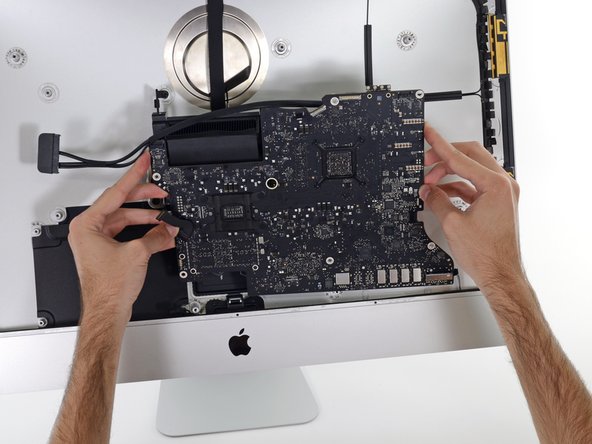


Compara la nueva pieza de repuesto con la pieza original; es posible que tengas que transferir los componentes restantes o retirar los adhesivos de la nueva pieza antes de instalarla.
Para volver a montar el dispositivo, siguw los pasos anteriores en orden inverso.
Lleva tus residuos electrónicos a un centro de reciclaje certificado.
¿La reparación no ha ido según lo previsto? Consulta nuestra Comunidad de respuestas para solucionar problemas.
Cancelar: No complete esta guía.
2 personas más completaron esta guía.
Un agradecimiento especial a estos traductores:
100%


Estos traductores nos están ayudando a reparar el mundo! ¿Quieres contribuir?
Empezar a traducir ›

6 comentarios
Are these really pictures of a 2020? I don’t think Apple ever sold any of the 2020 units with a rotational hard drive.
Correct, this is not a 2020 27-Inch iMac.
I tested the procedure and found that these iMacs were similar enough that reshooting photos was not necessary. As noted in the introduction, some photos in this guide are from a different model and may contain slight visual discrepancies, but they won't affect the guide procedure.
Is this the same procedure for replacing the logic board on a Mid-2017 iMac? That page doesn't have a repair guide for logic board replacement.