Introducción
Cambiar el disco duro requiere separar la pantalla y quitar el altavoz izquierdo.
Esta guía también incluye pasos para actualizar el disco duro de tu iMac con un SSD. Describe cómo instalar el sensor de temperatura del SSD para que los ventiladores de la Mac funcionen a la velocidad correcta.
Antes de comenzar cualquier trabajo en tu iMac: Desenchufa el ordenador y mantén presionado el botón de encendido durante diez segundos para descargar los condensadores de la fuente de alimentación.
Ten mucho cuidado de no tocar los cables del condensador o cualquier junta de soldadura expuesta en la parte posterior de la fuente de alimentación.
Qué necesitas
-
-
Con la bisagra libre para moverse, el iMac estará desequilibrado y será difícil de trabajar en él. Las reparaciones se pueden completar con el iMac desequilibrado, pero son más rápidas y fáciles con una cuña de servicio iMac.
-
Si estás usando la tarjeta de servicio de iFixit, sigue estas instrucciones de montaje para armarlo.
-
-
-
Comenzando a la izquierda de la pantalla, cerca del botón de encendido, inserta la herramienta de apertura iMac en el espacio entre el panel de vidrio y la carcasa trasera.
Would a heat gun make this step easier? Or damage the iMac?
A heat gun wouldn’t help you here as you still need to cut though the adhesive. You also risk damaging the display with the excessive heat.
Dan -
Removing the original adhesive is easier than removing newly applied adhesive (e.g., if you have to reopen iMac). If you should happen to need to reopen the iMac, please use extreme caution and highly consider my suggestions below.
When using the pizza cutter tool, do the first few steps in reverse starting with step 8. Starting on the left side is better since this is where the adhesive is narrowest. The right side has two antennas and the top right has one, see the pictures for step 18-21, they are the brass colored metal rectangles near the edges. The adhesive on these pieces are wider and therefore have more holding power. The thickness of the pizza cutter tool is enough to crack the glass.
Continuing from my previous comment. To remove the adhesive on the right side you’ll need to create a very slight gap to give the pizza cutter some more room. Do this by cutting the adhesive on the left side up and around to the camera. Before attempting to cut the right side. Carefully slide the plastic cards (I purchased two sets) to ensure the adhesive on the left top and side is completely free. Now slowly move towards the right side. After every inch or two of removing new adhesive, slide the card over to create this slight gap. Be careful to not move the card too close to where the adhesive has not been cut. You want to create a very slight gap without creating too much pressure. Use extra caution with approaching the areas where the antenna are since the adhesive is stronger here and will need some additional cutting. Follow this approach all the way around the right side. Be careful to not create too much pressure at any one time. Good Luck!.
I can confirm with Walter - trying to remove freshly applied adhesive is WAAAAY harder! My pizza cutter didn’t work correctly (the circle became a rectangle!) and I ended up with a small crack on the left of my screen. Dang it!
I would highly, highly, highly recommend AGAINST doing this at home. I followed these instructions to a T, and still somehow managed to have the screen not be able to turn on after the hard drive replacement. Then, once you’ve opened your Mac yourself, Apple will refuse to fix anything on the computer, and even other third party, Apple-authorized repair facility will refuse to repair it for you, and you will have to locate a non-authorized Apple repair facility. There, I am having to pay ~$600 to fix things that got screwed up, even though I followed the instructions here to a T, step by step, and did everything slowly and methodically.
Beware, if you’ve never done this before, that be locked out of ever being able to use an Apple repair facility, or Apple-authorized repair facility, if you mess things up here now.
I performed this on a Late 2015 iMac and there weren’t any significant differences to these steps, but I did find the repair to be nerve-wracking. My model cost nearly $3,000 and about 10 steps into this guide (which I did fully read ahead of time) I was thinking, “what have I got myself into?” But I didn’t rush and happily I’m typing this on my repaired iMac! I found a video from OWC that was more useful than the photos in this guide for certain steps: https://vimeo.com/139364064
Don’t know if you are still around, but THANK YOU for posting this video! The video made it seem SO NOT SCARY and, in conjunction with the photos and comments and tips on this guide, was a lifesaver. Big thumbs up.
First impressions so far: yes it can be a bit nerve wrecking if it is your first time doing this sort of thing and even with lots of experience with a 2011 model it’s still a bit unsettling haha (nervous laughter).
What I recommend: use a guitar pick to start cutting the glue. You’ll need a bit of pressure so do just the tip.
Once you’ve done the whole perimeter (minus bottom) do it again but now it should be easier to go deeper so go very slow and careful. Then get the old suction cups used to open older models and start lifting the display very carefully to see where it’s still glued and cut those as well.
Then you should be done and now the real fun begins! :D
It’s ridiculous. Apple should pay for doing this. Like glue parts together to block a repair / make difficult. I smashed my iMac. FU Apple. Seriously, every product I owned had hardware issues. For example, bad solder joints. Never again Apple. I’m happy with Windows and in 2018 / 2019 there are many other manufacturers with high quality stuff. Apple is dying, if they do not change …
NOTE: I followed every step word for word, but the adhesive strips supplied are as bad as double sided tape. Within 48hours the screen had slipped off and cracked. Now I need to fork out for a new screen and try again.
Not sure what to try next time with strips? Perhaps a bit of glue to help hold it??
Where do i get the “iMac Opening Tool?” its neither in the list of tools nor could i find it on the tool page.
Hi @snappadoodle! The opening tool is included in the adhesive kit included in the tool list, but you can purchase it separately here.
After disconnecting the power cord and before cutting the panel adhesive, push and hold the power button for 10 seconds. This will discharge the power supply capacitors. In case you accidentally touch the solder joints on the board, you won't be shocked and drop the panel.
Bottom line: This repair seems to have worked (so far no more intermittent shut-downs). Thanks iFixit!
As a novice who fully expected to destroy the display or worse, I make the following recommendations: (1) Before you start, read the steps several (many) times; visualize doing them and imagine how things could go wrong; (2) Read all the comments—there were some really helpful tips—like simply displacing the left speaker rather than fully removing it; (3) Get the recommended tools*; and (4) take your time—if you start to feel frustrated—seriously, stop and take a calming breath. Time is your friend. Failure is not an option.
*I would add a 3-prong parts puller to the tool list—it’s great for pulling and starting loose screws so you don’t drop them down into the chassis like I did. It’s also great for retrieving the screws you’ve dropped into the chassis.
Hi brad, what exactly did you repair to stop the shutdowns? I’m having the same issue
merinian -
Merinian: I replaced the power supply and it’s still working fine at this late date. No more intermittent shut-downs. Fingers still crossed!
Thank you very much for the instructive tutorial. I just successfully replaced the hard drive on my 2012 iMac 27. I used a disposable surgical scalpel 15 blade, and locked the blade extending 9 mm from the scalpel shaft using office tape. I used regular double sided tape to reattach the screen. I cut the strips using the scalpel. I have no previous computer experience and this is the first time I replaced a computer part. This was easy and fun.
Filip Dolatowski - Friday 11th Dec 2020
You are very lucky! I’ve had three systems come in which someone did the exact same thing! All three cut the display ribbon cables. Please don’t use surgical knifes or any other knife! Use the proper tool the special pizza cutter wheel designed for the task.
.
You likely spent more on the knifes than what the wheel cost with the correct tapes. You make the next time doubly hard to open not using the correct tapes! Hows the built in microphone? You may have messed it up.
Dan -
Thank you very much for the tutorial. You are the best!
After reading all the post here I almost gave up doing this on my own. But I did it anyway and was succesful. I would recommend everyone to use the rollcutter. There is no risk of harming the screen if you use it. And in my case it was enough to open the imac. If you do not harm the screen connector or the screen the biggest part is done. It gets easier once you`ve stacked your screen somewhere safe. The parts inside are mostely not as delicate as the heavy and expensive screen!
Take your time and work carefully. It is definitely doable!
I found the cutter tool that came with my kit to work just fine. The wheel is extremely thin and I had no problem inserting the wheel to begin cutting. I follow the guide for the most part but took my time and use the cutting wheel slowly and then repeated the process a few times. Once I was able to pry the screen back about an inch I used the other end of the tool to cut additional adhesive that was still clinging to the body of the iMac and the screen. Having just replaced the power supply, and having my iMac running again, I do not think I will use the adhesive strips to reattach the screen. The screen fit back in place no problem which I did to test my Mac. Because the iMac screen sits at an angle I am quite comfortable that the screen is not gonna fall off. Also while having a screen off I was able to clean the inside of the Mac of dust buildup. I think I will only use the adhesive strips down the road if I’m gonna sell the Mac, which means I can give it a good clean before securing the screen.
If the screen falls off (which it will do!) it will damage the parts which would be a lot more expensive! PLEASE get the correct tapes and properly mount the screen back on.
Think of it this way how many people have shot them selves with a gun not realizing it was loaded or set to go off!
Dan -
I think Dan is right as I decided it best to complete the process with the adhesive tapes to secure the screen. I just took some time to do a complete clean of the interior before sealing the display.
Ordered the full kit to replace my busted 3TB disc hard drive. All the tools work and are excellent. These pictorial and instructional install videos are complete, easy to use, and have good imagery. The 2TB SSD installed exactly as depicted. I used some 3M double sided automotive emblem tape to stick adapter to iMac case, no probs there. The adhesive strips also worked fine and stick firmly. Screen is solidly mounted, no falling out here. IFixit is awesome and this kit saved my over $1200 in getting another iMac. Highly recommended.
-
-
-
Use la herramienta como un cortador de pizza: gíralo a lo largo del espacio y cortará el adhesivo de espuma a través del centro.
-
Ejecuta la herramienta hacia arriba a lo largo del lado izquierdo de la pantalla.
In my experience the cutter also worked very well for cutting the original adhesive. Unfortunately when I was reinstalling the display with the new adhesive strips, somehow the display power connector came loose. I had to open the display a second time and the cutter was not as effective against the new adhesive. I managed to break the cutter tool plastic wheel and cause a few small cracks in the edge of the displays glass as I worked! Be careful and go slowly!
The cutting tool worked great until I accidentally twisted it a bit while rounding a corner. A chunk of the wheel snapped off, making the rest of the job quite a bit more challenging. Just make sure you are keeping the tool directly parallel with the screen.
I concur, opening the screen a 2nd time is considerably more difficult because the adhesive strips are thinner than the original, which makes getting the cutting tool inserted much more difficult….as a result unknowingly I elongated a small crack to a much longer crack and somehow, the LCD now has a wide grey strip from top to bottom….The first time opening was easy, second time resulted in a ruined screen.. The cost of. a replacement LCD is the same has replacing the entire computer….I would recommend anyone attempting to remove the screen for any reason, do not use the aftermarket adhesive strips if you ever intend to open it up; again, or cut the strips much shorter, or possibly use a few pieces of scotch tape or similar to hold the screen in place….since the screen tilts back, this should not be a problem…Good luck…
-
-
-
Corta el adhesivo a lo largo de la esquina superior izquierda de la pantalla.
The pizza cutter will sink in all the way to the tool handle when the adhesive is full cut, but don’t feel you have to do this in one motion. Some parts cut easier and some require a lot (like 20x) of gentle back and forth.
-
-
-
Continúa por la parte superior de la pantalla.
I measured a depth several positions.
- About 6 centimeters near iSight Camera center, you must no use iMac opening tool, because iSight element exists.
- iMac opening tool has a 9mm radius, so it may break iSight camera element.
- Making a plastic card stacking 2 or 3 to 3mm, under the iMac opening tool, that makes inserting a gap 5~6mm like below.
@. iMac opening tool
====== plastic card3 (credit card 1mm)
====== plastic card2 (1mm)
====== platic card1. (1mm)
———————————————— isight camera element (total 5~6cm) ————
In my case, i got a display problem where lcd display yellow connector was torn without care.
Be helpful.
-
-
-
Finalice empujando la herramienta de apertura hacia la parte inferior del lado derecho de la pantalla.
I didn’t have the fancy cutter or cards. So I used my actual pizza cutter. Followed directions just the same, and it easily cut through the adhesive w/o issues or marring the surfaces. Actually used it to rock back and forth to lift the screen. It’s all about taking your time. I rolled it back and further until cut thru. The 3/8 to 1/4 inch is right, but the screen framing actually prevents further depth unless you force it further. The adhesive actually protected the glass while cutting thru, so no damage. Great instructions, but where to get the replacement adhesive to reinstall?? Should be four independent strips.
You are very lucky you didn't cut to deep! The plastic cutter that's in the kit is the only thing I would use. Spending a few bucks on a tool is a lot cheaper than $500 for a new display!
Please don't use a real pizza cutter!
Dan -
-
-
-
Coloca el iMac boca arriba en una mesa.
-
Comenzando desde la esquina superior derecha del iMac, inserta una tarjeta de plástico entre la pantalla y el marco.
I actually DESTROYED my display (black vertical strips) by pushing the card in a bit TOO DEEP. So it is REALLY important to insert the card only a bit (1-2mm) more than the cutter wheel, in particular at the top side, where many flat cables connect the panel with the PCB. These can be damaged very easily!
Same thing with me…. Pushed cards to far…. new panel needed…€600…..
i think ifixit needs to place a bigger caveat, as I have missed it the first time
i successfully upgraded two imacs. one opened with ifixit pizza knife and another with a regular paper knife. however, when i had to open the first one once again i broke its screen glass. it seems ifixit adhesive strips are too strong. next time i’ll try to use heater to weaken glue tension.
I broke one too. And even if you think you did it correctly, you’ll not be able to see where you might have gone too far. You would think it’s very protected behind that metal plate, but no. Take special care with this offence to “right to repair” This should have been designed WAY better. I mean replacing a hardrive that is very likely to fail over the course of time, or even a simple desire to upgrade to an ssd!.
Bummer
HINT: If you turn the card and use the blue part of it, then you can avoid going to deep: no further then the blue part …
On the cards I got with my iFixit kit, the blue part was way bigger than 9.5mm — closer to 20mm!
I made a line 9mm from the edge of each of my cards and used that as a guide.
I’m thinking I might just use vinyl tape to keep the screen in place for at least a little while after an upgrade. The extra strength of the replacement tape sounds scary.
I wrapped two layers of vinyl electrical tape around the short side of an old gift card 3/8” from the edge. This “stop" prevented the card from going in too far. The card really helps to break the panel free.
This is a good tip!
Great idea! Wish I had read this before doing it. My less then optimal solution was to draw lines 3/8” around the cards, not as safe as your fix, but fast.
surely the card should have been designed such not to go further than certain distance with a barrier band.
The cards don’t have any means to control the depth, its your skills which control it. Its no different from how you use a knife to cut your chicken up when you serve it for dinner.
Dan -
The pizza roller tool is enough to cut through the adhesive. You dont need to cut in a lot further. So the cards are really not necessary.
You need the pizza cutter! The cards are used to hold the display off of the case frame.
As for as using old credit cards and useless ID cards sure they will work. I wouldn’t use anything important ;-}
Dan -
No problems. I used two old credit cards and marked out a line using permanent marker so it was at the same depth as stipulated on this page. I even pushed it in a little deeper and no issues.
-
-
-
Gira suavemente la tarjeta de plástico para abrir el espacio entre la pantalla y el marco, y corta cualquier resto de adhesivo en la esquina.
My children tend to collect cards like this from hotels, Disneyland, old IDs, iTunes cards, gift cards etc. They came in handy for this step. After wedging in the first card into the left corner, I wedged the left corner, then added cards along the bottom edge. Finally I continued to push in additional cards to existing cards and found that this created a smooth even pressure along the display top. At 2-3 card-thickness the last of the adhesive let go, gentle as a baby.
-
-
-
Deslice la tarjeta hacia el centro de la pantalla para cortar el adhesivo restante.
-
-
-
-
Con las tarjetas insertadas como se muestra cerca de las esquinas, gire suavemente las tarjetas para aumentar el espacio entre la pantalla y la carcasa.
-
Si hay secciones que parecen pegarse y no se separan, deje de girar y use una de las tarjetas para cortar el adhesivo en el área problemática.
-
Comience a levantar la parte superior de la pantalla desde el marco.
I would recommend using suction cups at this stage to lift the display.
I would strongly recommend using suction cups
Agreed about the suction cups. An extra pair of hands might be good here as well.
The stickiest location on my iMac was the mid-to-lower section of the right side. There are a couple of thicker areas that needed attention from the plastic cards.
WARNING!!! This is where you can crack you screen. TAKE YOUR TIME! Everything work fine for me because I took my time. I was very shocked at how fragile the screen is. It does have a small amount of flex but don’t push your luck. There were two things that made this easy for me #1 Once you have used the cutting wheel to your best judgement to cut the adhesive, start using the iFixIt plastic cards as spacers and space them evenly around the screen. I used 10 individual cards of and gently moved them up and down at each section two at a time. Once I started having less resistance, I combined 2(i.e. 5 sets total) cards evenly space to allow for move rigid and stronger movement to separate the screen. This really helped me to free up more adhesive. #2 before lifting the screen up fully, use tweezers to pull the adhesive like a string from around the entire monitor. This will make lifting the screen much easier since all adhesive will be removed. Finally when lifting the screen use the cards with your hands under them.
Would any of you consider the possibility of heating the glass with a hot-air fan before starting the process? In that way, the adhesive would let the screen go easier, I think.
The type of tape has a lot to do with it. If the original tapes are still present then the pizza tool slices through the thin foam core of the tape so heating is not needed. If on the other hand someone replaced the tapes with just regular double sided tapes then there is no foam core to split and there is a sizable risk the display will get damaged in the process of taking it off. So sure in this case a bit of heat might help, just be aware the LCD panel area is quite close to the edge along the top three sides so you also have the risk of dating it from over heating!
Dan -
If not for iFixit tuts and tools, no way I could do this. iMac 27" takes the prize as the worst design ever for upgrades/maintenance, what were they smoking when they designed it like this?
I have always believed that a properly placed screw can be a beautiful thing. A few decorative, but functional, screws placed in the back of the iMac case to attach the screen would be awesome, but this method is anything but beautiful and borders on insane.
-
-
-
Mientras sostiene la pantalla con una mano, use la otra para desconectar el cable de alimentación de la pantalla.
Mark all cable connectors with a spot of white correction fluid before removal. This will remove the risk, when reinserting them later, of getting them the wrong way round. Yes - I know they will only plug in one way round, but it does make life easier if you are not in perfect lighting!
At this step, if you mess up anything with these 2 cables, especially when plugging them back in, even if you think you’re following the instructions here to a T, then you’re screwed.
I would highly, highly, highly recommend AGAINST doing this at home. I followed these instructions to a T, and still somehow managed to have the screen not be able to turn on after the hard drive replacement. Then, once you’ve opened your Mac yourself, Apple will refuse to fix anything on the computer, and even other third party, Apple-authorized repair facility will refuse to repair it for you, and you will have to locate a non-authorized Apple repair facility. There, I am having to pay ~$600 to fix things that got screwed up, even though I followed the instructions here to a T, step by step, and did everything slowly and methodically.
Beware, if you’ve never done this before, that be locked out of ever being able to use an Apple repair facility, or Apple-authorized repair facility, if you mess things up here now.
Quote - "Beware, if you’ve never done this before, that be locked out of ever being able to use an Apple repair facility, or Apple-authorized repair facility" You cannot be serious can you? So because someone attempted to repair their own Apple device that they OWN, you are saying that they may/will be locked out of using any Apple repair service again? Ridiculous claim sorry.
The display cable, the wider one, has a lock on it , usually a plastic tape lift tab to release it, once thats flipped it should come out fairly easily, if your experiencing resistance and the cable isn’t coming out then check for this lock/latch, the power cable just pulls out, just don’t rush it everything should go fine, fairly easy to do with the end result a working iMac
Is it possible to replace the power cable if its damaged? I can’t seem to find anything about this.
After finishing my hard drive replacement I reconnected these connectors to test my display before using new adhesive. Everything was working beautifully. But then when I applied the new adhesive and went to seal the display on for good - the display power cable somehow became disconnected! I had to reopen the Mac for a second time which was far more difficult with new adhesive. When reinstalling double and triple check that the cables are securely inserted before the final seal. Sounds obvious but it’s quite the annoyance if something goes wrong at this point.
Very difficult to work with these connectors.
Power cable very difficult to unplug - data cable veeeeery difficult to plug in.
I noticed that working with the iMac positioned vertically (and with a proper support for inclination) makes this step slightly easier…
Interesting comments.. personally, I didn’t find the cables particularly difficult to detach and reattach. You do have to be patient and gentle. Personally, I found that a rolled up beach towel gently wedged between the unit and back of the display helped keep the glass up. Also, a small flashlight can be helpful to see the cables and connectors if you’re lighting isn’t perfect.
I’d agree to John - not overly difficult. My workaround was to prep the screen for re-installation and then place it in front of the standing machine. The cables are long and flexible enough to be put in place even in this state. You can easily attach the cables and continue with fixing the screen to the housing.
I would not recommend doing this step as pictured. The cable you are removing has little tabs on the wide side that can be depressed inwards towards the center of the connector, releasing the cable. If you just grab the cable as pictured and yank it out, without depressing the side tabs, you are likely to damage something. Don’t pull on the wires, use your fingernails at the connector to squeeze the very small little tabs inward to release the cable from the connector.
I agree with maccentric. DO NOT just pull the power cable. Use your fingernail or spudger and gently press the tiny notch inward and towards you gently and one side will disengage. Do the same for the other side and it will slide right out. The notches just have enough edge to catch your nail or spudger. Using your nail is better as you can better feel when you have caught the edge and can feel the cable move.
I lifted the display a few inches up and propped it open in the middle using my iPhone in portrait mode with its torch on. Did the job nicely:
-
-
-
Levante el soporte de retención de metal en el cable de datos de la pantalla.
-
Desconecte el cable de datos de la pantalla.
I replaced HDD to SSD and assembled parts again. When I boot up the iMac, I found black lines on display (looks partly not broken).
I searched Internet, and some says graphic card problem, but I didn't touch anything but cable to lift up.
Could the damaged display data cable cause this situation? I hope I could fix this by just replacing the cables..
Sorry, Black lines is a damaged display assembly ;-{ In the process of removing it you either pushed the tool into deep or you torqued the glass severing the tiny wire traces.
Dan -
Same trouble here, is it cable trouble or connector trouble?
Sorry damaged display
Dan -
I think whenever words like "...is a delicate connection that can be broken. Be sure to pull the [cable in a certain direction] ANYTIME.... It is worth either a closeup or 2, maybe one with annotations or insertion directions and maybe a motion direction arrow with the something like and 'X' char or a circle division slash over the wrong one.
I agree! +1
Yes, John is absolutely correct on this one. I damaged the display cable trying to get it back in. A close up would have helped and now my computer might have actually been fixed.
[|There are 2 cables to disconnect on my Mac (?). Also, I don’t see a metal retaining bracket. I can take a picture, but cannot attach. I got the glass loose with no problem, but am worried about damaging the cables]
Hi Jim! You can go to our Answers Forum to post some better images of your situation!
At this step, if you mess up anything with these 2 cables, especially when plugging them back in, even if you think you’re following the instructions here to a T, then you’re screwed.
I would highly, highly, highly recommend AGAINST doing this at home. I followed these instructions to a T, and still somehow managed to have the screen not be able to turn on after the hard drive replacement. Then, once you’ve opened your Mac yourself, Apple will refuse to fix anything on the computer, and even other third party, Apple-authorized repair facility will refuse to repair it for you, and you will have to locate a non-authorized Apple repair facility. There, I am having to pay ~$600 to fix things that got screwed up, even though I followed the instructions here to a T, step by step, and did everything slowly and methodically.
Beware, if you’ve never done this before, that be locked out of ever being able to use an Apple repair facility, or Apple-authorized repair facility, if you mess things up here now.
First: During reassembly, I highly recommend you connect these cables and do a test boot BEFORE you remove the protective tape on the adhesive strips. That way you can fix any issues(like a damaged cable) if something is not right and you have not re-glued the screen back down which will cause a problem. If you have a second person and everything is working after test boot, you can just leave the cables connected, lift the bottom of the screen and have 2nd person pull the protective tape on the adhesive strips and you can set the screen in place. Second I damaged the video data cable during reassembly on my late 2015 iMac- I did not get the connector straight and I damaged the wires on the cable. I recommend you have someone else hold the screen while you attach the cables - they are fragile. Luckily, the data cable was easily replaced for only about $20. If you must do this by yourself, just be careful I highly recommend have 2 people at this step during reassembly.
At least on my “late 2013” model, the smaller display cable connector has tiny, tiny clips on the outside edges. These must be squeezed to unlatch it. Don't pull on the cable itself or the wires can be pulled out. Even with my small fingers, it was hard to grip the clips. When reconnecting, the connector will lightly snap into place.
I managed this step without any problems, but I had my wife hold the screen up while I disconnected/connected the cables. I STRONGLY encourage another pair of hands here so you can focus your full attention on being ultra careful with the cables.
On the 2015 there are 2 cables.
1. Once the display is loose use the Mac foam block sold from Ifixit to keep the display from rocking to hold open the glass
2. Blow out dust with canned air
3. Get a flash light and small flat edged screw driver
4. Use the screw driver to slow pry loose the connector from the socket by gently inserting it in the gap on the left and then on the right slowly easing the connector from the socket towards the top of the glass
5. The more center connector has a pull tape and a wire loop. Lift pull tape and the wire loop will raise up.
6. Pull the wire loop towards the top of the glass to slide out the connector from its socket
Good instructions except for the screwdriver - try and use a plastic spudger instead ! Also, getting a headworn LED light makes life a bit easier.
Have a late 2013 model and went to do the SSD upgrade. When going to remove the display we cracked the bottom left corner of the glass (just the glass frame part - not part of the screen that displays anything). We were also having difficulty putting re-attaching the display flex cable. Whenever we finally went to test it before re-sealing the screen back on with new adhesive it would sound like it is turning on as it makes boot-up noises and the fans start running, but the screen would just remain black. Just wondering if the crack in the bottom left-hand side of the glass/display would have damaged a part of the display assembly or if it would be more likely that we just damaged the display flex cable (which can be replaced for $26)?
Did you get to the bottom.of this?
does anybody know how the Display Cabel pin assignment is? I want to try if I can attach the Panel to another grafic card
I’ve completed the upgrade to SSD, but while restarting my screen remains black. As if no connected.
I assume I broke the sensitive connector.
—> how to order a spare?
Did you get to the bottom of this?.
No! Apple loves to mess us up!
Dan -
The panels are different since technology progresses at a rapid pace and Apple does like to be on bleeding edge of things. When they do a manufacturing run of screens, there will be a few years that will have the same screen. I believe 2017 is when they introduced the higher resolution panels. Everything from 2012 late to 2015 should be the same though.
That display cable connector is common to many Macs of the 2012 era. I’ve destroyed 2 in 38 years of servicing all types of computer equipment.
As stated, there is a latch on this connector. If you put any incorrect force on the cable or connector during disassembly or reassembly, you will break the cable and possibly the connector. The cables can be purchased online and the video connector on the display is exactly the same.
I repeat, if you pull out on the video cable after it has been unlatched instead of parallel to the logic board, YOU WILL BREAK IT.
-
-
-
Levante la pantalla hasta una posición casi vertical.
-
Retire la mayor cantidad de adhesivo posible agarrándolo por los bordes exteriores, y luego tirando o rodando hacia el centro.
Thanks Stef, this has saved me! Simple yet very effective.
Yep, I cracked the lower corner of the display as well. I failed to work the adhesive enough to loosen it sufficiently. Be careful, I just had to buy my customer another screen!
There seems to be missing a step or two. As I was removing the old display, there are two wires that need to get transferred to the new replacement display. There is not note about these two wires located at the top of the display. The 1.128-inch ribbon cable and then this other 4-inch long, two-wire cable that goes to a very small circuit board that is 1/4 by 3/8 of an inch and seems to be adhered to the panel.I have not been able to get this cable off the old display. There is a port for it on the replacement display.
Note: When ordering this screen, and plastic cards as noted tools, ifixit.com did not list the pizza cutter or the new replacement adhesive strips. So now I’m not sure how to get the new one on and secure.
Are you sure your trying to remove a late 2013 model A1419 display assembly?
robert -
The adhesive strip along the bottom is designed with a pull tab on each outer end. Rather than lever and pull the screen simply carefully pull the tab which removes that half of the lower adhesive strip and frees up the screen.
Niemals den unteren Klebestreifen mit einem scharfen Gegenstand wie Rasierklinge oder so versuchen zu trennen, davon geht die Beschichtung des Displays kaputt und man hat hässliche Streifen unten hinter dem Glas. Stattdessen lieber versuchen, das Display nach oben zu klappen und abzuziehen.
translation from Bas Ti because this is very important:
Never try to separate the bottom adhesive strip with a sharp object such as a razor blade or something, the coating on the display will break and you will have ugly strips at the bottom behind the glass. Instead, try to flip up and pull off the display.
If you are just replacing the hard drive, I have found that it is quite possible to do while leaving the screen connected, making the process much easier. The amount you need to tilt the screen to access the little pull tabs at the bottom to release the screen is also sufficient to access the drive. I remove the drive while the iMac is upright. I also heat up the bottom of the screen to soften the glue and to help with the possibility of the glass cracking while doing this step.
Very dangerous! You’ll stress the cables and the logic board connectors.
Dan -
I meant that you can leave the bottom strip of adhesive attached; you still need to disconnect the 2 cables.
As mentioned before you can pull out the lower adhesive strip. Dont cut it or move the display up and down. This is even more dangerous. On the lower side of mac where the display glass ends is a offset. When moving the display up and down you might crack it over that offset.
When removing the adhesive from the top of the screen, be sure to start at the iSight camera location (= in the middle). If you start at an upper egde of the glass (side doesn’t matter) towards the middle, you risk removing the black background foil from the screen, which will result in ugly stripes behind the glass.
-
-
-
Si es necesario, se puede usar una tarjeta de plástico para cortar las secciones restantes de la tira adhesiva inferior.
Would have been helpful to box the same red area when using the plastic card to separate the glue. Since the red blocked picture is inverted, if someone doesn't pay close attention it may not be obvious that the area of concern is at the right top of the graphic pictures in which the plastic card use is being demonstrated..
you don't need to cut the bottom part as the bottom tape is stuck on each side and you can easily pull it out
[|I opened up my iMac and there’s no HDD or SSD in that spot. its just empty.]
You probably had just an SSD installed and no HD, which is on the opposite side of the motherboard (and quite a bit more work to access).
Please update the picture to include the RED BOXED IN AREA that you refer to on all three pictures in this step. I have had a few zaps from these supplies and it is not pleasant.
J’ai réussi à intervenir dans l’iMac sans décoller l’ensemble de l’écran. Je l’ai ouvert en laissant la dernière partie collée (vers le logo Apple) et qui sert comme une charnière. Bien calé et assuré l’écran n’a pas bougé et j’ai pu changer mon disque dur facilement. Le grand avantage et d’avoir l’écran toute suite juste quand on le recolle par la suite.
Well, I of course touched a soldering point in the red area as my hand slipped. I heard and felt a tiny “click” and after replacing the HDD with SSD etc I can not power the iMac up anymore. Not a sign of life :-( I suppose I broke the power supply. Can someone confirm? Or could something else have broken too?
I took my time and pulled both tabs slowly gently. Easily removed and glass came right off.
-
-
-
Levanta la pantalla del marco y retírela del iMac. Coloca la pantalla hacia abajo en una superficie plana y suave.
-
Podría ser necesario levantar lentamente de un lado, para poder eliminar el adhesivo restante.
You really should be using film handling or surgical type gloves to handle the screen to minimise finger grease on any of it. Even if it’s possible to clean most of it off, it can be corrosive over time.
Use a large suction cup and latex gloves for this:
I think iFixIt should have mentioned this step might be safer using a suction cup as mentioned by Philip.⏎
I thought following the guide, holding the screen on each side would be fine, but the glass cracked almost immediately.I did not grab it by the corners, just the middle of the glass.
This glass is horrendously fragile. I don't think I can afford to repair the screen :(
Lowering the screen down at the end here does not need a suction cup. It sounds like you left something in the channel so you fractured the screen from the object (a loose screw?). I've done a ton of these systems and have not needed a suction cup at this step. I do agree a suction cup can be helpful in the screen removal process. just to give you a better purchase, not pulling! As you can damage the screen if you pull too hard.
Dan -
-
-
-
Si hay un alambre o cable debajo de una cinta adhesiva, siempre separa la cinta primero.
-
Si el cable está pegado a la estructura, usa un iOpener calentado o un secador de pelo primero para soltar el adhesivo. Entonces podrás introducir una púa de apertura por debajo del cable para aflojarlo. Nunca tires directamente de los conectores delicados.
-
Desliza una púa de apertura por debajo de los cojines de acolchamiento para separarlos de la pantalla, y tira de ellos con cuidado. Podrías necesitar algo de cinta de doble cara para unirlos a la nueva pantalla.
Be extremely careful removing the LCD Temp Sensor from the rear of the screen. If you pull the wire, you run the risk of severing the metal wire from the connector but not notice it because the surrounding plastic insulation may still be intact. Use a razor blade so “shave off” the sensor under the adhesive. I just had the screen replaced by a local shop and, upon boot, the fan was running full-speed and the Mac’s speed was miserable; Excel took 30 bounces in the Dock to launch rather than the expected 4-5. Novabench showed the Mac running at 4% of its expected speed (overall). The tech examined the sensor carefully, found the broken connection, soldered it back into place, and all was fine. Note that the (partially disconnected) sensor actually showed up when I ran Macs Fan Control in an attempt to work-around this. No problem controlling the fan speed then but the iMac’s running speed was awful until the disconnected sensor wire was fixed.
Hi barryjaylevine,
I’ve had my LCD replaced on my iMac 27 / 2013 and there is no LCD Temp Sensor cable on the replacement screen.
I’m experiencing the same performance issues.
I’ve ordered a new sensor, do you have any pointers as to how to install it?
Thanks,
Simon
UK
hey Simon, I used 2-sided tape….this is assuming the new sensor doesn’t already come with an adhesive surface already applied.
a roll of kapton tape for your own peace of mind will make sure nothing detaches from thermally-induced adhesive crystallization
make sure you position it in such a way that you can easily plug the lead back into the mobo….not a lot of length to that wire
Howdy folks,
Thanks for all the tips, LCD sensor fitted and iMac back in action.
Never again!
Simon
Hello all. So I’m trying to pinpoint my backlight issue on my 2015 retina 5k - I noticed I’m missing my thermal sensor on the LCD. Would this help with the backlight? I’m sure it will keep my fans from going crazy. Any help would be appreciated! Note: I have LEDs except the 4th one. Thanks!
-
-
-
Usa un destornillador T10 para remover los dos tornillos de 10 mm que sujetan el altavoz izquierdo.
-
-
-
Tira directamente del cable combinado SATA para desconectarlo de la unidad.
-
-
-
Utiliza un destornillador T8 para quitar los dos tornillos de 7.3 mm que fijan el soporte izquierdo del disco duro a la carcasa trasera.
-
-
-
Quita los cuatro postes de tornillo T8 de 8.1 mm del disco duro y transfiérelos al receptáculo de la unidad de reemplazo.
-
-
-
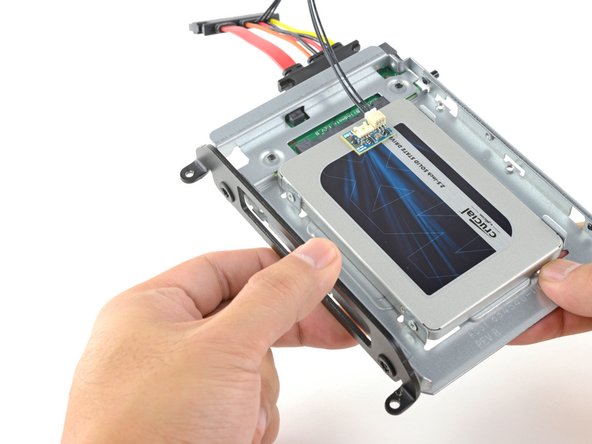
Alinea los conectores de la SSD con las tomas de la caja metálica.
-
Presiona la unidad contra las tomas de la carcasa hasta que la SSD quede firmemente asentada.
what if I’m installing a hard drive?
Didn’t bother with the SSD caddy. Some 3M sticky pads did the trick!
Been using them for years...works great.
Two thoughts on SSD replacement/upgrade:
1) It would help if some references were made to help us determine what we need in terms form factors. I’ve never used an SSD and see a 2.5” one that would work, but I don’t know if 2.5” SSDs are different (in form factor) from 2.5” HDs. A lot of us are still learning about SSDs and isn’t that what this site is about? (Learning new things about hardware and using hardware?)
2) I’m not clear if I definitely need a new temperature sensor if I put in an SSD or if
Can I buy the kit without the SSD. I'm thinking of replacing my 3TB hard drive with a 4TB SSD.
Also, would you happen to know what the maximum hard drive dimension that can fit inside of this iMac? I may try a 14TB hard drive instead.
A 14Tb HDD does not represent any problem. But I will care about rising temperature. Must attach a heat sensor. If rise to high, it will suddenly shutdown to protect it.
-
-
-
Conecta el cable de alimentación SATA habilitado para sensores incluido en el puerto del recinto.
Is the thermal sensor needed? I fitted a replacement SSD and it’s all back together and the iMac’s fans are fine. They don’t go into full max speed mode.
If you have a problem with the fans, you can always use Macs Fan Control (free) to set the speed. The sensor is not needed.
-
-
-
Despega el revestimiento blanco de la parte posterior de la pequeña placa del sensor de temperatura para exponer el adhesivo.
-
Pega la placa del sensor de temperatura a una superficie metálica expuesta del SSD, cerca del conector SATA.
-
Dobla los cables del sensor de temperatura sobrantes para que estén fuera del camino mientras instalas la caja.
Great pics ! Is that “temp sensor board” is already on my HDD IMAC ?? Or must I buy one ?
Don’t bother with the thermal sensor. I didn’t fit one and the iMac is working fine and no fans are kicking in.
Instructions say to attach sensor to the SSD, but all pictures show it being attached to the SSD carrier. This may not represent accurate SSD temp as much of the carrier dissipates the heat absorbed from the SSD
Confirmed, no need for the extra temp sensor on Mid-2015 iMac. (EMC 2806, Mid-2015 27" iMac). Just changed the old 1TB HDD to SSD, no extra fan RPM after power on.
-
-
-
Coloca los soportes de montaje que se hayan retirado del disco duro antiguo en el recinto.
i don't have a combo cable.i also didn't have asata drive. just a blade ssd. i don't see wwhere i could add a cable
-
-
-
Desliza el recinto del SSD en el espacio que ocupaba anteriormente el disco duro.
-
Encamina los cables SATA para que no interfieran con ningún otro componente.
The SATA cable on my Late 2012 was not long enough to comfortably attach to the end of the temperature sensor array after it was plugged into the new SSD. I had to fold the array and slide it under the SSD and housing. There was much resistance to the folding so I took it slowly to let the wires adjust gradually to the fold so they would not break.
Unfortunately, the adapter that comes with it isn't long enough to avoid pushing against the screen in the front. One week after upgrading to SSD my screen fell off shattering and breaking the power connector on the systems board. A new screen is ordered but I'm hoping the power connector isn't damaged beyond repair. I'm going to try to adhere the HD adapter to the back inside of the case with 3m adhesive to avoid pressure against the screen.
As a newbie, the only other upgrade I have done is to replace my iPhone 7 battery. I had trouble on reassembly.
This is a great upgrade guide, but it would be important to me to see the reassembly instructions including the cautions.
For example, I had issues with reattaching the plugs in the phone. I could see having an issue with them here, as well as repositioning the display back into the cabinet.
I do PCB board repair work and repair pinball machines. But I won’t try this.
Try 3m double sided tape from Amazon, it available in 3mm width which is ideal for iMac screen. It has a very thin foam and is much better quality than the cheap Chinese kits available on Amazon. You will have to trim it to size with a sharp craft blade as you fit. Don’t risk your screen falling off from using cheap tape in the so called fitting kits!
In my Late 2012 27" iMac I Scotch-taped the SATA connector to the case to stop it from pushing against the screen after reassembly.
Only 39 steps!
Is it possible to clone the internal disk and have the imac boot off the external SSD?
The extension cable is too long. I folded it over carefully & stuck it down to the case using a double sided sticky pad. Photo here
-


Para volver a armar tu dispositivo, sigue estas instrucciones al revés y usa nuestra [gude|136011|Guía de tiras adhesivas|nueva_ventana=true] para volver a colocar el cristal de la pantalla.
Lleva tus desechos electrónicos a un centro de reciclaje certificadonew_window=true.
¿La reparación no salió según lo planeado? Prueba algunos solución de problemas básicos, o solicita ayuda a nuestra Comunidad de respuestas.
Cancelar: No complete esta guía.
222 personas más completaron esta guía.
Un agradecimiento especial a estos traductores:
100%


Estos traductores nos están ayudando a reparar el mundo! ¿Quieres contribuir?
Empezar a traducir ›

54 comentarios
Hi,
I'd like to buy this imac with ssd-pci, it's possible to add a new hard disk 3.5???
Do I need some cables???
thank you
Dear Antonio have solved your question? I would put a 1TB SSD instead of HDD, but having bought the model with pre-installed SSD pci. Before opening the mac I wanted to know what was needed to do the upgrade ...
How are the temperature sensing and fan speeds affected by a swap? In the future if I install an SSD I wouldn't want the fans going full speed.
The fans will go a little crazy because of the swap. At my work they swapped the HDD with an SSD and installed software to maintain that. You can download either, which I believe work just fine:
Danny -
Didn’t affect my SSD replacement at all and I didn’t use any thermal sensor. iMac works just as before. SSD was Samsung 870QVO
Bought the kit and this works perfect. Installed my ssd tonight, so so happy!
What type of SSD did you install and what about the fans, do the run like crazy?
Peter -
I purchased one of these Samsung 850 Evo SSDs and on my Late 2013 iMac had no issues with fans or thermal sensors. http://www.msy.com.au/hard-drive/14930-s...
steve -
Do I need any special cable or adapter for replacement?
No special cable or adapter required. However, you do still encounter the constant high speed fan issue after replacement. My understanding is that they built the fan sensor into the firmware of the Apple issued hard drives, so third party drives result in a null value being reported and thus the crazy fan noise. I'm curious how others are solving that problem.
No I installed a WD 1TB SSD and fan speeds are normal. Just a way to get money needlessly
Did some investigation into this. I found that OWC macsales.com has a complete wire harness kit that adds the plug-and-play cable with the In-line Digital Thermal Sensor to eliminate fan noise and maintains proper system fan control through the iMac's System Management Controller. No software hacks, or third party solutions needed.
Hi. I have a Imac 27 late 2013. Next week an apple certified service station will replace my old HDD with an Samsung 850 Pro. I asked them for the thermal sensor but they said it is not necessary for the iMacs beginning late 2013. Can anybody confirm this?
Ok for all with a late 2013 27". No thermal sensor is needed.
Thanks, can I also add an SSD to my HDD 1TB sata hard disk to make a fusion drive?
So without removing the HDD drive.
As Antonio already asked, is it possible to add an HDD to an iMac (EMC 2639) which originally only has an pci-e SSD?
Are the data ports available?
I didin't find a full kit, so I suppose, I need to buy in addition of the HDD the brackets and the Apple connectors to the motherboard?
Thanks in advance!
Hi
I would like to substitute my HDD (1tb) and install a 1tb SSD intead. What i have is a 27 inches late 2013 imac and i have some questiosn.
Do the SSD have to meet any special characteristics?
I´ve read something about the temperature control, is it applicable to the 2013 imac (I´ve read something about the 2009/2010 models but nothing about mine
Thanks!
I recently replaced my 1TB HDD with a 1TB SSD and had no problems with any of the sensors on my iMac Late 2013. I used this Samsung Evo SSD: http://www.msy.com.au/hard-drive/14930-s...
steve -
So, you only installed the SSD without the thermal sensor and worked just fine?
theont -
Hi guys !!!! Could you please help me? I bought this Imac 27 2013 EMC 2639 and i this there is a problem with the hdd inside the Fusion Drive. What kind of hdd should i take in order to replace Hdd? are there any specific requirementы to do that? Thanks in advance
do i need some adaptors for a smasung 850 ssd evo? this is 2.5 inch? can you recommend something ?
https://eshop.macsales.com/item/OWC/K27I...
Fan sensor cable included
Hello,
With some googling I have found that the EMC 2639 has a 3,5" hard drive. I have a Samsung 850 Evo SSD which is a 2,5" drive. In the comments I see people have installed this. Do I need a special enclosure for the 3,5 to 2,5 change?
Thanks
On another note do I need the following thermal sensor? https://eshop.macsales.com/item/OWC/DIDI...
If so, where would I stick it on the SSD?
Danniel -
Followed all the instructions. Had difficulty to connect the display data cable again. Very difficult! Clumsy connector, screen heavy and obstructing work, no good explanation nor detailed photo of connection. After finishing and restarting imac: nothing... after a while very loud fan noise. Had to bring it to repair store. Verdict: logic board damaged (burned) screen maybe damaged, and other minor things... cost: 1400€
Having just done this to my late 2013 27" iMac replacing my 3TB hard drive this is fairly easy especially using this guide, there is a bit of misleading information out there regarding the need for a thermal sensor cable. Well I can tell you my 27" iMac did need one, I had the sense to rebuild with out sticking the screen back on and try it without the lead so it was a quick job to fit the thermal sensor. I replaced the drive with a seagate Barracuda same as the original.
hey Peter,
I just did the same as you on a very same late 2013 27" iMac
I replaced the old HDD with a Seagate Barracuda (3TB newer generation) - but it looks like it doesn’t need the thermal sensor?
I booted on the new drive and the fans run on an average 1400, which is fairly normal I guess?
I also installed iStat and can clearly see that the HDD temperature is monitored! (30°C)
How did you notice that you actually needed a sensor? Did the fans just go mad?
Is there any other check I can do to see whether I need one or not too?
Thank you so much
Luca
I read on another site that starting w/o the screen attached can cause $$$ Damage
I did this repair a week or two ago and have been loveing my new iMac Build. I did learn a few tricks along the way that aren’t mentioned here. I did a little blog post about it so hopefully it’ll help some people out there: https://goo.gl/hBVLzg
Hi,
I have upgraded my 2017 iMac with a 500GB Crucial SSD.
The iMac is now painfully slow and struggles with the most simple tasks.
The Crucial SSD did NOT come with a thermal sensor and I did not install a third party one - could this be the root of the problem?
I’ve installed Mac Fan Control software which controls the fan speed no problem.
I’ve already replaced the screen as it broke during the upgrade and I’m reluctant to remove it again!
Any pointers greatly appreciated.
Simon
Thank you for the guide. I found it generally spot on and was successful in swapping the HDD with a Samsung V-Nand SSD 860 EVO (2TB). I did use glass suction cups to get a good lift on the display which I think helped. With this upgrade I am betting another two years of service before I’ll feel compelled to buy another one.
I ran into fan issues after installing a 8TB hard disk (replacing a failed 3TB Seagate Barracuda). Tested the two fan control applications listed by shaolindave, but the free one (SSD Fan Control) has not been updated for a while and the other, HDD Fan Control, seemed overpriced… Did a bit of search and found this: Macs Fan Control. ( https://www.crystalidea.com/macs-fan-con... ) It is currently free, was recently updated and seems to be doing the trick…
My 11 year old and I followed this detailed guide and it worked like a charm. Two sets of eyes were helpful, but Jr. really did this almost entirely on his own. Once finished (just before re-sealing the iMac) we followed a youtube video to create a “bootable USB thumbdrive” to start-up the refreshed iMac. We then reinstalled the operating system (from the internet) onto the freshly installed hard drive. Very happy and proud. Very grateful for this well written guide.
Hey do you need the sensor-enabled SATA cable or can you connect it straight into the mac?
Thanks
Hi Tom,
You can connect it straight to the iMac, but the fan may operate at full speed. You can get around that with software, i.e. Macs Fan Control.
Great guide which allowed me to replace hard drive without using anything up, - yet.
Two issues for optimisation of the guide.
1) The front panel door for the HD adapter is taken off but not replaced in the guide. Leave it off or reattaching after SSD instal is not clear.
2) Second is the cable setup is cumbersome with the sensor adapter cable being too long and not optimised for the original setup.
Hi Charles,
Thanks for the tip! I’ve added a step to replace the front plate.
Nice! Did it under 45min. Another person helps a lot when you’re removing the cables. Skipped the part where speaker was disconnected, only loosened it and the hdd comes off easily!
Couldn't have done it without ifixit! Thumbs up!
Hi,
I would like to replace 3,5” HD with an 2,5” SSD HD on my iMac 27” late 2013;
This is the question: my iMac has a FusionDrive so, after replaced the 3,5” HD with an 2,5” SSD HD, do I have to remove the PCI drive?
Thank you so much in advance for answering.
Hi,
I can confirm that replacing an Apple HD with a Seagate Barracuda (equivalent to the original) works fine, at least on my a iMac 27” late 2013 with Fusion Drive.
I know there’s mixed opinions about this, but in my case I didn’t need the OWC Temperature Adapter: I can see the temperature is monitored correctly and fans work as expected.
I just needed to open the iMac, replace the old Barracuda HDD, boot from USB, rebuild the Fusion Drive from Terminal, install Mojave and copy from backup.
Do not clone the HD if you have a Fusion Drive,: to create the new Fusion both SSD and HDD will be completely erased.
Apart from that, everything was pretty much streamline
Thank you so much for this guide: it would have been impossible otherwise!!!
L
Yep it is not needed waste of money IMO
Super easy to do it, 1h 30 minutes to do it including the re-mounting of the screen.
Merci ifixit pour ce tutoriel au Top !!
j’ai hésité longtemps avant de me lancer et grâce au kit ssd pour iMac ,j’ai pu installer ce dernier en moins de 2 heures … faut juste bien suivre le tutoriel et tout ce fait très bien. Un grand bravo à vous
Step 27 you do not need to remove the speaker. Loosen 2 torx 10 screws lift the front screw up a bit and shift speaker to right towards edge. You will see the 2 Hard drive screws. Much simpler.
Step 36 why are you using such a fancy box just to hold an SSD. Just pick up a 3.5 to 2.5 adapter frame for $4.99 at best buy. Waste of money that box.
In line temperature sensor about a 90% chance you wont need it . I installed a Western Digital 1 TB SSD in my 2013 27” without the sensor and the imac fans are running at normal speeds. Another possible money waster.
I am cheap as you might have guessed! Just trying to send some helpful info may save some money even,
Hi
I also have a 27” late 2013 with 256GB PCIe and would like to add a 1TB SSD to the hopefully built in HD-connector. Does anyone know if this is possible? Is the supplied cable sufficient or do I have to buy something else?
Maurizio
Successfully followed the guide and no issues. It was one of the easiest repairs I’ve carried out. Much easier than the older 27” iMac. New SSD fitted and all working fine. Don’t bother wasting money on the thermal sensor as I didn’t fit one and the iMac is working fine with no fans going at it like a 747 taking off! Also I didn’t bother with the SSD caddy: just stick it down with some 3M sticky pads!! ?
This instruction page is not clear and is ambiguous if you have to do all the steps to just change the power supply please clarify another words do I have to remove the speaker and the hard drive to replace the power supply?
crawfordjohn - Contestar
This is a display removal guide not the power supply guide!Here’s the guide you need to follow for that Reemplazo de la fuente de alimentación del iMac Intel 27" EMC 2546
Dan -
Didn’t need the cardboard wedge to remove the display. Waste of money. Lay your Mac on its back.
James Clive - Contestar
Die verlinkte Karton-Reparaturhilfe ist für den 21"-iMac. Passt sie auch 1:1 für das 27"-Modell?
Stefan - Contestar