Introducción
Si tu Galaxy A3 no mantiene la carga puedes utilizar esta guía para reemplazar la batería gastada.
Si tu batería está hinchada, toma precauciones apropiadas.
Esta guía incluye remover la tapa de cristal trasero y el marco medio. Necesitarás reemplazar el adhesivo para volver a sujetar la tapa trasera al teléfono.
'''Antes de desmontar tu teléfono, descarga la batería por debajo del 25%. La batería puede prenderse fuego y/o explotar si se perfora accidentalmente, pero las chances que esto ocurra son más bajas si se descargan.
Qué necesitas
-
-
Comienza apagando tu teléfono.
-
Toma un iOpener para calentar y suavizar el pegamento detrás de la tapa posterior.
-
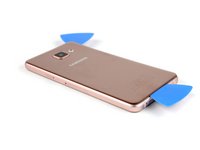
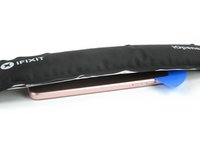
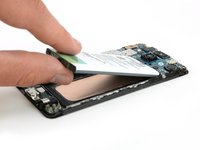
Con una palanca de succión levanta la tapa posterior para insertar una púa de apertura.
-
-
-
-
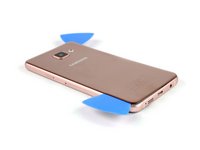
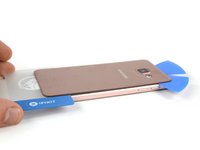
Mueve la segunda púa a lo largo del lado izquierdo de la tapa trasera para ablandar el adhesivo.
-
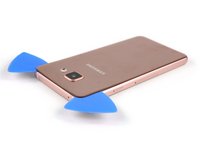
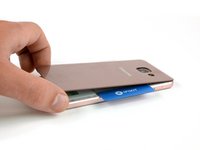
Mueve alrededor de la esquina izquierda superior y ablanda el adhesivo por encima de la cámara trasera.
-
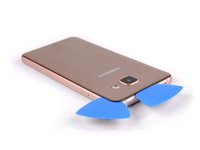
Luego de ablandar todos los bordes y lados de la tapa trasera usa un iOpener para soltar el adhesivo por debajo del centro de la tapa trasera.
-
-
-
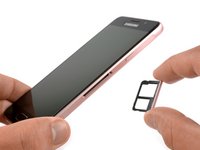
Remueve la bandeja de la tarjeta SIM.
-
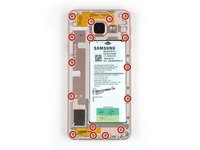
Remueve los 16 tornillos Phillips #00 en el marco medio.
-
-
-
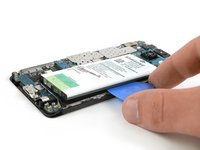
Introduce una púa de apertura entre la batería y el marco. Deslízala a lo largo de la batería para separar el adhesivo.
-
Remueve la batería.
Unfortunately I encountered the same problem as matbub. A close plastic frame around the battery on the circuit board prevented me from introducing any tool under the battery, and the battery was sticking so firmly to the circuit board that it was impossible to lift even a single corner. Heating with my hair dryer did not help as well. I have changed a lot of batteries in other phones so far, but finally I had to accept not being able to change this one. Despite all the obstacles that I managed to pass through before. Bad job, Samsung!
i found a good solution in a video. this guy detached the first layer of the battery and pulled on it. of course he warmed up the glue before.
Réparation assez facile. Deux remarques:
il faut chauffer longtemps la coque avec un sèche cheveux, 3 à 5 mns avant d’arriver à décoller le dos avec la ventouse.
Pour enlever la batterie, il y a une languette sur le dessus de celle ci, il faut la tirer fortement et pratiquement pas besoin d’autre chose. quelques petits points de colle aident à refermer la coque.
Comme j’ai deux portables identiques dont un ne marche plus, j’ai fait un essai sur le mauvais et pour le deuxième, j’ai mis moins d’une demi heure
Using the label to pull UP / out the battery is the good solution for me
Thanks !!
-


Para volver a ensamblar tu dispositivo, sigue estas instrucciones en orden inverso. Volver a aplicar adhesivo donde sea necesario.
Para volver a ensamblar tu dispositivo, sigue estas instrucciones en orden inverso. Volver a aplicar adhesivo donde sea necesario.
Cancelar: No complete esta guía.
44 personas más completaron esta guía.
Un agradecimiento especial a estos traductores:
100%

¡ Mariana Roca nos está ayudando a reparar el mundo! ¿Quieres contribuir?
Empezar a traducir ›


8 comentarios
Nice post on Samsung phone. People are courageous about Galaxy phones and there is lot of hype about Samsung.
I bought a budget j7 for my wife and I am sure this will have good review.
not sure why they are not talking about.
Thanks
Rakesh Birchi
Owner of http://www.birchi.in
Thank you so very much! I'm an ageing priest working in Transylvania and The Republic of moldova with victims of child trafficking. My battery has suffered extensive use and I believe it still should have lasted longer. I have limited resources to use for myself and feel attempting to replace the battery myself far more economical and funds conscious. Thanks to you I shall endeavour to replace it myself…thanks to your instruction.
May all your journeys be ones of discovery!
Fr Bill+
Projectnewlife.org
PNLMoldovaPrisons.blogspot.com
BigWorldSmallBoat.blogspot.com
ScmMoldova.blogspot.com
DogDogma.blogspot.com
Assolutamente insufficiente. L’iOpener non scioglie l’adesivo posteriore e quindi il vetro posteriore si rompe facilmente. Il tutorial indica una parte assolutamente inutile, ovvero lo smontaggio del telaio. Non serve basta estrarre la batteria con un piccolo cacciavite. I tutorial fateli scrivere a chi lavora sui device. Grazie
Hello axlduri,
thanks for your feedback. In case you weren’t able to loosen the adhesive beneath the back cover with an iOpener, you can use a heat gun to do so. However the iOpener should do the job and should be applied for at least 2 minutes to the back cover. Repeat this step several times until the adhesive is loose. Additionally the battery sits super tight in the mid frame and it’s nearly impossible to remove it safely, without removing the mid frame. You should never work or pry on batteries with metal tools like a screwdriver. If you accidentally puncture them, they can explode or catch fire. Thats the reason why we advise to remove the mid frame. It’s the safest way to remove the battery.
Merci pour ces instructions. J’ai essayé de démonter la batterie, mais me suis arrêté à l’étape 6. Je ne comprends pas pourquoi il y a toute cette colle! A quoi servent les vis si tout est collé? Remplacer la batterie était un jeu d’enfant dans les anciens modèles Samsung. Maintenant on a l’impression que les constructeurs font tout pour qu’on désespère et rachète un nouveau mobile! C’est honteux dans un monde où on essaie de minimiser les déchets!
Hi, thank you for this tutorial, very useful. Could you please say which tesa adhesive width (1, 2, 4 or 8 mm) should be used to replace the old adhesive? And how to remove the latter? Thank you.
Hi Guido,
the original battery adhesive is 3 mm wide but anything between 2 and 4 will do the job. However the original back cover adhesive has different widths between 2 and 3 mm. In case you only want to invest in 1 tape I’d personally suggest buying the 2 mm tape but to take care to use enough of it. To remove the adhesive remains you can use our adhesive remover or high isopropyl alcohol (>90%).
Dieser Schritt war der schwierigste für mich. Ohne iOpener und nach langem Fönen wollte sich immer noch keine Lücke für den Pick finden…
Was dann geholfen hatte, war eine Sticknadel, die ich vorsichtig auf der unteren Rückseite bei einer der beiden kleinen Plastikstreifen ansetzte. Mit dieser konnte ich die Rückabdeckung so weit anheben, dass ich mit dem Pick dazwischen kam.
Honigerdnussbrot - Contestar