Esta traducción podría no reflejar los cambios más recientes añadidos a la guía de referencia. Ayúdanos a actualizar la traducción o revisa la guía original.
Introducción
Utiliza esta guía para sustituir la junta Force Touch de tu Apple Watch Series 2. Esta guía muestra el procedimiento dejando la pantalla conectada. Si prefieres desconectar la pantalla o vas a sustituirla de todos modos, consulta this guide y sustituye la junta Force Touch después de retirar la pantalla.
Si la función Force Touch funciona correctamente y sólo necesita un adhesivo nuevo para volver a sellar el reloj, siga la guía de sustitución del adhesivo en su lugar.
Qué necesitas
-
-
Antes de comenzar las reparaciones, saca tu reloj del cargador y apágalo.
-
-
-
Prepara un iOpener (o usa un secador de pelo o una pistola de calor) y calienta la esfera del reloj hasta que esté ligeramente demasiado caliente para tocarla.
-
Deja el iOpener en el reloj durante al menos un minuto para calentar completamente la pantalla y suavizar el adhesivo que lo sujeta a la caja.
I have heated up the iOpener to 165 degrees and left it on for more than a minute. No way I can lift the screen off with the exact knife. Tried different angles in various places, but no go. I also used a hair dryer un til the watch screen was too hot to touch and even tried a very hard cutting tool blade and also no go. Could n ever get the blade under the face I applied enough force where I could see that the blade left small marks, not very big, but could never get anything to move or lift. What am I doing wrong? I spent 47 years at a global computer company and I am used to taking apart small things and applying force when required. I don’t know what I am doing wrong. Please help me.
Getting the initial gap is not easy. Maybe a playing card could work its way in the tiny gap and cut some adhesive. After that there might be some success with an exacto knife. Or you want to try a piece of aluminum foil (folded for more rigidity) for cutting the adhesive. Be aware of the force touch gasket and that it might get damaged during that procedure.
I finally used a hot air gun set to 150 deg. C heating up the edges by slowly spinning the watch around before the technique worked. Difficult is the level noted and it’s correct. Finally worked and watch perfectly functioning.
I used a heat gun, too. I was worried after reading comments that it would burn up the LCD, so I heated it a little bit at a time, rotating it like you did, and checking to see if I could get my knife under it. I must have hit one of the buttons because it did turn on, but that did reassure me that the display was okay.
It's open. Now that the watch and I have had a few minutes to cool down, I'm ready for the next step. Not as difficult as I thought it could be. Tomorrow, I'll be replacing the battery in an iPod Touch 6th Gen.
bester -
I had to heat the iOpener 2 times and leave it on top of the watch for 10 minutes.
-
-
The Watch 3 stainless Steel has an additional Frame. Where do i have To Open it?
I wore thick gardening gloves just to be safe 😅 and it took a while but the screen did come off.
-
-
Coloca el borde de una hoja curvada en el espacio fino de la pantalla y la carcasa exterior. Comienza en el lado corto de la pantalla, más cercano a la corona digital.
-
Presiona firmemente hacia abajo en el hueco.
-
Una vez insertada, inclina la cuchilla para abrir ligeramente la pantalla.
It’s difficult to grip case in a way that keeps fingers safe from the blade but doesn’t hit the side buttons and turn the device on!
If it’s a struggle to get the display to release, warm case for a few more minutes.
I have tried so may times to get the display to release but nothing works. Should have bought a new watch LOL. Kept the iOpener on 2 times for 10 minutes and it still won't open. There must be a better way.
Hi Susan,
if you're struggling to get the adhesive loose enough a hair dryer, heat gun, or hot plate may also be used, but be careful not to overheat the device. The edge should feel slightly too hot to the touch.
-
-
-
Una vez que has abierto un pequeño espacio con la hoja curvada, retira la hoja e inserta el borde mas delgado de una herramienta de apertura en el hueco.
-
Empuja la herramienta de apertura en el hueco. Usando tu pulgar como un pivote para levantar la pantalla abierta un poco más lejos.
-
-
-
-
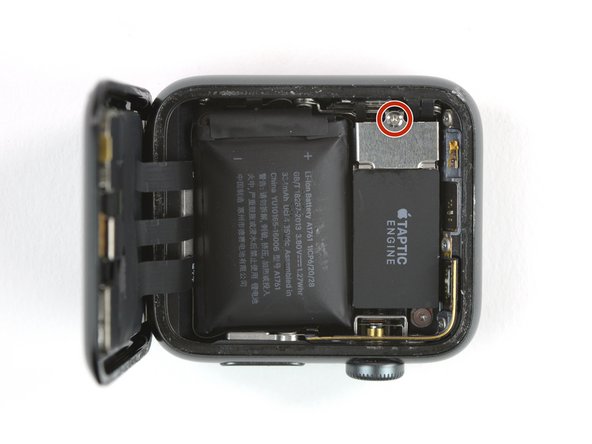
Utiliza un destornillador Y000 para quitar el tornillo de tres puntos que sujeta la cubierta metálica del conector de la batería.
-
Remueve la tapa.
-
-
-
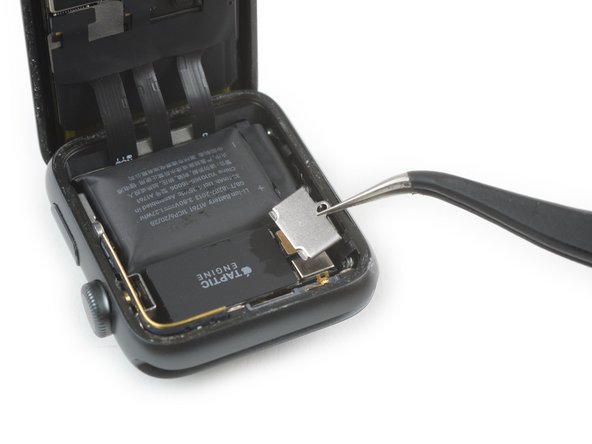
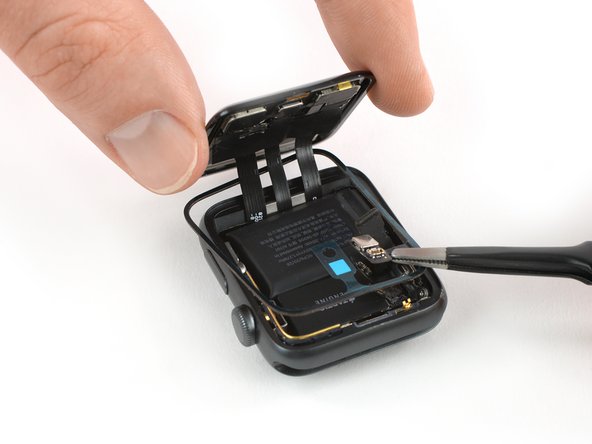
Utiliza la punta de una herramienta de palanca para desconectar la junta Force Touch haciendo palanca hacia arriba desde el borde exterior.
-
-
-
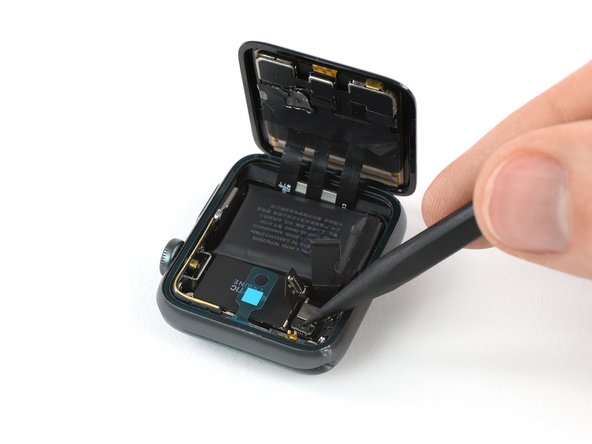
Levanta la placa del conector de la junta Force Touch.
-
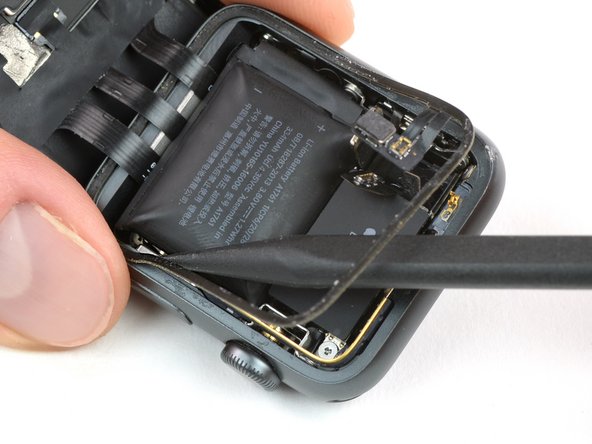
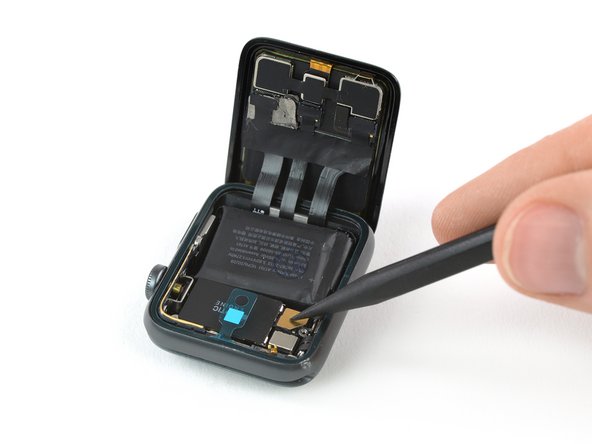
Desliza tus pinzas o una herramienta de palanca por debajo de la junta para separar el pegamento que hay debajo.
-
Separa el pegamento alrededor de todo perímetro del reloj excepto del borde donde están los cables de pantalla para evitar arrancarlos accidentalmente.
-
-
-
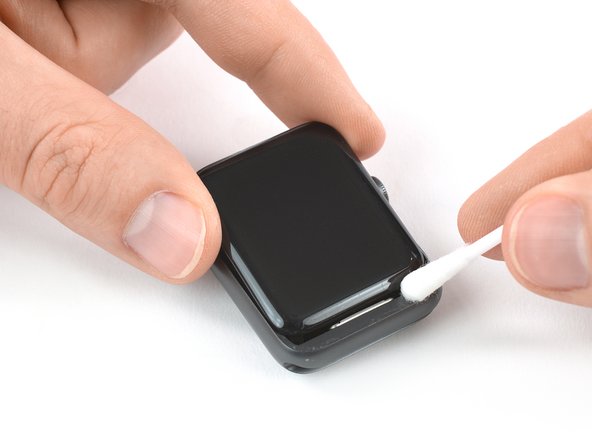
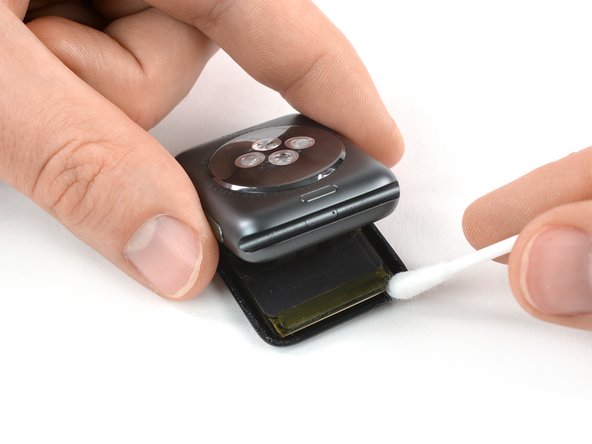
Aplica un poquito de alcohol isopropílico (>90%) en un bastoncillo de algodón o usa una almohadilla de limpieza para remover con cuidado cualquier residuo de la junta Force Touch anterior
-
-
-
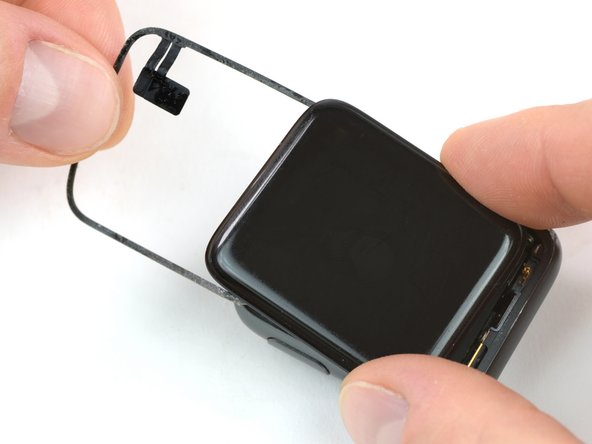
Gira el Apple Watch boca abajo para que la pantalla quede plana mientras levantas la caja.
-
Remueve los residuos en la parte posterior de la pantalla.
-
-
-
Usa un par de pinzas para remover con cuidado el film protector desde la parte inferior de tu junta nueva Force Touch.
There’s a clear plastic stiffener that must be removed at the same time as or just before removing the protective liner. Be careful to remove only the plastic and not the protective liners, it is possible!
-
-
-
Sostén la junta Force Touch diagonalmente para pasarla a través de la pantalla.
-
Inclina ligeramente la pantalla hacia adelante para poder alinear la junta Force Touch con el marco.
-
Comenzando en la esquina opuesta al conector de la junta Force Touch, coloca la junta en el marco y presiona hacia abajo.
-
-
-
Usa pinzas para colocar la placa metálica que cubre el conector de la batería en su posición original.
-
Instala el tornillo Tri-point #000.
-
En este punto, tendrías que encender el reloj y fijarte si todo funciona antes de sellarlo.
-


Lleva tus residuos electrónicos a un R2 o e-Stewards certified recycler.
¿La reparación no ha ido según lo previsto? Prueba a solución básica de problemas, o busca ayuda en nuestro foro de Respuestas.
Lleva tus residuos electrónicos a un R2 o e-Stewards certified recycler.
¿La reparación no ha ido según lo previsto? Prueba a solución básica de problemas, o busca ayuda en nuestro foro de Respuestas.
Cancelar: No complete esta guía.
48 personas más completaron esta guía.
Un agradecimiento especial a estos traductores:
94%


Estos traductores nos están ayudando a reparar el mundo! ¿Quieres contribuir?
Empezar a traducir ›

Equipo

Tobias Isakeit - Repairability Engineer Miembro de Tobias Isakeit - Repairability Engineer
Business
1 Miembro
1,083 Guías creadas
7 comentarios
Hola, Me presento como nuevo y NOVATO. Me llamo Jaime, y Yo creo que os mereceis un 10. La caña de España.
Hola Jaime! Bienvenido! Muchas gracias por tu comentario. Nos alegra que te guste nuestro sitio. Cualquier duda que tengas, no dudes en consultarme. Soy la moderadora y líder de la comunidad hispanohablante.
The gasket comes with all the necessary adhesive or you need to put he the sealing adhesive separately? I need to replace my screen and I got the gasket and screen but don’t know if I need glue to waterproof it?
I bought iFixit’s battery replacement kit and the gasket which I received had adhesive on both sides, just like in this guide.
The repair kit does comes with extra gasket adhesive, which confused me at first. The extra adhesive is included in case you manage to open the watch without damaging the original gasket.
I have no idea why they include the extra adhesives. When I tried to use one the screen sat too high and it looked bad.
Thank you for an awesome guide. It got a little dodgy for a second there, but I replaced the screen, Force Touch Gasket and Battery. It works as new!
Congrats, welcome to the club of fixers :)
Verify your model. The back of the Cellular model just says GPS, so be sure to check the groves where the watch band goes to determine you model. I made the mistake of just reading the back of the device and since I’d been gifted the device didn’t know it was cellular. Cellular has a different type of touch force gasket, different screen, and different battery connections.
Ryan Holt - Contestar
From what I just read on Apple, the only differences in watch series 3 is 38mm and 42mm.
mcr4u2 -
As a consumer all you need to know are 38mm and 42mm
Michael Adoga - Contestar
The back will say GPS LTE if it’s the cellular version. If it doesn’t say LTE it is only the GPS version. The displays are different whether or not it is LTE(cellular).
themepark - Contestar
This alternative method only reboots the watch.
Gregg Stanley - Contestar