Introducción
¿La batería no dura mucho? Cámbiala.
Qué necesitas
-
-
Antes de abrir su iPod, asegúrate de que el interruptor de retención esté en la posición de bloqueo. La barra naranja debe estar visible, lo que indica que la retención está activa.
-
-
-
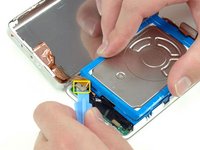
Inserta una púa de apertura lo más lejos posible en la costura entre el frente de plástico y el panel trasero de metal, en el borde derecho del iPod.
-
Usa la púa de apertura para hacer palanca contra el panel frontal de plástico y suelta las cinco pestañas de retención (que se ven en la tercera foto).
-
Desliza la púa a lo largo del borde del iPod y continúa haciendo palanca para liberar el resto de las pestañas de retención.
-
Una vez que las cinco pestañas del lado derecho estén libres, la carcasa debería abrirse con facilidad.
Is that wide opening pick shown in the photo available? Or should I be able to get my iPod 3G open with just the narrow opening tool? So far I’ve been unsuccessful.
Hi David, an opening tool can definitely work, but we’ve found that the opening picks tend to be a bit easier. You can find those in our store. The clips are definitely really tough and, like Matthew mentioned, using multiple picks might help. Getting the pick in the seam is the hardest part, then once it’s in you should be able to work it in farther, or add another pick to eventually release the clips.
I had to use about 10 guitar picks. The case “clips” are amazingly tight. I’d get one in just barely, then I’d add another in the now-opened slot. Then another. I’d space them about 1 or 1.5cm apart on two sides. Work into a corner and it will release. (I’m going on memory. I bought packs of the cheapest guitar picks. I have both thin and medium. I think I used medium, but I can’t remember.)
so much easier to open with an xacto blade and handle. the blade has a more defined edge that helps to move the plastic front cover. then a pick can help do the rest.only took 2 mins. using xacto blade and handle
also not mentioned is reattachment of hard drive plug to board . not a normal plug as the others.need to be sure it is attached before closing up ipod. replacement battery was thicker than origional and allowed hd to not sit level
After trying fruitlessly with a variety of plastic tools, I remembered I owned an iSesamo. Got in in 20 seconds.
I second the idea of using an Exacto handle with a flat chisel blade to start the opening on the right side. Then I could insert the pick and work it around to undo all the clips. I could get a lot more purchase on the edge and make a gap for the pick. It took some pressure as it’s been 20 years since this unit was built, an iPod Special U2 black edition.
As others noted, it’s darn near impossible to get a pick into the seam to get started opening the case. I finally got mine by pressing up on the back of the case, which causes the side of the back piece to angle out a bit and allowed me to get the pick that came with the replacement battery in. Once I finally got that far, it was fairly easy to slide the pick up and down the side of the case to pop free each of the clips. I scubbed up the edge of mine a bit before I figured this out, and those efforts didn’t help, so maybe avoid that. (I didn’t have an Exacto like others have suggested, but having done this, I can see how that might work well also, if you are careful about it)
As you described: Pressing on the back case, squeezing it together with the top case was key for me! It allowed me to easily get the first pick in - without the risk of scratching the case or stabbing oneself. 🙈
Nito -
This tool worked great! iFixit Opening Tool
I could push the plastic top part back enough to get the pick in.
Two guitar picks did the trick – as soon as the edge of the first pick goes into the gap, twist it more upright; the next pick can then be slid into the opening and the rest of the case opens up easily. One warning: be very careful near the charging port – there’s a delicate plastic trim around the opening in the metal case and I accidentally cut through the trim with the edge of a pick. The trim is attached to the case with two screws so I removed it before repairing it with superglue. This worked well and the trim screwed back in very easily.
Turn the iPod upside down and squeeze (push the white plastic in while squeezing). You will hear a click, creating a gap to insert the pick. You're welcome. :)
-
-
-
Abre la carcasa como un libro con el conector de la base en la parte superior y coloca el panel posterior junto a la mitad frontal del iPod.
Remember to fold the backplate up the correct direction, otherwise you might break this cable.
-
-
-
-
Utiliza una herramienta de plástico o las uñas para desconectar con cuidado el cable naranja del conector de auriculares. Asegúrate de tirar hacia arriba del conector, no del cable en sí.
Be more than careful with the headphone jack, because I thought I was until I broke mine (I still don't figure how I did this). Those are hard to find after and if you do, it may cost you something around 20-30$
Yeah, I just did the same. Oops.
just did the same, and no part available in the UK. Looks too small to solder :(
Yikes - yes, be SUPER careful - just damaged mine too (snapped some of the soldered connections between ribbon and plug). I only use my iPod with a dock in my car, so hoping I will get away with this.
Arrgh...I should have paid closer attention the red warnings above. I ended up pushing up on the ribbon part rather than the actual socket. Thereby completing separating the connector from the ribbon cable. I got way too excited when I finally got the case loose after an hour of trying that I rushed through this part. Now I have to see if I can replace this part.
Blech - despite these thoughtful warnings I snapped that plug right off the ribbon! So please, be careful. I found a replacement headphone jack (used) on eBay for 20 bucks. What a not-fun way to spend 20 bucks!
Yep - did the same. Bugger. Is it possible to carefully fix? Solder or glue or are there replacement parts? I do actually have another iPod but I was hoping to end up with two working versions rather than one just for parts.
Well, that reminds me to view the comments first before attempting any of the repair steps. Did the same thing. iFixit should put that suggestion at the top of every repair guide. “Review Comments First, Save $20”.
Yep, that’s me buggered too.
Same thing happened to me. I was extra careful. Now what?
This step appears to be optional for a battery replacement - or, at least, I could not persuade the connector off the logic board without applying more force than I was prepared to given all these warnings. So I just carried on, and replaced the battery without ever removing the headphone jack connector.
You are correct, this step is not necessary for a battery replacement although it may give you more room to work with. In my opinion it’s not worth the risk of damaging the connector though, as you can just place the metal cover to the side like Rob said, leaving the connector attached and carefully folding the metal cover to the side like opening a book (although it may not lay perfectly parallel to the front case of the iPod).
Bagel -
I REALLY wish I had read this comment first, now it's broken, my bad :/
Yep, the step should be place the metal back cover to the side without removing the connector, because you’re certain to break it, especially if this is the third time you’ve replaced the battery and you forgot to be careful the third time.
100% this should be changed, look at how many people have had this problem
-
-
-
Levanta el disco duro con una mano y desconecta con cuidado la cinta del disco duro de la placa lógica.
-
Saca el disco duro del iPod.
When re-installing drive cable, be sure it "clicks" into place - if not,
your iPod will display a "missing folder" icon instead of working.
It might be worth trying to replace the battery without completely
removing the hard drive connection.
Also, when reassembling ensure the metallic tab/tape connecting the hard drive ribbon to the blue mounting bracket. As seen in step 6 is still on top of the mounting bracket.
When I replaced my battery this bracket fell off of the hard drive. When reassembled the tab became folded down and was touching pins connecting the drive. As a result the iPod worked as a player but had difficulty charging, would not connect to iTunes or show as a mounted drive. After waiting along time it would be detected but would not work with iTunes. iTunes would report the iPod as corrupted or in recovery mode. Removing the tab/tape from the pins restored function.
I was able to get the battery out without performing this step. My opinion: don’t remove parts you don’t have to.
I agree with Nicholas, the HD can stay at 45° angle sitting on the back of your hand, then there is enough space to remove the battery
IMHO (In Mikes Humble Opinion), reconnecting the drive proved to be very challenging, having fat fingers, and they get in the way of the light to see what I was doing, along with wearing bifocal glasses, which was also contributing factor. I worked under a lighted benchtop magnifier, with my glasses and with out, did not appear to make a significant difference.
Just a thought,
Mike
-
-
-
Desconecta con cuidado el conector blanco de la batería de la placa lógica. Asegúrate de tirar solo del conector y no de los cables.
I managed to break this connector off the board. Waiting for the soldering iron to arrive.
I did too! Did you ever manage to solder it back on? Is it difficult?
-
-
-
Retira el tornillo Torx T6 negro que se encuentra cerca del conector de la batería en la placa lógica.
For me, this step was more important for reassembly. The new battery leads were thicker so I needed to lift the board a little (very little) to slide them under.
I did not have to do this step at all, just tucked the cables one by one following the corner shape
-
-
-
Pasa con cuidado el cable de la batería alrededor del extremo de la placa lógica. Ten cuidado de no tirar demasiado de la placa lógica mientras liberas el cable de la batería.
-
-
-
Levanta la batería hacia arriba y hacia afuera del iPod.
-


Para volver a armar tu dispositivo, sigue estas instrucciones en orden inverso.
Para volver a armar tu dispositivo, sigue estas instrucciones en orden inverso.
Cancelar: No complete esta guía.
326 personas más completaron esta guía.
Un agradecimiento especial a estos traductores:
100%


Estos traductores nos están ayudando a reparar el mundo! ¿Quieres contribuir?
Empezar a traducir ›

19 comentarios
If you are real careful you don't have to remove the Torx screw to get the battery out.
I found this quite easy. The tools worked great. I agree with Andy, if you push the tool into the groove, then lift or pry it up so the tip of the tool is down inside the back cover, you should be able to slide it across to pop the clips quite easily. Once you get the first two sides open, it goes quick.
I also did this without having to remove the Torx screw. It helped to lift the battery up a bit to give the wires a little slack, and then just feed them around the corner of the motherboard. Putting the new battery in, I just fed the wires around the corner, and used the opening tool to push them the final bit of the way around the corner.
My old iPod is like new now! Hours and hours of battery life, when it would previously die after 5 minutes.
Very simple and clear guide. I managed to replace the battery in the first try and it worked!
I was able to do it without disconnecting the headphone jack and without removing the Torx screw.
I found the replacement battery to be a little thicker than the original battery but there was no issue resealing the case.
Now my first iPod works like new. I had a lot of trouble coaxing the back off, and found it much easier just to run down one side. I ended up putting on heavy work gloves because the pry tool was hard to push in there. I also didn't find it necessary to remove the Torx screw. The leads on the replacement battery were thicker and longer than the original's, but no problem getting it to fit. My 20-something co-workers are impressed. "Is that the original iPod?" they asked. "Get off my lawn," I snapped.
Worked a treat! Loved bringing this bad boy back to life and finding 10 year old playlists! Thanks very much.
Per a couple of the tips in the comments, I found it easier to start prying open the case from one of the sides rather than the top. When disconnecting the headphone connection, you’re pulling out a little plug (the descriptions and comments are a little confusing about exactly which bit you’re separating). Also, I didn’t find it necessary to remove the hard drive (Step 8) - You can just lift it up when taking the battery out, without disconnecting it (one less step to risk).
Great guide. I did not have to disconnect the hard drive, however I did have to remove the torx screw because the wires on the new battery were thicker than the original and wouldn’t slip between the motherboard and case. Now to find the Firewire charging cable…..
I was able to successfully replace the battery in my 3rd Gen iPod using the steps above with a new iFixit.com battery and it showed about 25% battery life after installation. I then connected my original iPod FireWire cable charger to the electrical outlet overnight and the iPod showed ‘Fully Charged’, but when I disconnected the FireWire cable it only showed about 50% and then the battery quickly decreased and lasted about 10 minutes. Subsequently I’ve tried several times to charge the battery with the supplier FireWire, but it quickly runs out within 5-10 minutes. Is this a defective battery or another issue?
I have the same problem. Were you ever able to find a fix?
I had to work the guitar pick tool from the top of the ipod, but it got in eventually. the replacement battery had the same part number as the existing one, but the new one was just a little longer, fed it into the the space under the power connector. heres hoping this gets me some more playimt out of my 3rd gen
Well, crap. I was trying to be extra careful to remove the headphone jack cable in Step 4, but one inadvertent slip with the pry tool, and exactly as described - the ribbon cable separated from its connector plug, plug still in the socket. The new battery works fine, the primary-use face controls work fine, but the headphone socket, remote jack, and hold switch are no longer functional. Not the end of the world, since its primary life now is “car iPod”, but still disappointing. BE EXTRA CAREFUL PULLING THE HEADPHONE JACK CABLE OUT! (My car has a USB jack, but while the iPod 3rd generation can send data/sound over the USB, it can’t charge over USB, so I have to bring it in to the house every so often to charge over a FireWire dock cable to a FireWire power brick.)
This guide is awesome! Managed to get it done as a first-timer! Thank you!!
The instructions show trying to start the case separation from the corner. I found if you started the case in the middle of the side, the bottom flexed a bit and a pick or spudger could bet pushed in. Other than that the repair took less than 20 min. Thank you
Where can I find a battery for this mdoel ? :)
The battery was slightly too thick but still fitted in OK.
When I charged it the battery wasn't holding its charge very well.
When I attempted to load my songs from iplayer onto it, the unit heated up madly and crashed with the no HD logo on the screen.
I opened it again and the rubber mounting of the HD and the battery itself was sticky as if exposed to too much heat.
This must have been caused by trying to put too much data at once onto the HD or a not very good battery.
It's in the recycling bin now
Note that the lock will move out of position again easily once you have the case open (when disengaged from the internal switch). That being said, you will want to keep this little switch in mind even beyond making sure the lock is in the right place, as the little plastic tab that is the switch is extremely small and fragile. I ended up breaking mine off somehow while trying to get the case closed. It is small enough that I never felt it break; I finally got the iPod back together and found that the lock switch didn’t work. I was able to re-open it and use a pick tool to unlock what was left of the switch, so my iPod works, but no longer locks. I’m happy to have a working battery anyhow, but I’d have been happier yet to have completed the repair without breaking anything - be careful with this little switch.
Joe Sutton - Contestar
Good advice! Thanks! 👍👌👏👏
Nito - Contestar