Introducción
Esta guía te mostrará cómo reemplazar la batería en tu controlador Joy-Con.
Hay algunas pocas diferencias entre el Joy-Con derecho y el izquierdo. Estos pasos se aplican para ambos Joy-Cons.
Qué necesitas
Resumen del Video
-
-
-
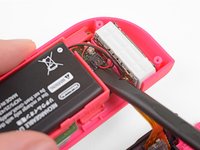
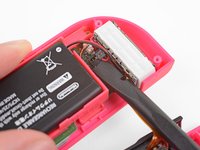
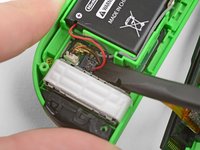
Usa un Spudger para sacar suavemente el conector de la batería de su zócalo en la placa madre. Esto evitará que el Joy-Con se encienda durante la reparación.
Beim wiedereinstecken des Akkus hat sich für mich bewährt die Flache seite des Spudgers etwas zwischen die beiden Akkukabel zu stecken.
Außerdem sollte man darauf achten, dass wenn man wie in den Bildern zu sehen den Akkustecker von der Platine entfernt nicht ausversehen die Bauteile von der Platine bricht die unmittelbar vor dem Stecker sind
Hallo Sontha,
danke für die Anmerkung. Viel Spaß mit deiner Switch!
Viele Grüße!
-
-
-
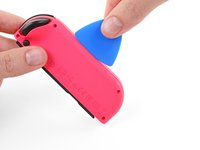
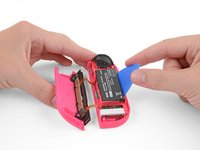
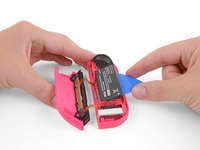
Inserta una púa de apertura entre la batería y la carcasa del Joy-Con.
-
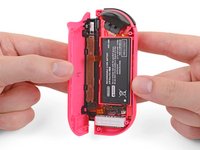
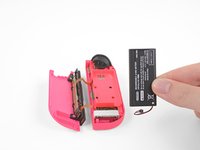
Suavemente saca la batería, que está ligeramente pegada con cinta adhesiva en su lugar.
thx for making this process ez and affordable.
definitely saved the environment of dumping 4 perfectly reusable joy-cons.
Thank you Ifixit, I changed my battery fairly easy. Your guide has been very helpful!
Easy-peasy. Joy-Con now works while disconnected again. Thanks, ifixit!
What width of tape should I buy for this? The link to the store for the double sided-tape shows four choices (1, 2, 4 or 8mm). The kit we can buy comes with a tape card, but I need to change four batteries, and buying four kits would be a waste.
-


Para volver a ensamblar tu dispositivo, sigue estas instrucciones en orden inverso.
Para volver a ensamblar tu dispositivo, sigue estas instrucciones en orden inverso.
Cancelar: No complete esta guía.
69 personas más completaron esta guía.
Un agradecimiento especial a estos traductores:
100%


Estos traductores nos están ayudando a reparar el mundo! ¿Quieres contribuir?
Empezar a traducir ›


11 comentarios
Bonjour, après avoir suivi les étapes tout fonctionne ,SAUF la recharge … à savoir également que je me suis trompé dans la commande de la nouvelle batterie, celle-ci étant d'une capacité plus faible
Bonjour Ced ! Nous sommes désolés de l’apprendre. Avez-vous essayé de calibrer la batterie ? Veuillez prendre contact avec notre service client (support@ifixit.com pour la boutique américaine ou eustore@ifixit.com pour la boutique européenne et française) en indiquant votre numéro de commande. Ce sera un plaisir de vous porter assistance !
Bei mir ging beim roten Joy Con oder Akku nicht mehr, ich hab ihn jetzt auseinandergeschraubt, das Kabel vom Akku gelöst und wieder eingesteckt.
als ich alles zusammengebaut habe ging er. Es war wahrscheinlich nur das Kabel was nicht richtig drin war.
Hello, i'm unsure what to do now but I have replaced my battery but my switch still doesn't show the presence of my right joy-con. I opened up the joy-con while connected to the switch and the battery is only charging at 1.2v (without the battery the pins are the same) could it be the charging rail? Any tips would be appreciated. Thanks!
What type of connector is on the battery.is jst molex dupont Jr futaba or something?can you tell me?
What is the little mat with the ifixit logo on it that came with the kit? I thought it was a mini magnetic mat, but I tried to get a screw to stick to it and it didn't. It's very flexible and looks like it should be peelable, but I didn't want to attempt this on the off chance it is something else.
As far as the guide itself, it was very easy to follow and worked perfectly for me. Thank you!
I believe that is replacement tape or adhesive for the battery, incase yours came off of the joycon case with the battery!
Vielen Dank! Meine zwei Joy Cons haben nun wieder frische Akkus! :)
Hi! I recently preformed this repair successfully, but now the buttons on the rail do not work. However the rail itself still works and connects to the switch. There are no broken ribbon cables or loose connections to my knowledge. Could it be the way the ribbon cables are positions inside the casing, maybe I placed them back in wrong? Any help would work, thanks!