Introducción
Reemplazo del conjunto de la placa lógica
Qué necesitas
-
-
Retira los siguientes 5 tornillos que sujetan la pared intermedia a la caja superior:
-
Tres tornillos Phillips de 10.5 mm.
-
Dos tornillos Phillips de 3.7 mm.
-
-
-
Retira los siguientes seis tornillos que sujetan el ventilador derecho y el ventilador izquierdo a la placa lógica:
-
Cuatro tornillos Phillips de 3.5 mm.
-
Dos tornillos Phillips de 3.2 mm.
Pry under the side where the wires connect.
I think this the screw dimensions may be reversed. My late 2008 Unibody had four 3.2mm and two 3.5mm.
-
-
-
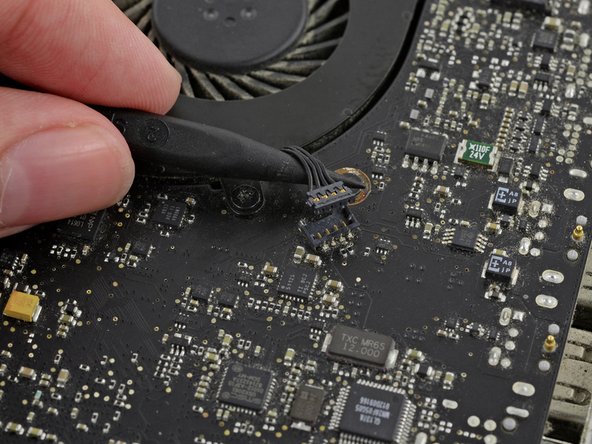
Usa la punta de un spudger para levantar el conector del ventilador derecho hacia arriba desde su zócalo en la placa lógica.
-
Retira el ventilador derecho de la caja.
Be really gentle and patient with this connector, I popped the socket right off of the logic board (thankfully the already broken one that I was replacing). It actually shouldn't take much force, and just gently work on it until it comes out.
-
-
-
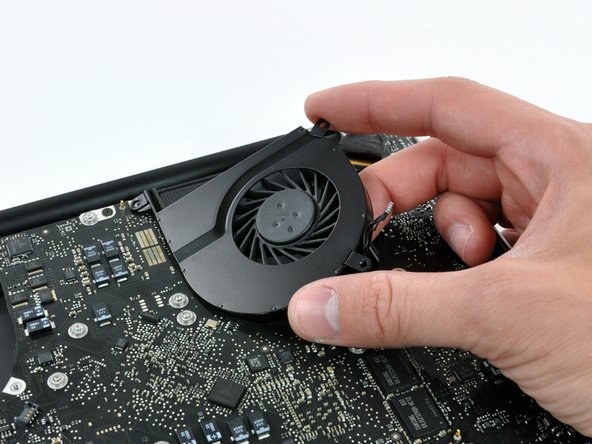
Usa la punta de un spudger para levantar el conector del ventilador izquierdo hacia arriba desde su zócalo en la placa lógica.
-
Retira el ventilador izquierdo de la caja.
I unfortunately broke the fan receptacle connector (2 pin) on the board. How do I order a new connector and how do I put it on?
-
-
-
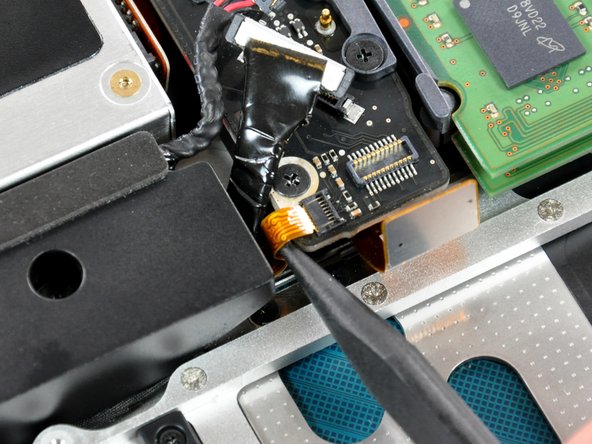
Retira cualquier adhesivo del conector del cable de la cámara.
-
Desconecta el cable de la cámara tirando del extremo macho fuera de su zócalo, paralelo a la placa lógica, no lo levantes hacia arriba.
There's a little shiny piece of plastic holding this item in place to keep it from sliding out of it's slot. It's glued on and if you don't take it off first, you'll likely bend the connector so that it won't work anymore. Ruined a motherboard because this step was missing.
It is not necessary to disconnect the camera cable to remove/replace the left speaker. You can leave the cable connected to save you from damaging it.
-
-
-
Con el extremo plano de un spudger, levanta el conector del subwoofer para sacarlo de su zócalo en la placa lógica.
I Broke the subwoofer socket on the logic board. Can I use without subwoofer, or do I now have to replace the logic board?
Sorry to hear this. Yes, you can use the machine without the subwoofer. To be safe, cover the subwoofer plug with some electrical tape so that it can't cause a short circuit somewhere.
-
-
-
-
Con la punta de un spudger, levanta la solapa de retención del cable plano IR / sleep LED.
-
Extrae el cable plano IR / sleep LED de su zócalo.
Hi, thanks for this tutorial: it solved my problem.
But unfortunately I have broken the IR/sleep LED ribbon cable socket on motherboard (cable is ok, socket crumbled): computer works fine but now it doesn't go on standby anymore. Is there a way to fix the cable on motherboard (for example with Kapton tape) or is there a software to manage computer standby?
Thanks in advance for your help.
Mary
Hi, thanks for this tutorial, it is really helpful. Unfortunately I cannot push the ribbon cable into the socket. The space is really limited, the cable is hard, and the socket seems to be too narrow. Is there any tool to push this kind of cable in a short space? Very fine plastic tweezers could work? Even without this cable the Mac can work, so I leave it before I break it.
Hideyuki
-
-
-
Con la punta de un spudger, levanta la solapa de retención del cable plano del teclado.
-
Tira del cable plano del teclado para sacarlo de su zócalo.
I ran into trouble when re-installing the keyboard cable. I got everything put back together, plugged it in, and pressed Power... and nothing happened. I took everything apart again, reseated the heat sink and everything, put it back together... and the Power button didn't respond.
The MagSafe light came on, and the battery charge lights came on. But it wouldn't power up.
Finally I figured out that the keyboard cable is really tricky to get in correctly. If you can slide it out with the retaining clip locked (applying very little pressure), then the cable isn't actually in correctly. I had to really fiddle with it, and maybe slide it in one side first, to see that it actually needed to slide in another 1/8th inch or so beyond what felt like "in" the first few times I did it.
Once I'd secured that cable, my MacBook turned on again without a problem. So far, after just replacing the Thermal Paste (I didn't actually install a new heat sink), the computer is running 20°F cooler than it has in years. Thanks!
I think I broke the keyboard ribbon cable, now I have to replace the keyboard.....
I agree. The instructions should place emphasis on seeing how deep this ribbon is. Most ribbons are pretty easy to slot back in. This one is not (maybe because of the colour). The IR/sleep is a b... too!
Hi Jerome. Thank you for your feedback. I agree with you and simolinic. There should be a reminder bullet that warns people about the depth of the ribbon cable. Thanks for adding that. Much appreciated.
Thank you simonlinic, for pointing this out. I was so disapppointed when the MacBook Pro wouldn't start up. I reopened the MacBook and was able to insert the keyboard ribbon cable quite a bit more by pushing agains the top of the cable while inserting it. I tired starting up after that and it still wouldn't start. I took a 15 minute break and then it started up perfectly! I'm grateful to you all!
Here is the best way to reinsert this cable: MacBook unibody keyboard ribbon cable won't go in Putting a piece of tape on the connector (creating a pull-tab) and pulling it in works great.
-
-
-
Con el extremo plano de un spudger, levanta el conector del cable del micrófono hacia afuera de su zócalo en la placa lógica.
I don't believe this step is actually necessary, the cable is attached on the other side of the logic board and comes along with it, so it just isn't really necessary to disconnect (although it's not hard either).
-
-
-
Quita los siete tornillos Phillips de 3.2 mm que sujetan la placa lógica a la caja superior.
On reassembly, check carefully that none of the fiddly little cables are trapped under the logic board. I had to back up and liberate the subwoofer connector. It takes some careful jiggling to get the sockets seated in the port holes.
The two screws closest to the optical drive have smaller heads. (May not be critical.)
-
-
-
Retira los dos tornillos Phillips de 3.5 mm que sujetan el clip de la caja inferior a la caja superior.
-
Levanta el clip de la caja inferior fuera de la caja superior.
My clip is oriented 180 degrees (flipped) from this picture.
The bottom case clip is screwed to a black plastic bracket that's glued onto the upper case. My replacement upper case did not come with this bracket. I had to carefully pry it off the old upper case, taking care not to break it, and glue it to the new upper case before replacing the logic board.
I have a 2.66ghz 15inch Unibody Macbook Pro (A1286) and this step was not necessary.
Cita de Andrew Mostajo:
I have a 2.66ghz 15inch Unibody Macbook Pro (A1286) and this step (24) was not necessary.
Apropos to the last tip in this step, the replacement unibody I purchased omitted the receiving end of this clip, but it was in my original. As it only captures (but does not secure) a small metal tab on the bottom cover, I skipped transferring it.
Agree with @colleenthompson - mine was also rotated 180 degrees from what is shown, which also matches the other side of the computer.
-
-
-
Levanta la placa lógica lo suficiente para agarrar el conector de la batería y tire de él directamente hacia afuera de su zócalo en la placa lógica.
-
Levanta el conjunto de la placa lógica de la caja superior.
Its better to carefuly “flip” the board towards battery compartment and then take the connector out. The way, how it is written here, its badly accessible with fingers and with tweezers and the connector has plastic point which clicks into hole in the middle of connector. So its better to carefully flip the board upside out and then take it carefully out.
-


Para volver a ensamblar tu dispositivo, sigue estas instrucciones en orden inverso.
Para volver a ensamblar tu dispositivo, sigue estas instrucciones en orden inverso.
Cancelar: No complete esta guía.
4 personas más completaron esta guía.
Un agradecimiento especial a estos traductores:
100%


Estos traductores nos están ayudando a reparar el mundo! ¿Quieres contribuir?
Empezar a traducir ›
