Esta traducción podría no reflejar los cambios más recientes añadidos a la guía de referencia. Ayúdanos a actualizar la traducción o revisa la guía original.
Qué necesitas
-
-
Primero apaga tu teléfono y remueve la bandeja de tarjeta SIM.
-
Destornilla los dos tornillos Pentalobe P2 ubicados en la parte inferior al lado del puerto USB C del dispositivo.
-
-
-
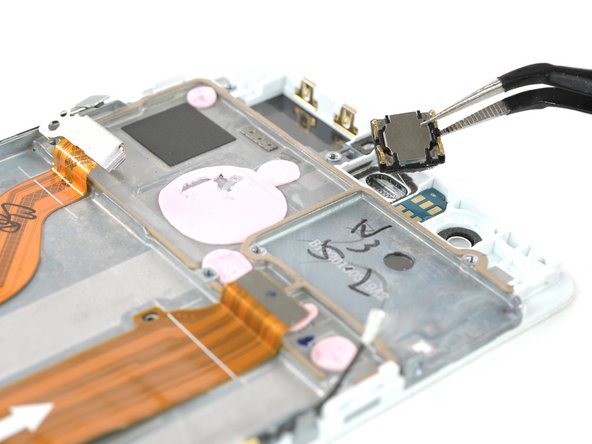
Desconecta el sensor de huella digital utilizando un spudger.
-
-
-
Desenchufa el cable de antena.
-
Remueve la pegatina que se encuentra sobre el tornillo.
-
-
-
-
La batería está sujeta con tres piezas de adhesivo, una lengüeta extraíble en el centro y del lado de la bandeja SIM. Una tercera pieza de adhesivo del lado del botón no tiene lengüeta.
-
Jala de las lengüeta con un movimiento lento y constante para liberar la batería.
-
Levanta la batería despacio hacia el botón de lado y libérala de la pieza escondida de adhesivo restante.
-
-
Este paso está sin traducir. Ayuda a traducirlo
-
Heat the top part of the glass with a heat gun or iOpener.
-
-
Este paso está sin traducir. Ayuda a traducirlo
-
When the glue is softened, insert a spudger through the camera bay in the midframe and push the display away from the frame.
-
Place a plastic card or two opening picks under the display bezel at the top, between the screen and the frame. This will prevent the glue from readhering.
-
-
Este paso está sin traducir. Ayuda a traducirlo
-
Insert an opening pick approximately 1/16 of an inch and slide it along the side to sparate the display from the frame.
-
You might feel more resistance where the LCD ends on the lower end.
-
Stop here and take your time to reheat that part and soften the glue.
-
-
Este paso está sin traducir. Ayuda a traducirlo
-
When the glue is soft enough carefully move the pick around the bottom corner.
-
You can now work your way along the bottom edge.
-
Leave the opening pick on one side and flip the display over.
-
-
Este paso está sin traducir. Ayuda a traducirlo
-
On the back side detach the display flex cable from the frame.
-
Now you can lift the display away from the frame.
-
Check for any small parts like the rubber gasket at the top behind the speaker grill.
-


Cancelar: No complete esta guía.
46 personas más completaron esta guía.
Un agradecimiento especial a estos traductores:
16%
¡ Imanol Martín nos está ayudando a reparar el mundo! ¿Quieres contribuir?
Empezar a traducir ›


14 comentarios
While the guide shows pictures along the process it doesn't really give the whole picture.
Just one example: as a repair guide, you could easily expect the display to be cracked and you can no longer use a suction cup to open it up.
A bigger issue is that the guide doesn't show steps up to the replacement part listed.
An incomplete guide while still providing enough information to help someone with experience in repairs.
ifixit sent me screen and digitizer without the metal frame. is there a way to remove the metal frame and add it to the replacement screen? does ifixit sell screen and digitizer with the metal frame?
you guys are killing me... first you sell the display without the frame even though your instructions clearly show the frame and now it is exactly the same story with a middle frame screen... why it is not part of your display package since it is necessary for the replacement and once again showed in instructional video?
Hello David, I am very sorry for the confusion. The guide was not congruent with the spare part in the shop. Having a display assembly with the frame already attached would be more convenient and an easier repair. Though the display without the frame is a bit cheaper but makes the guide more complex (hence the rating "difficult").
What instructional video do you mean? Is it for another device?
Please sir let me know if I replace the only screen is it not effect to battery. Because someone told me if I have replace screen it should need whole cover with battery . Please tell me is it true or not