Esta guía ha sufrido modificaciones. Revisa la última versión sin revisar.
Introducción
If your HP B210a has a clogged printhead, this guide can be used to try and clear the clog.
- IMPORTANT: This does not fix every printer. If your printer has hardware problems, this procedure will not work.
- Note: If the problem persists, your printer has hardware problems. It is typically more cost efficient to replace the entire printer at this point.
Guide Notes
- WARNING: THIS PROCEDURE MAY DAMAGE PRINTHEADS WITH EXISTING DEFECTS!
- If hardware issues are suspected, use another method or be prepared to scrap the machine.
- This guide is primarily made for the HP Photosmart Plus B210a, but is largely universal with other HP 564 printers (removable printhead).
- Non-removable printhead models (Ex: Photosmart 6520) require special attention to preserve the calibration. These may not work again if SETUP cartridges are expected.
- If I have not tested your specific printer, I cannot guarantee the calibration preservation procedure will work.
Printhead bypass validated models
- Photosmart C6380
- Photosmart Premium C309g
- Photosmart Plus B209a
- Photosmart Plus B210a
Qué necesitas
Documento destacado
-
-
In addition to the parts listing, these items are highly recommended:
-
Plastic bag or ink caps (Protect your cartridges!)
-
Strongly advised: Extra ink cartridges (in case Printhead Preparation empties your old ink)
-
Optional: Gloves and 91% alcohol (Stubborn clogs only)
-
-
-
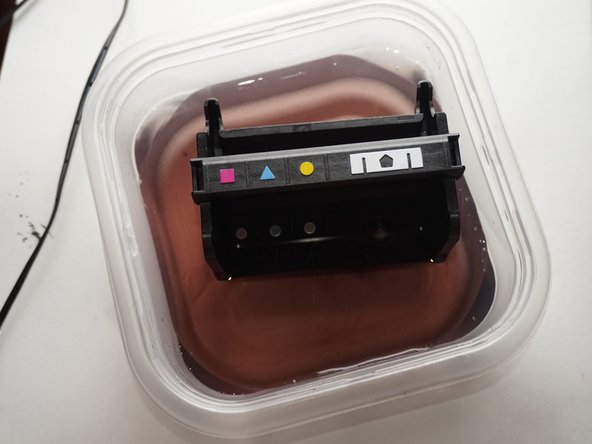
Before removing the printhead, hot water is needed. Remove the K-Cup holder and get a bowl of water.
-
-
-
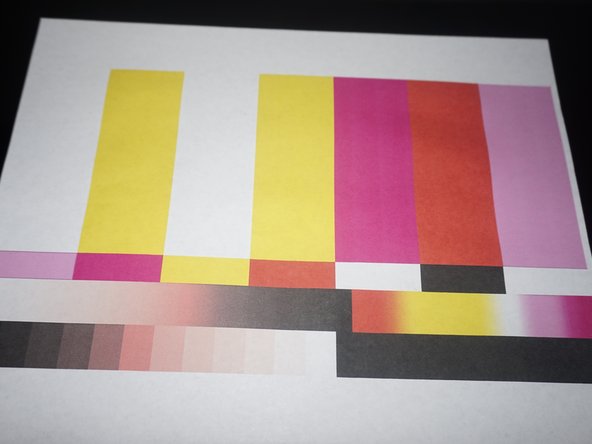
Print a test image as a baseline. A good image can be found here: SMPTE color bars.
-
-
-
-
Remove the ink cartridges from the printer. Install the shipping caps or put them in a plastic bag.
-
-
-
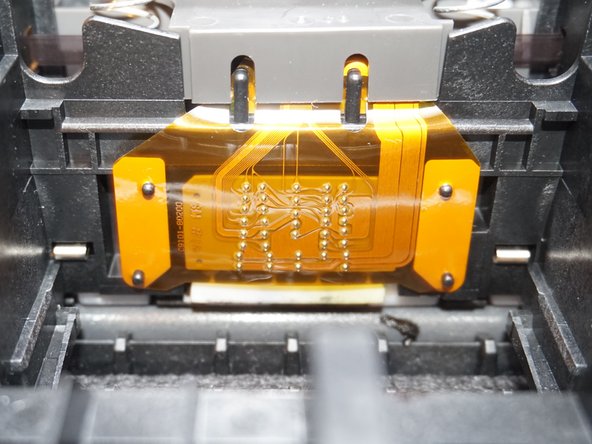
When the printer is unplugged, lift the lever up and remove the printhead.
-
Remove the printhead as shown. IMPORTANT: Leave the scanner lid open to indicate there is no printhead.
-
-
-
Using a alcohol wipe, clean the printhead interface. This will prevent any Ink System Failure problems.
-
-
-
Put the printhead in hot water. Let it sit until it is reasonably clean. Change the water as it turns black.
-
Wipe down the printhead contacts and nozzles by hand to ensure these areas are dry.
-
Before reinstalling the printhead, let it air dry for ~3-4 hours. Using a fan may speed this step up.
-
-
-
Once the printhead is satisfactorily dry, reinstall the printhed and ink in the printer. Plug the printer in.
-
-
-
After replacing the printhead, test the printer. Match the previous settings and check for improvement.
-


If your printer is working correctly, it was just a clog. Persistent issues usually total out the printer as a unit.
If your printer is working correctly, it was just a clog. Persistent issues usually total out the printer as a unit.
Cancelar: No complete esta guía.
12 personas más completaron esta guía.
Documentos Adjuntos

Equipo

9 comentarios
While/when soaking the printhead, I used a small intact artist's paint brush (no hairs falling out of it) to help loosen the globs of ink. I changed the water several times as there was a lot of ink.
Also, the first time I tried printing after soaking/cleaning the printhead (my issue was that the regular black cartridge showed it was NOT empty, but printing black documents wasn't working), I still had a blank page. Next I tried aligning the printhead but got a "failed," or similar, result. Next, I printed a "print quality report" from the printer's Tools menu and that seemed to be fine, so I tried printing the invoice I originally was having issues with, and voila, it worked!
Thanks.
Thanks this worked and all is well again
The one things that I had to do: I put the machine back together when it looked dry and the machine would not work. It refused the print head and complained that the ink packets were used. I tired it about 4 times with the same results. So I set it all aside and let it dry out over night. Wha La it worked. I put it all back together, the machine did it's thing and suddenly everything worked perfect.
Thanks again for saving me from having to buy a new machine.
HI, I am glad to find your explanation. I have followed HP's instructions, which didn't include soaking the print head, but will try that, too. What I am having trouble with now is that the printer screen says that "the print head appears to be missing, not detected, or incorrectly installed". I've redone it 3 times with no change. Also, the HP instructions did not say to unplug it and leave the cover open, so I left it plugged in and put the cover down. Since the printer is not recognizing the head, I have no way of telling if the alignment settings are messed up or not. Do you have suggestions for getting the printhead to be recognized? Thanks a lot.
Thanks so much!! It worked! Never would have guessed!!
I am using refilled cartridges for the Photo-smart 6520 all in one wireless (mainly) . I am trying to get the printer to not give me problems due to the chips being read by the system and knowing that they are previously used. I took the cartridges out last night and also the print head as described. There was a WHOLE LOT OF INK (mainly black) in several places inside the printer that I did not like. Even with the print head out, I had to continue to move the carriage and clean "leaked" drops of mainly black ink from the path on the metal part. I also had to carefully clean it from the white rollers. I cleaned so much ink from the print heat and it seems that the colors side it pretty much clean. It is the black side that concerns me. From underneath the print head, that nozzle seems to still have some dried ink there. I let it dry overnight, am in the process of a hard reset, and will be plugging it in again and inserting the cartridges during that process. I will try and check back for comments.