Introducción
Ocurre con relativa frecuencia que el control deslizante de la tostadora ya no permanece abajo, pero los calentadores siguen funcionando. En la mayoría de las tostadoras, la corredera se mantiene en su lugar mediante un electroimán, que es donde a menudo se encuentra el problema: o la bobina está defectuosa o el imán está sucio con migas de pan y, por lo tanto, ya no puede sostenerse. Esta falla se puede eliminar fácilmente y la reparación es casi la misma para muchas tostadoras.
La reparación se muestra en una Tefal modelo 539627
Qué necesitas
-
-
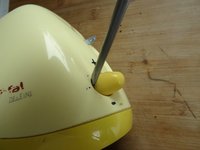
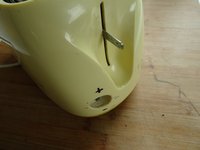
Tira del botón del control deslizante, necesitas mucha fuerza para hacer esto.
-
-
-
También saca la perilla del regulador, aquí se usó una herramienta de palanca.
-
-
-
-
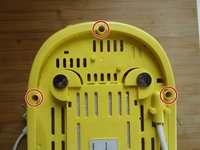
Coloca la tostadora boca abajo sobre la superficie de trabajo.
-
Saca la bandeja para migas.
Place the toaster face down on the work surface. Pull out the crumb drawer.
-
-
-
Tres de los tornillos están en la mitad delantera.
-
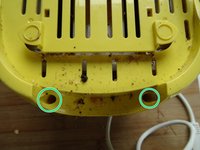
Dos de los tornillos están en la otra mitad debajo de la bandeja para migas.
-
Desenroscar y quitar todos los tornillos.
The upper part is screwed to the lower part. Here there are five Phillips screws that are in deep holes. Three of the screws are in the front half. Two of the screws are in the other half under the crumb drawer. Unscrew and remove all screws.
-
-
-
Inserta una herramienta de plástico en la costura entre la parte superior e inferior, aumentando el espacio alrededor.
-
Tira de la parte superior de la parte inferior, prestando atención al eje del controlador y el control deslizante.
-
Levanta la parte superior y déjala a un lado.
Insert a plastic tool into the seam between the upper and lower part and enlarge the gap all around. Pull the top off the bottom, paying attention to the axes of the controller and the slider. This may require some strength. Lift the top off and put it aside
-
-
-
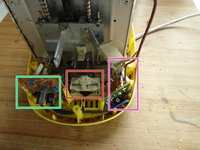
Aquí están las principales partes internas:
-
Los contactos para los hilos calefactores. Se cambian cuando el control deslizante se mueve hacia abajo.
-
La temporización. Cuanto más largo sea el tiempo, más oscura será la tostada.
-
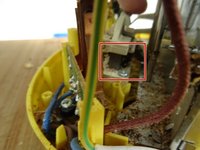
El imán de sujeción. Mantiene el control deslizante hacia abajo. ¡Aquí tienes que buscar el error!
Here are the main internal parts: The contacts for the heating wires. They are switched when the slider moves down. The timing. The longer the time, the darker the toast becomes. The holding magnet. He holds the slider down. Here you have to look for the error
-
-
-
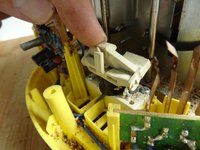
Limpia a fondo el espacio entre el imán y el soporte de hierro. Usa un hisopo de algodón con alcohol para hacer esto.
There is an iron tilting device on the magnet, here embedded in a molded plastic part. When the magnet pulls in, it holds the hook on the slide. Thoroughly clean the space between the magnet and the iron holder. Use a cotton swab with alcohol.
-
-
-
Enchufa el cable de alimentación y prueba si tu reparación fue exitosa.
-
Desenchufa el cable de alimentación y limpia a fondo la tostadora antes del montaje.
Caution mains voltage: do not touch conductive parts! Insert the power plug and test whether your repair was successful. Pull the power plug again and clean the toaster thoroughly before assembling
Your explanation of how to fix the problem with my toaster solved my problem. Like you said bread crumbs were stuck in the magnet. Thank you very much!
-


Realiza los pasos en orden inverso para volver a ensamblar tu dispositivo.
Realiza los pasos en orden inverso para volver a ensamblar tu dispositivo.
Cancelar: No complete esta guía.
13 personas más completaron esta guía.
Un agradecimiento especial a estos traductores:
100%

¡ Francisco Javier Saiz Esteban nos está ayudando a reparar el mundo! ¿Quieres contribuir?
Empezar a traducir ›
Equipo

Repair is War on Entropy Miembro de Repair is War on Entropy
Community
Miembros de 29
1,759 Guías creadas
10 comentarios
Hey super, das klappte!!
Mein Toaster sieht leider anders innen.. schade, das hat nicht geklappt.
Hallo Elke,
es gibt neben den Toastern mit dem Magneten noch eine andere, weit verbreitete Toaster-Bauart, bei dem ein kleiner Haken aus Kunststoff oder Metall den Auswurf solange unten hält, bis ein Bimetall sich entspechend erwärmt oder eine Zeitschaltuhr auslöst. Häufig greifen diese kleinen Haken nicht mehr, und der Auswurf rutscht immer nach oben. Hier hilft in der Regel eine kleine Dreikantfeile oder die Rekonstruktion des Hakens.
Bei einigen Fällen ist aber auch der “Zeitgeber” defekt.
Danke!!! jetzt macht er wieder was er soll...hätte schon fast einen neuen bestellt. (Elta)
Grüße aus Österreich
Hat geklappt. KRUPS macht es einem aber schwerer. Eine der Schrauben ist nicht Kreuzschlitz, sondern TX10 mit Stirnloch (ein Schelm, wer ....). Das muss man bei einem schwarzen Gehäuse erstmal erkennen. Bei mir Schwachstelle dann aber nicht der Magnet selbst, sondern die Kontaktkorrosion an den Kupferlaschen, die beim Herunterdrücken des Hebels den Stromkreis schließen (vgl oben Bild bei Schritt 8, da sieht man sie rechts) oder eben auch nicht mehr. Da hilft dann Kontaktspray eher als Alkohol.
🙏for the tips ! Y fix my toastere !
Konnte den verdeckten Magneten bei meinem Brewsly 4-scheiben toaster, finden und reinigen. Diese Anleitung hat mir gezeigt nach welcher Art Fehler ich suchen musste.
Vielen Dank!
Esraba buscando para una tostadora umco, estas no usan electroiman, gracias de todas maneras !
The repair is done on an old Tefal model 539627, but is the same for many toasters. Unplug the power cord before repairs
Matthew Newton - Contestar