Introducción
Sigue esta guía para remplazar un ventilador roto o defectuoso en la consola Nintendo Switch
La Switch usa tornillos JIS, pero puedes usar un destornillador Philips en caso de necesidad. Se muy cuidadoso con no desprender el tornillo. Puntas Phillips de iFixit están diseñadas para ser compatibles con los tornillos de estilo JIS
Nota: Cuando retires la placa de protección, necesitaras remplazar el compuesto térmico entre la placa y el disipador de calor. Dado que la pasta térmica normal no está diseñada para salvar grandes huecos, el sustituto más cercano es la pasta térmica viscosa K5 Pro.
Nota: Esta guía y la parte que vendemos, son compatibles con la Nintendo Switch original lanzada en 2017, además del nuevo modelo refrescado lanzado en 2019(Números de modelo HAC-001 y HAC-001(-01), respectivamente)
Qué necesitas
-
-
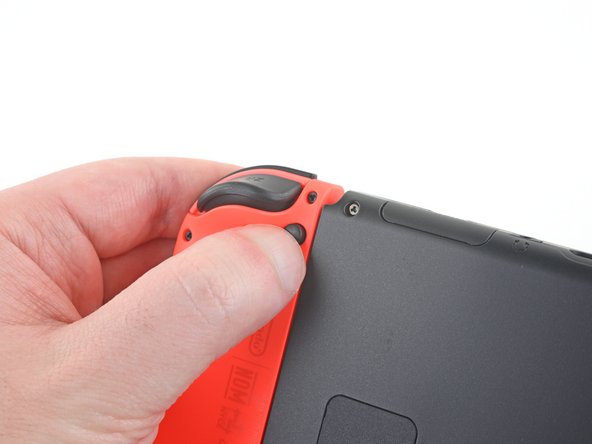
Mantén pulsado el pequeño botón redondo de la parte trasera del mando Joy Con.
-
Mientras mantienes pulsado el botón, desliza el mando hacia arriba.
-
-
-
Continúa deslizando el control hacia arriba hasta sacarlo completamente de la consola.
-
-
-
Utiliza un destornillador Y00 para retirar los cuatro tornillos de 6.3mm de longitud que sujetan el panel trasero.
-
-
-
Utiliza un destornillador JIS 000 o un destornillador PH000 oficial de iFixit para retirar los siguientes tornillos que fijan el panel trasero:
-
Un tornillo de 2.5 mm de longitud en el borde superior del aparato.
-
Dos tornillos de 2.5 mm de longitud en el borde inferior del aparato
-
-
-
Utiliza un destornillador JIS 000 o un destornillador PH 000 oficial de iFixit para retirar el tornillo de 3.1 mm que fija el lector de tarjetas microSD al dispositivo.
-
-
-
-
Usa un destornillador JIS 000 o un destornillador PH 000 oficial de iFixit para retirar los seis tornillos de 3 mm que fijan la placa de protección al aparato.
-
-
-
Inserta un spudger debajo de la placa de escudo a lo largo del borde del dispositivo.
-
Haz palanca para levantar la placa de escudo y removerla del dispositivo.
-
Puedes reutilizar el compuesto térmico rosa si tienes cuidado. Mantén el compuesto limpio y asegúrate de que haces un contacto sólido entre el disipador de calor y el protector durante el montaje.
-
Si necesitas reemplazarlo, consulta nuestra guía de pasta térmica para quitar el compuesto térmico antiguo y reemplazarlo con un compuesto apropiado, como K5 Pro, durante el reensamblaje.
-
-
-
Usa la punta de un spudger para hacer palanca en el conector de la batería hacia arriba y fuera de su zócalo en la placa madre.
-
-
-
Usa un destornillador JIS 000 o un PH 000 oficial de iFixit para remover tres tornillos de 3 mm asegurando el disipador a la placa madre
-
-
-
Despega con cuidado las dos piezas de espuma pegadas sobre el disipador y el ventilador.
-
Introduce la punta de un spudger debajo de la parte de la espuma que no está pegada a nada,
-
Presiona la parte superior de la espuma con el dedo para mantenerla en su sitio.
-
Pasa la punta del spudger por debajo de la espuma hasta el otro extremo de la espuma para liberarla.
-
-
-
Usa una spudger o tus dedos para levantar el disipador arriba y fuera de la placa madre para removerlo
-
Aplica pasta térmica a todas las superficies a las que se les haya aplicado pasta térmica anteriormente. Esto incluye entre el tubo de calor y el escudo de aluminio, que el Switch usa como disipador de calor adicional.
-
-
-
Usa una herramienta de apertura o tu uña para levantar el candado del conector ZIF del digitalizador
-
-
-
Use una herramienta de apertura, un spudger o la uña para levantar la pequeña solapa de bloqueo en el conector ZIF del ventilador
-
Para volver a ensamblar tu dispositivo, sigue estas instrucciones en orden inverso.
Lleva tus desechos electrónicos a un Reciclador certificado por R2 0 e-Stewards
La reparación no salió como planeado? Trata algunas soluciones básicas de problemas, o pregunta nuestra comunidad de respuestas de Nintendo Switch para ayuda adicional
Cancelar: No complete esta guía.
201 personas más completaron esta guía.
Un agradecimiento especial a estos traductores:
100%
Estos traductores nos están ayudando a reparar el mundo! ¿Quieres contribuir?
Empezar a traducir ›
47 comentarios
If your joycons are not charging, it could be the fans fault as they seem to share a 1.8v and or 5v rail, I had both joycons refusing to charge, and the fan was not working, so by replacing the fan, it had them charging properly again.
oh? i was wondering why my joycons died and never turned on. i though the hot switch short circuited them. the same thing happened to mine. The fan died as well as my joycons. very useful mate. thanks for the info!
I changed the fan and it still don’t charge my Joycon. What should I do?
baron154 -
I’ve recently found a video that shows what can be wrong with Switch with the same issue, but working fan https://www.youtube.com/watch?v=WuQC3ipu... . In the comments people confirmed several times that it helps.
Andrey -
If I'm just replacing the fan, do I need to clean off/reapply any thermal paste?


