Saltar al contenido principal

Guías de reparación y soporte para tu televisor LG.

Preguntas 1340 Ver todo

Need help diagnosing an OLED TV issue (Power Supply vs. Main Board)

Hi all,

(CONTEXT)

I've got an LG TV (OLED) model number is: 55EC9300-UA.AUSWLJR that a close friend gave me for repair, as he was going to throw it out otherwise. I don't have much experience with these sorts of things. To provide a bit of context, the TV will not turn on 99% of the time that the power button is pressed and does not display a standby light near the front logo of the TV. The screen itself has turned on and functioned properly a few times and it stays on until I turn it off. I've tried resetting it to no avail. Upon pressing the power button, a red light will appear on the Main Board (screen not lit), although the red light will not turn off upon pressing/holding the power button again.

Given this, I've started testing voltages to try to figure out if it's the power supply since that's the most common issue with these devices. I've only really been testing the 18-pin Power Wafer. The values provided in the schematics/Technical repair manual for the standby pins are rated at 3.5V, but when I test in standby, I am getting a reading of 7V. One or more of the 24V pins are reading 55V, once the board is powered on.

The voltages I am seeing in my tests are higher than the nominal ratings on this power wafer listed in the schematic/technical repair manual that I've found online.

Given all of this information, I am unsure if this issue is with the Power Supply or the Main Board. Typically, from what I have seen with power supply issues on TV's, the voltages are too low. It may be worth noting that the capacitors are not bulging or showing any clear signs of issues, though I have not tested them.

(QUESTION)

In my case, the voltages are more than double the nominal values stated in the manual (and on the board). Would this indicate that it is a Power Supply issue?

Edit:

Here is an imgur link with a picture I've taken of the mentioned parts. I've circled the pins I've been testing in red. I've measured the pins on the board-side (where the arrows point) as well as the connections where the wires insert as well, with no difference in voltage.

I've also attached screenshots of the schematic and service manual I've found, which provide relevant voltages for the 18-pin power wafer:

https://imgur.com/a/37ORJd9

Block Image

Block Image

Block Image

Block Image

Update 09/07/22

All of the pins came back with very normal values except for the areas I have circled here:

https://imgur.com/a/pVkKIFR

Block Image

Contestado! Ver respuesta Yo también tengo este problema

Es esta una buena pregunta?

Puntuación 2
1 comentario

Hello, I have a similar problem with the same model of LG TV that I just pick up. Would it be possible to point me to the link to download the correct service manual / schematic? Thank you very much for your help.

- de

Agregar un comentario

1 Respuesta

Solución Elegida

Bailey S if the voltages are truly as high as you are saying, then yes, its a power board issue. I would check the transformers as well as the components around it. ? If you let us know the exact model of this TV we can probably verify all of this better. Of course, you can also add some images of your boards with your QUESTION so that we can see what you see. If you mark where you checked the voltages, we can double check and verify. Ultimately, voltages to high-power board

Agregar imágenes a una pregunta existente

Update (09/07/2022)

Bailey S see if this makes sense and if you can follow along those steps of the power on sequence:

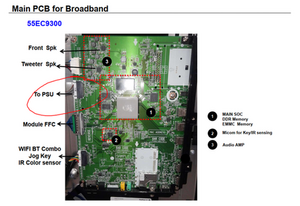
TV Turn On Commands (Explained) 55EC9300 OLED (2014) Power Supply Section 05

(1) When AC is applied to the SMPS, it outputs 3.5V_ST to the Main board, P2300 pins 3, 5 and 6. This 3.5V is routed through L2304 and on to the Microprocessor IC3000 pin 48 as its main power source. The 3.5V also goes to the Reset circuit. At the moment 3.5V arrives at C3004 (+) side, the capacitor isn’t charged, so pin 40 of the Micro is low while the power input pin 48 is high. This is known as the reset state, where the Microprocessor is reset to the first operational state. As C3004 charges through R3030, pin 40 pulls up and the Micro comes out of Reset. The TV is now in the Stand-By state. The 3.5V is also routed to pull-up resistors to the Key 1 and 2 lines. It is also sent to the IR receiver and as source voltage for the Power on switch Q2300, but it is not on at this time.

(2) When the Power on key is pressed on the Joy Stick (Press in and hold), pin 31 of the Micro drops. This notifies the Micro that the TV should turn on. If the Power On key on the Customer’s Remote is pressed, The IR receiver sends this signal (3.4V p/p) to the Microprocessor pin 6 and the TV knows by this signal to turn on.

(3) The Micro outputs a low on pin 36 (RL_ON) which is routed to pin 2 of Q2300 turning it on. The 3.5V on pin 1 is then switched out pin 3 and on to the SMPS via pin 1 of P2300. The Controller on the SMPS receives this command and turns on the 12V and the 24V.

(4) The 12V and 24V lines are routed to the Main board via P2300, 24V pins 9, 10 and 16 and 12V pins 13, 14 and 15. The 24V is used for the two Audio amplifiers as their amplification voltage.

(5) The 12V is routed to many different regulators (too many to mention here), but for this “Power On Cycle” discussion it goes through coil L2303, then L12007, then L1401 and out P11401 pins 1-4 to the T-CON board.

(6) The 12V also routed to IC2307 (Power Detector). This IC then outputs a high to the Micro pin 14 to notify the Micro that the voltage arrived. So the Micro can continue turning on the rest of the set. If missing, the TV will click on and then Click off. This fault shows up in the Power Off Status as “5VMNT”.

(7) Once the Micro knows the 12V has arrived, it outputs a high on pin 15 which is routed to pin 1 of IC2300 turning it on. This IC is the +3.3V_NORMAL regulator. This 3.3V is routed to many different circuits, but one of them is as a pull-up voltage through R2310 to the INV_CTL (DRV_ON) line. However, the Micro is holding “INV_CTL” low via pin 19 at this time.

(8) The next step for the Micro to release the low on pin 19 and allow the “INV_CTL” line, (Inverter Control) to pull high, (approximately 3.5V). This high leaves P2300 pin 2 and now becomes DRV_ON (Drive On). When this high arrives on the SMPS controller IC, the controller turns on the Panel 24V line which is output P202 (pins 8-14) and on to the T-CON board CN7. This voltage is then routed through the T-CON and out to the Panel itself for the Panel’s operational voltage.

NOTE: The Panel 24V is monitored by the Main board. There is a line on the Vx1 cable P11401 pin 20 called MODULE 20V DET. This line is normally 3.29V when the 24V is normal. If the 24V is missing or low, this line drops, pulling pin 44 of the Microprocessor low. Then the TV shuts off and logs “POWER_OFF_BY_20V_DET in the Power Off Status in IN-START Menu.

Power Supply Board Low Voltage Test 1

AC Should not be applied at any time while adding jumpers or While unplugging connectors as damage to the circuit Board may occur.

a) When AC is applied, the SMPS “MUST” be producing STBY 3.5V on pins 3 and 5 of P201.

If 3.5V Standby is not being generated, the SMPS is defective and must be replaced. There is no need to continue with the next test. But, make sure AC is arriving at the connector SK100 and +3.5V_ST is not loaded down by the Main Board or the IR or the Joy Stick Boards.

( b) Unplug P2300 on the Main Board to make insertion of the Jumpers easier.

Use P2300 side to insert resistors

TEST 1: Testing the Power Supply turn on circuit.

(1) (A) Add a jumper between (3.5V STBY) pin 3 or 5 and Pin 1 (PWR_ON).

Apply AC, (See Fig 1). This will turn on the SMPS, relay click will be heard.

Check that the 24V and 12V power supplies are turned on,

Main Board Power:

• P2300 (12.07V pins 13, 14 and 15)

• P2300 (23.28V pins 9, 10 _

Fue útil esta respuesta?

Puntuación 3

13 comentarios:

Thank you for the response. This OLED TV's model number is: 55EC9300-UA.AUSWLJR

Here is an imgur link with a picture I've taken of the mentioned parts. I've circled the pins I've been testing in red. I've measured the pins on the board-side (where the arrows point) as well as the connections where the wires insert as well, with no difference in voltage.

I've also attached screenshots of the schematic and service manual I've found, which provide relevant voltages for the 18-pin power wafer:

https://imgur.com/a/37ORJd9

- de

@Bailey S

I agree with @oldturkey03, that the problem is the power board.

It may be a problem with the voltage regulation on the board. (power mosfet?)

Is there a schematic of the power board in the manual?

- de

@jayeff

Thank you for your input.

I've taken a screenshot of the schematic, let me know if you are looking for something different as I'm a bit new to this subject:

https://imgur.com/a/5JfAD8V

- de

@Bailey S do us a favor and measure something else. Of course you do realize that these are all DC voltages and your meter is set properly. No, I do not mean to insult your intelligence and mean no offence. Really just wanting to make sure.

On the schematic you posted, the very first picture on there, (the one that shows P2300) Locate the components L2304 and L 2303 and measure the voltage on there (red probe on one point of the inductor and black to ground) Let us know what you get. Do the same with VA23001.

For the voltage to be that far out of whack there must be multiple voltage regulatory circuits that have failed. Any history on this TV? Lightning strike? Water damage? Anything?

- de

I'm ashamed to say this, but I've mistakenly been measuring in AC and that's where the majority of the issue lies (I'm not insulted, I'm very inexperienced so thank you for the insight).

I tested all of the power wafer's pins again with the power on, and oddly enough the TV's screen started turning on. I heard a click later on and the screen stopped working.

All of the pins came back with very normal values except for the areas I have circled here:

https://imgur.com/a/pVkKIFR

These areas came back with a value of '1.' on the multimeter, rather than something like '1.00' or, as with the grounds '0.00'. I'm not sure what this would mean, but according to the diagram these should be measuring around 24V correct?

Edit: I'm following your above update at the moment and breaking it down, I will update accordingly

- de

Mostrar 8 comentarios más

Agregar un comentario

Añadir tu respuesta

Bailey S estará eternamente agradecido.
Ver Estadísticas:

Ultimas 24 horas: 6

Ultimos 7 días: 59

Ultimos 30 días: 282

Todo El Tiempo: 6,166