Saltar al contenido principal

"The worlds smallest 15.6-inch laptop packs powerhouse performance and a stunning InfinityEdge display all in Dell's most powerful XPS laptop."

Preguntas 56 Ver todo

How to fix the heatsink screws hold-downs?

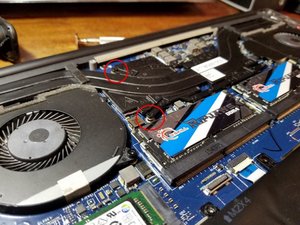
In my Dell XPS 9550, I have noticed that two of my 6 heatsink screws hold-downs are out from the motherboard, causing the heatsink part near to the GPU loose, accordingly, less contact with the GPU and less heat dissipation.

I need to know how to fix these screws hold-ups again to the motherboard with a kind of glue that can withstand the high temperature generated by the GPU during load time.

I have found over the internet that it is a common issue for XPS 9550. This is a link of the picture that might give a better understanding of my issue., which I found over the internet as well.

Block Image

Block Image

Contestado! Ver respuesta Yo también tengo este problema

Es esta una buena pregunta?

Puntuación 0
4 comentarios

I also have it. I am looking for metal to metal screw glue

- de

I just found this thread. I have the same problem. Did you find a solution?

- de

@javiercarrillo I removed the motherboard and replaced the screw with a longer screw and a nut, the nut is fit on the other side of the motherboard. It is working fine since then. The only drawback is when repasting the processor, you will have to unscrew the motherboard to remove the nut!

- de

@haitham thanks a lot for getting back to me. I was asking around about this and, for now, I am going to try using some thermal glue and see how it goes. I guess, in the worst case, I will have to go for the longer screw.

I'm a noob for these things :( What is the size/specs of the screw you used? Thanks!

- de

Agregar un comentario

4 Respuestas

Solución Elegida

Hi @h_amak ,

I don’t know your laptop but was wondering if it may be better to see if you can use a suitably sized nut/star washer and bolt arrangement to hold down the heatsink. That way you won’t have to worry about the heat problems

This of course depends on whether there is enough space under the systemboard to accommodate either the nut or the bolt head, depending on which way it was installed. It may have to be insulated as it passes through the hole (not sure about that) to prevent any possible electrical problems.

Here’s a link to the service manual for your laptop (taken from this webpage which may be of some help. Scroll down to p.50 to view the necessary pre-requisite steps and then the procedure to remove the systemboard.

Fue útil esta respuesta?

Puntuación 5

3 comentarios:

Thank you so much for taking the time to read and answer my question, it is really appreciated.

I have thought about that, but then I have to completely remove the motherboard to fix the nuts, which is not easy, and I'm afraid to do more damage than fix in this case.

I have found over the internet that epoxy glue withstands temperature up to 150 degrees Celsius, which would be more than enough in my case (looking for around 90 degrees Celsius at max). So I guess I would give this a try!

Thanks again for your input.

- de

Hi @h_amak ,

OK,

You could always have the bolt facing up and the nut on top that would make it easier to install. You'd still have to remove the systemboard to insert the bolt but I can understand why you may not want to do this.

Good luck with the repair - be sure to allow enough time for the epoxy to "cure" before you test it out.

- de

Thank you for the advice.

- de

Agregar un comentario

The corresponding nut for the screw is press-fit into the board. Your best bet is to glue it down. Believe it or not, the gel type of superglue should work the best. Be careful not to get any of the glue inside of it though.

An epoxy may work, but being thicker, may be more difficult to get in place to work effectively. Completely remove the heat sink to give yourself room to work and try the super glue.

Let us know how you make out.

Dan

Fue útil esta respuesta?

Puntuación 1

1 comentario:

did it work? I am facing the same problem with the same laptop model... please help

if anyone tried the nut solution, any idea on the size

- de

Agregar un comentario

FIXED! (see reaction)

Epoxy can indeed stand the heat, however it’s quite brittle, therefor the glue can break loose. But it’s not bad, and as there will be no UV light near the glue, you can try off course.

As I probably have the same issue with mine, I personally will try to see if I can re-solder a bolt to the original spot on the motherboard, or otherwise try the bolt arrangement. In case I can reach the back to use a press-nut from the back, I might try that.

2 things:

1)when touching anything on your motherboard I recommend you earthen yourself, so your static energy cannot shock anything on the board. You can Google how to do that;)

2) I will replace the cooling paste when doing this fix and recommend to to that.

ps about drilling a hole in pcb’s: the silicium of the PCB can make it a slow process.

Fue útil esta respuesta?

Puntuación 0

1 comentario:

I fixed it, and fixed it well! My recommendation:

So the same nuts as on the poster their picture were loose. They actually are M2 pressnuts, but they originally were soldered on the motherboard as it’s not using the press nuts in the way they work.

Tried soldering but soldering a galvanised steel nut wasn’t a great thing to do in the fist place and my attempt didn’t hold.

So, removed the motherboard (easy enough to do), repasted and used the original press nuts the way you’re supposed to; from the back. I used 2 M3 rings as spacers on the top to replace the height the press nuts normally provided. Fixated those rings with 1 second glue to make the process easier.

This is as good as it can get mechanically.

Ir. Freek

- de

Agregar un comentario

I had the same problem and came across this thread. What I ended up doing was simply soldering the surface mounted nut back in place by heating both the loose nut and the part of the PCB where it had come loose and applying a generous amount of solder and then pressing it back together and holding it in place using a screwdriver until the solder cured. This seems to have worked nicely.

Care must of course be taken to not overheat the PCB or damage any surrounding components in the process.

Fue útil esta respuesta?

Puntuación 0
Agregar un comentario

Añadir tu respuesta

Haitham estará eternamente agradecido.
Ver Estadísticas:

Ultimas 24 horas: 2

Ultimos 7 días: 4

Ultimos 30 días: 22

Todo El Tiempo: 2,115