Introducción
This guide is intended to help those whose reMarkable is no longer supported by the manufacturer, so only begin this repair if you have exhausted all other possible means to get the device fixed by the original manufacturer!
Because the aluminum backplate of the device is glued to the plastic frame it is very difficult to remove and put back. I would not recommend starting the repair without the proper tools and some prior fixing experience.
I do not take any responsibility for damages done by following this guide and as I stated above, first try connecting with official reMarkable support!
Qué necesitas
-
-
First, make sure that your reMarkable is completely turned off before you start the repair process.
-
Warning: Do not let the display come in contact with alcohol or any solvent containing alcohol as this may damage the device.
-
Remove both the bottom and top rubber strips. It will reveal 6 small Philips head screws underneath.
-
Remove all 6 screws.
-
-
-
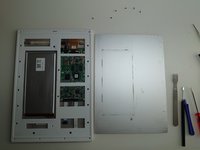
The aluminum backplate is glued to the device and you will need a good prying tool to be able the separate the back from the plastic holder.
-
The glue is holds all 4 sides together, the glue also runs vertically and down the middle.
-
The hardest part is to start somewhere on the backplate where there is a big enough gap (between the backplate and the device) to put a prying tool in without bending the aluminum back.
-
Start from one of the upper corners. Slowly and carefully remove the aluminum back plate with a prying tool that is durable enough and can fit between the backplate and the device.
The gap between the aluminium plate and the plastic is quite snug. What sort of spudger did you use?
I have used the tools that are on the picture. To start, I have probably used the black handle pointy tool and then with the metal flat headed to go around... At least that is how I would do today ;-). Those tools were the time available for me, so I am not sure if you have any similar looking and similar strength of tools in iFixit store. They do improve their tools set time-to-time, so I kinda think they must have something...
What's the point of removing the aluminum backplate? Can we not skip to removing the plastic frame and keep the aluminum backplate attached to the plastic frame with no reduction in access to the internals?
I only see 6 screws in the picture which aligns with the six holes that aren't covered by the aluminum backplate. So if none of the other holes that are beneath the aluminum backplate have screws, it might seem like a good opportunity to leave it attached.
But I may be missing something. Please let me know, thanks.
If you do not remove the aluminium backplate then you have no access to any internals at all.
You see that I started with the 6 screws but than I get nowhere. Nothing was lose or removable. Only option was left to continue with the backplate. (Which in a sense makes step1 and step2 to be possibly done in any order you wish)
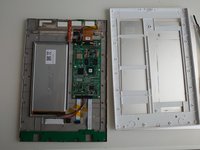
In step 3 you can also see that there are 15 more screws to be able to separate the plastic frame from the magnesium base.
If you do not belive then just try it yourself :-)
I understand now. Thank you for clarifying this for me Visegradi.
I cut away part of the frame that connects to the metal back plate by gouging gently with a sharp knife until an edge of the frame was visible and the knife could go between. I then extended the blade and ran it under the plate all the way around several times. I suggest gouging on the bottom left corner, as it'll be noticeable.
When replacing-I recommend bending the plate slightly concave (so the edges touch the frame first), then the glued centre part of the frame will hold the edges down rather than them peeling up slightly.
-
-
-
There are 6 screws on both sides and 3 in the middle upper part. Remove all (6+6+3 )15 screws. (The bottom 2 screws do not need to be removed).
-
After the screws are removed the plastic frame can be separated from the main logic board holding frame. THERE'S ALSO SOME GLUE/FILLER BETWEEN THE 2 PARTS! So be mindful when separating the two pieces.
-
-
-
-
Pull/pry the battery connector upwards to detach it from the mainboard.
-
-
-
Use similar battery to replace the original.
-
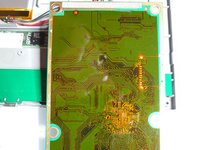
The battery is held in place by some glue. Use a durable tool to remove the battery from its place.
-
-
-
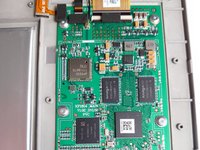
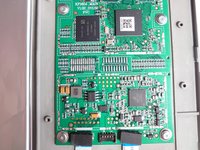
Remove all connectors if you want to replace the mainboard. All connectors work similarly - you need to turn up the black / back part of the connector and pull out the cables. The two exceptions are the battery connector which simply needs to be pulled or pried upwards. Same for the WiFi coax connector.
-
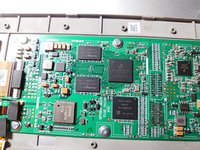
There are 6 screws with special washers that are holding the main board to the frame.
-
-
-
Interestingly, even the other side of the mainboard contains some elements near the CPU which require a semicircle hole cut into the frame... interesting design decision.
-
-
-
Remove the 2 screws that are holding the button/USB panel in place.
-
Disconnect the ribbon cable from the panel by turning/pulling up the black/back part of the connector (see picture)
-
-
-
Illustration on how the power button and WiFi cable are connected to the upper part of the mainboard.
-


To reassemble your device, follow these instructions in reverse order.
To reassemble your device, follow these instructions in reverse order.
Cancelar: No complete esta guía.
7 personas más completaron esta guía.

11 comentarios
The one thing I’m having difficulty with is simply identifying the proper battery. Suggestions/source would be greatly appreciated. Unfortunately “similar to” doesn’t give much guidance.
@crawfordlong, Unfortunately, it looks like Remarkable isn’t too keen on the end user replacing their own battery so they don’t provide the specific battery you would need. I did find this on their website. You could probably contact them directly and ask about battery specs? They’ll probably warn you about it voiding your warranty, but it’s worth a shot.
They have been awful. Completely ghosting any request for technical information after I rebuffed their attempt to turn a tech support request into an upsell opportunity (for a new tablet). I’m unlikely to support them in the future at this point, given the way they’ve handled this. I would have been fine with almost any answer, up to and including “I’m sorry, we do not recommend and do not assist with out of warranty self-repairs.” But losing all interest in communicating after I declined to spend several hundred dollars to replace a device that might simply need a battery? Horrendous.
I had a broken tablet, so I got it from there… but as far as I see from these old pictures a 3.7V 3000mAh battery with size 2867144 what was installed here. If you unable to find exact same size then I would go with any fitting size which is closely matching.
Obviously, if you do not know what you are doing then please DO NOT play with the battery! It can cause fire or other type of damages!!!
R,
PS: quick search gave me this (I have not tried to install it or buy it - this is only a search result)
The issue I’m running into is the connector + number and nature of wires (everything I’m finding has a single +/- wire pair, not 2 pair + yellow). Frustrating. (And your warning is both appreciated and received, but I’m comfortable with the attempt.)
Hello and thank you so much for you guide
I find a battery online on a “BIG BAY “
But according to this vendor the dimensions are essential
But 3,7volts are standard exactly like apple 🍏 battery inside … are all the same different dimensions….
Are extremely cheap considering giving new juice to your device 👍🏻 And new life !
Thank again cheers
I was able to purchase this battery.
https://www.aliexpress.us
It fits perfectly in the thin design of the remarkable 1 tablet and works; however, once the battery was drained, I could not get it to charge. I checked the ports with a multimeter the voltage reads 3.5 V when the battery is disconnected and the tablet is connected to a charger. When I connect the battery, it reads 3.7 V. The old battery I had it was also reading at 3.7 V.
Please if you have any suggestions to make this work, let me know.
I am not an expert, but I know my way around this kind of stuff.
I also tried this battery and had the same issue. The plug on this battery didn't fit the port on the back of the tablet, so I cut the plug off of this battery, cut the plug off of the old battery, and one-by-one reconnected the wires (red to red, red to red, white to yellow, black to black, black to black).
The tablet started up fine and worked until it needed to charge. It won't charge.
I found a unrelated battery-mod post elsewhere, involving a Wii U gamepad. Instead of swapping at the wire level, that user disconnected the old battery at the PCB, and swapped the lithium cells themselves, stating it was necessary step "In order for the new battery to work properly and not run into issues like not being able to power up the console..."
https://old.reddit.com/r/WiiUHacks/comme...
Screenshot of text:
https://cdn.discordapp.com/attachments/9...
I threw out my old battery so I'm out of luck.
Hi, do you have any idea where to buy a similar battery? What I find on aliexpress and ebay is only has three or two wires and the original has five.
Hello, i dismounted mine and it finally worked after taking out the battery and placing it back again, but there is an issue with charging it. There seems to be overheating the component called: AG 9K126. Do you now if we can replace it or how can we charge the battery without the usb connector?
Thanks!