Esta traducción podría no reflejar los cambios más recientes añadidos a la guía de referencia. Ayúdanos a actualizar la traducción o revisa la guía original.
Introducción
Mira lo que está pasando con un nuevo iPod Nano 5ª Generación LCD.
Qué necesitas
-
-
Inserta una herramienta de apertura de iPod entre la caja exterior y el marco superior cerca de la pantalla.
-
Levantando la herramienta de apertura del iPod, saca suavemente el panel superior del dispositivo.
-
-
-
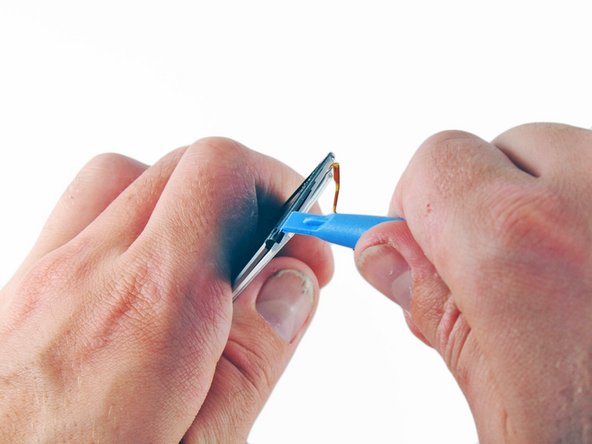
Inserta una herramienta de apertura de iPod entre la caja exterior y la placa de interruptor de retención de metal cerca de la parte superior de la pantalla.
-
Mientras levantas ligeramente la herramienta de apertura del iPod, saca la placa del interruptor de retención del iPod.
My ribbon broke.
I see that on the pictures further down, you removed the covering plate, which I would suggest to do, as it'll put less weight on the ribbon.
Luckily, we can find spare ones. In fact it doesn't sell alone, it's with the earphones jack.
could you elaborate more as to how did you remedy the broken ribbon?
is the broken ribbon fixable?
is the broken ribbon fixable?
I am new to this my ribbon broke when I was taking out the battery doesn't the new battery ribbon connect to the one connected to the end switch, by that I mean can I connect the new battery ribbon to the end switch ribbon?,where it broke?
-
-
-
Inserta una herramienta de apertura de iPod entre la pantalla y el panel de vidrio en la parte superior del dispositivo.
-
Gira la herramienta de apertura del iPod hacia la parte posterior del dispositivo, levantando ligeramente la parte superior del cristal de la caja exterior.
At this point, I find it helps to separate the lock switch from the top metal casting. You then have just the switch dangling on the fragile ribbon cable. Much less likely to snag or break the ribbon. Just loosen (Don't remove completely) the two Phillips screws. The heavy clunky casting bit can be removed.
You can remove this lens with virtually zero risk to the LCD underneath:
Get a couple guitar picks or spudgers ready, and another old spudger. Using a hot glue gun, glue the old spudger into the very middle of the lens. Let the glue cool completely.
Using a heat gun pointing up from the bottom, heat the 3 edges of the shell around the top and sides of the lens. Avoid getting heat on the lens or hot glue as it will soften.
Using the spudger as a handle, pull up on the lens to get the top edge started and get your guitar picks/spudgers under the sides at the top of the lens.
Complete removal as above.
Using a spudger/guitar pick, start to peel an edge of the hot glue loose to remove old spudger from lens; then clean any residue with alcohol.
“couple of” guitar picks
After destroying one iPod, I learned from my mistakes. Heating it with a hair dryer to loosen the adhesive helped a lot. You need to get the tool between the glass and the lcd display; be very careful not to put pressure on the display!
-
-
-
Mientras levantas la pantalla con una herramienta de apertura de iPod, inserta una segunda herramienta de apertura de iPod entre la carcasa exterior y el borde superior izquierdo del panel de vidrio.
-
Retira la primera herramienta de apertura de iPod de entre el cristal y la pantalla LCD en la parte superior del dispositivo
The iPod I repared had a cracked screen. Caution here because it doesn't pop out that easily. I had to apply some force on the plastic opening tool while using another tool to take out the shards (who are glued to the side).
90% guaranteed you will destroy the LCD in this step. You just dont know how much for to use and if you stress the LCD too much, even with a plastic tool it will be damaged.That’s why ifixit sells those too. My advice is to first completely follow this guide, and if successful, and only then , start ordering parts.
Since the display is probably 99 percent broken, I decided to use a different method. I heat the ipod on my 3-printer heating bed to around 70 degrees Celsius, then I take a suction cup and pull on the display glass. When the glue is warm enough, the glass rises and you can carefully detach the glass with an opening pick. the display remains completely intact greeting Andre
-
-
-
Levantando ligeramente la herramienta de apertura del iPod, inserta una segunda herramienta de apertura del iPod entre el cristal frontal y la carcasa exterior, en el lado derecho de la pantalla.
-
Desliza la segunda herramienta de apertura del iPod a lo largo del borde derecho del panel para quitar el adhesivo.
-
-
-
Con una herramienta de apertura de iPod aún entre el vidrio y la carcasa exterior, inserta una segunda herramienta de apertura de iPod entre el cristal frontal y la carcasa exterior, en el lado izquierdo.
-
Desliza la segunda herramienta de apertura del iPod hacia la parte inferior del dispositivo para quitar el adhesivo.
-
-
-
Levanta el cristal desde el lado más cercano a la parte superior del iPod, retire el panel de cristal del Nano.
It might be a good idea to remove all the adhesive from the screen before trying to slide the internals out. I had a nightmare trying to get mine out, ended up cutting my thumb and finger from holding onto the edges of the screen too tight trying to wiggle it out. And then to top it off, I broke the hold switch ribbon cable too. I don’t know how much the screen glue vs the battery glue was responsible for making it difficult to remove. Also when sliding it out, be careful the lip on the lower edge of the button hole doesn’t snag on the thin steel frame around the screen.
Is it really needed to remove the glas? Can‘t you just slide out the logic board when glas remains?
-
-
-
-
Usa una pistola de calor para suavizar el adhesivo debajo del marco de plástico en la parte inferior del iPod.
-
Usa una herramienta de abertura de plástico para extraer el bisel de la carcasa del iPod y retirarlo.
You MUST remove the bottom plate BEFORE forcing of the wheel or you WILL tare it apart as there is a lug on the bottom plate that holds the wheel in place ( wish I had known this before I damaged mine)
also do not lose the very small spring that is under the wheel (I DID )
+1. There is a tiny piece of plastic containing a little spring just under the wheel. Remove thoses parts before extracting the main board or you will probably loose them.
-
-
-
Desatornilla tres tornillos de la parte inferior del iPod:
-
Dos tornillos Phillips en ángulo de 4.4 mm
-
Un tornillo Phillips de 54 mm.
-
Usa una herramienta de abertura de plástico para sacar el retenedor de metal de la parte inferior del iPod y retirarlo.
-
-
-
Coloca una púa de guitarra entre la rueda de clic y la caja del Nano y retire el spudger de metal.
-
Levanta los bordes de la rueda de clic con la selección de guitarra hasta que la rueda de clic salga de la caja.
Use extreme care when inserting the metal plunger to lift up the click wheel. I ended up damaging one of the sensor pads and then needed to order a new click wheel circuit. Not very expensive to replace but I had not intended to replace this item and so my finished repair was delayed.
-
-
-
Levanta la rueda de clic con una mano y use una herramienta de abertura de plástico para extraer el conector del cable plano de la rueda de clic de su zócalo en la placa lógica.
-
Retira la rueda de clic.
In the second photo where you can see under the click wheel, just above the square black piece with the apple on it is a black rectangle with a hole in the center. There will be a spring in the hole. Remove the spring and the black piece it is in and set aside or they will fall out and get lost.
-
-
-
Usa una pistola de calor para suavizar el adhesivo debajo de la cubierta de la cámara / micrófono.
-
Saca la cubierta de la cámara / micrófono de la caja con un spudger de metal y extráigala.
Use a heatgun/hairdryer for a very long time and use a cutter knife and pry continuously only from the right bottom corner (near the camera lens). If you don't get it open use the heatgun once more.
Alternatively use a fabric bag filled with chick peas, put it in a microwave for 4 mn at power 600w and leave it to rest on the iPod 10 / 15 mn. It does the same job. I also use a fresh stanley knife blade (mind your fingers) the blade is very slim and is therefore easier to wedge between the casing and the cover.
You can remove this lens with zero damage to case or lens:
Using a hot glue gun, apply a bead of glue across the entire lens but not on the body of the iPod. Move the nozzle back and forth in the glue for about 20 seconds; this keeps the glue hot and heats up the Apple adhesive on the other side.
Quickly jam an old spudger into the hot glue and hold it until the glue starts to harden; this will happen quickly. Gripping the spudger and digging into the glue over the spudger with the fingernail of your forefinger, pull straight up evenly but firmly. The lens will release pretty easily if you time it right; otherwise it will pop if it has gotten cold.
I’ve done a dozen of these this way successfully.
Thanks Paul! I will add this into the step.
This works great, as long as you time it right. I found putting the tip of the glue gun flat against the lens is useful, and a few seconds after the glue stops sticking to your finger is a good time to do it.
Aydan -
just use a needle and pull it from the little hole
have to be careful because after removing the click wheel, when you turn it upside down, the are pieces that fall down. I lost one that fall in my carpet
I was able to remove it using a pin in the small hole. Once it is out there may be pieces that want to fall off; a round ring and the white retainer piece.
Same here. With some pliers I bent the pointy tip of a push-pin to make a 120 degree angle and used that to lift up the plate using the microphone hole after I heated up the plate. Like a mini crowbar. It came off in 30 seconds including the white indent attached to it.
-
-
-
Desde la parte superior del iPod, inserta un spudger de metal entre la carcasa exterior y la batería para quitar el adhesivo que mantiene la batería en su lugar.
In case anyone else didn't realize this, you need to push your spudger fairly deep into the iPod to completely seperate the glue from the battery. I just stuck mine in maybe half an inch, then spent 30 minutes struggling to move the logic board. After removing all of the glue, it slid out with relative ease.
I didn’t have a spudger so I used a metal nail file with a rounded end. Heated the back of the iPod with a hair dryer for about a minute first to soften the adhesive and it all worked fairly smoothly. Be gentle with the lcd display.
Keep in mind the only glue holding the logic board to the metal case is a small rectangle of adhesive. In the picture, the author is just scraping away at the glue. You don’t need to insert your spudger any lower than half an inch as there isn’t any other adhesive holding the logic board to the metal case . Once the glue has been scraped away, then the board should slide out easily. If it doesn’t slide out, then the adhesive is still there.
-
-
-
Inserta un pasador de presión en el orificio en la esquina del retenedor y levántalo para sacarlo de la caja.
I think this step should be step 16. Otherwise you risk to drop the retainer.
-
-
-
Con una fuerza suave pero constante, presiona la parte superior de la pantalla LCD para deslizar el ensamblaje de la placa lógica fuera de la parte inferior del iPod.
-
-
-
Una vez que la parte superior de la pantalla LCD haya despejado el borde inferior de la carcasa exterior, retira el ensamblaje de la placa lógica del cuerpo del iPod.
I accidentally snapped the little ribbon that held the top of the device. Is it fixable?
-
-
-
Usa una herramienta de apertura de iPod para sacar el conector de la pantalla de su zócalo en la placa lógica.
On mine, there was yellow tape covering both the display ribbon connector and the adjacent S-shaped ribbon on the logic board - I had to lift the tape away from the display ribbon and cut it, leaving the tape covering the S-shaped ribbon. There was extra tape at the other end, too. I wasn't going to cut it, but the rubbery/foam stuff on the back of the display ribbon connector was stuck to the tape, with the new ribbon below, it was too thick. I replaced the tape with new, because re-assembling without tape, the rubbery foam stuff smears off on the housing as you push the assembly back in.
-
-
-
Usa un par de pinzas para doblar hacia atrás los clips de metal en la parte superior de la pantalla.
-


Para volver a armar tu dispositivo, sigue estas instrucciones en orden inverso.
Para volver a armar tu dispositivo, sigue estas instrucciones en orden inverso.
Cancelar: No complete esta guía.
31 personas más completaron esta guía.
Un agradecimiento especial a estos traductores:
90%


Estos traductores nos están ayudando a reparar el mundo! ¿Quieres contribuir?
Empezar a traducir ›

9 comentarios
Re-assembly is kind of the reverse of disassembly, but replacing some of the glue may be required, particularly for the camera/mic cover. Sliding the logic board into the housing is an exercise in considerable care - the display ribbon, the speaker ribbon, various bits of yellow tape, all can snag on the lugs around the clickwheel hole, or the camera/mic holes.
what type of glue would you recommend?
Help my ribbon for hold switch fell off!!! Will it still work without the hold switch connected?
I used a cigarette lighter instead of heat gun and worked like a charm.
Sadly my ipod was full of glue and it was not possible to replace the display and broke it. :-(
If you use the ‘blue’ opening plastic tool, it will take you forever to ever open your ipod !!!
I guess it is for demo only to make it appear it is indeed very easy to open your ipod.
Actually, it is NOT !
The glue is so called “"transfer tape”.
(Very thin double sided tape.)Use it to attach the new lcd to the frame.Glue 4 thin strips to the frame with corners of the backing tape folded free.
Put in the lcd screen and remove the backing tape piece by piece.
Before putting everything back together i filed a bit of the black plastic guidance rails inside the ipod casing,(Untill the little markings on them disappear.)
That way sliding the internals back in is a piece of cake.
And removing the metal from the switch at the start will prevent the tiny flat cable to break at the corner during the proces.
Oh…and replace the battery also while the bugger is open….you’ll regret it some day if you don’t….
Battery and lcd screen cost me 14 euro on Aliexpress.So i thought it was worth a try at that cost.
nice .. yor site
.
i love feel visit.
super step by step teaching ipod nano riper work.. supper