Introducción
Sigue los pasos de esta guía para reemplazar la pantalla en un iPad Pro 12.9" o para acceder a otros componentes internos para el servicio.
Ten en cuenta que el botón de inicio instalado en tu pantalla original está emparejado con la placa lógica del iPad y deberá quitarse y transferirse a la nueva pantalla para conservar la funcionalidad Touch ID.
Antes de comenzar, verifica si tu pieza de repuesto tiene una placa secundaria adherida a su parte posterior. Si es así, esta guía te servirá. De lo contrario, deberás transferir el tablero de la pantalla anterior a la nueva. Transferir la placa secundaria de la unidad original a la de repuesto requerirá un equipo de microsoldadura especial y recomendamos a los usuarios de bricolaje obtener una nueva pieza en lugar de intentar el procedimiento.
Algunas partes de esta guía se tomaron con un modelo Wi-Fi y, como tal, las partes internas pueden tener un aspecto ligeramente diferente al del modelo LTE. El procedimiento es el mismo para ambos modelos excepto donde se indique.
El procedimiento de apertura de este iPad Pro se muestra usando un Halberd Spudger. Si no tienes uno, puedes usar una punta de apertura en su lugar; el proceso es el mismo.
Qué necesitas
-
-
Apaga completamente tu iPad antes de comenzar.
-
Si la pantalla está rota, coloca tiras superpuestas de cinta de embalaje transparente sobre la pantalla del iPad hasta cubrir toda la cara.
-
Haz tu mejor esfuerzo para seguir el resto de la guía como se describe. Sin embargo, una vez que se rompa el vidrio, es probable que continúe agrietándose mientras trabajas, y es posible que debas usar una herramienta de palanca de metal para sacar el vidrio.
-
-
-
Mientras cortas el adhesivo, ten en cuenta lo siguiente:
-
La parte superior tiene un gran parche de adhesivo grueso. Deberás cortar 1/2" de profundidad para cortar el adhesivo.
-
No cortes más de 2 mm a lo largo de los bordes largos del iPad, o corres el riesgo de dañar el panel de la pantalla.
-
El borde inferior también tiene parches gruesos de adhesivo, pero hay cables flexibles delicados en cada esquina. No cortes más de 1/4" alrededor de las esquinas inferiores.
I have an A1652 iPad pro 12.9” that was originally my wife’s. The battery doesn’t hold a charge very long in use so I read through this guide and ordered the kit and battery. This iPad has a gold colored case that appears to wrap over the edges of the screen. As a result I could not find any place to slice through the adhesive. Model number brought up on the “about” screen is ML3P2LL/A and serial is DLXR3M7LGMW5. Is this possibly a transition model? Any ideas?
Hello! Based on the model number, it looks like you have the 1st generation cellular version of the iPad Pro 12.9". This guide should work for you. The tolerances on the iPad are very tight—you're looking for the seam between the black bezel and the gold case. You'll need a lot of heat in order to loosen the bezel.
-
-
-
Calienta un iOpener y colócalo sobre el borde izquierdo del iPad para ablandar el adhesivo que sujeta la pantalla en su lugar.
-
Espera unos dos minutos para que el adhesivo se ablande antes de continuar con el siguiente paso. El borde debe estar un poco demasiado caliente al tacto.
Oven works fine: preheat to ~225 then turn off, protect back with towel and warm for 10-15 minutes. Basically the same as a car interior in summer, this skips about a dozen steps. Used mini plastic pry tools and a few picks/cards, no need for suction or iopener: yet another reason microwaves should be relegated to diners to destroy perfectly good food. Two issues from my surgery: damaged small section of screen border by carding too far inside the device while effortlessly slicing through adhesive, and one of the smart connector pins was revived from bent pin purgatory. Apple’s planned obsolescence genius truly shines through the multipin snap connectors. I detached the screen cable before disabling battery, YMMV; remainder of procedure was done to spec with disabled battery on reinstall. Screw monster only ate about 2, even after breaking an elbow sweat with 70% iso the residual adhesive should outlast the ios nerf that will bring this ipad to the grave. Much easier than first impression with oven.
-
-
-
Tira de la manija azul hacia atrás para desbloquear los brazos del Anti-Clamp.
-
Coloca un objeto debajo de tu iPad de modo que quede nivelado entre las ventosas.
-
Coloca las ventosas cerca del centro del borde izquierdo: una en la parte superior y otra en la parte inferior.
-
Mantén firme la parte inferior del Anti-Clamp y presiona firmemente hacia abajo la copa superior para aplicar succión.
-
-
-
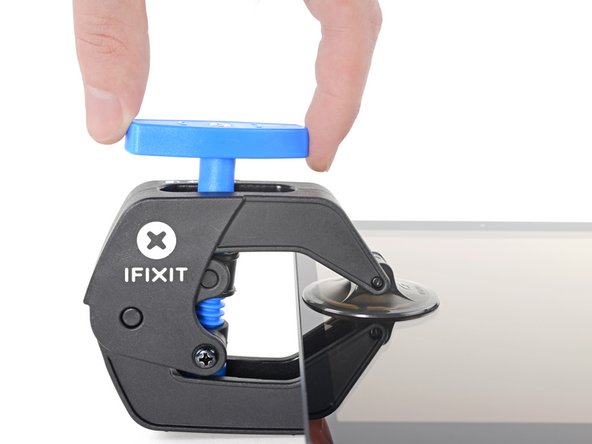
Tira de la manija azul hacia adelante para bloquear los brazos.
-
Gira el mango en el sentido de las agujas del reloj 360 grados o hasta que las copas comiencen a estirarse.
-
Asegúrate de que las ventosas permanezcan alineadas entre sí. Si comienzan a desalinearse, afloja ligeramente las ventosas y vuelve a alinear los brazos.
-
-
-
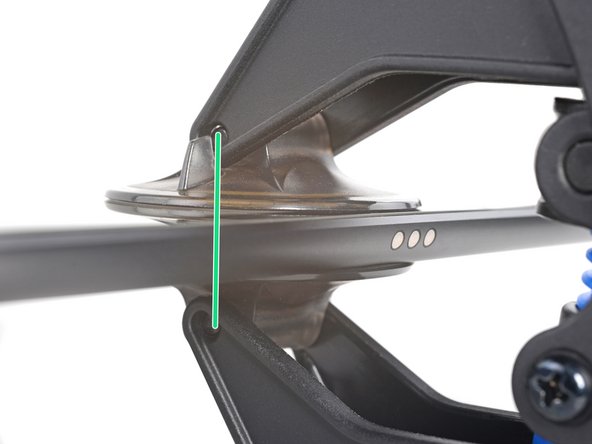
Espera un minuto para darle al adhesivo la oportunidad de liberarse y presentar un espacio de apertura.
-
Si la pantalla no se calienta lo suficiente, puedes usar un secador de pelo para calentar el borde izquierdo del iPad.
-
Inserta una púa de apertura debajo de la pantalla cuando el Anti-Clamp cree un espacio lo suficientemente grande.
-
Omite los siguientes dos pasos.
-
-
-
Coloca una ventosa en el borde izquierdo de la pantalla del iPad, sobre el puerto Smart Connector.
-
-
-
Mientras mantienes presionadas las esquinas del iPad, tira repetidamente hacia arriba de la pantalla y luego bájala para debilitar el adhesivo. Esto eventualmente creará un pequeño espacio en la costura.
-
Una vez que haya creado un pequeño espacio, inserta la punta de una púa de apertura en el espacio.
-
-
-
Coloca un iOpener caliente a lo largo de la esquina inferior izquierda del iPad, desde la selección de apertura hasta el botón de inicio.
-
Después de dejar que el adhesivo se ablande, inserta una púa de apertura o una espátula de alabarda en el espacio junto al conector inteligente.
-
Usa una púa de apertura o un spudger de alabarda para cortar el adhesivo a lo largo del lado inferior izquierdo del iPad. Si el corte se vuelve difícil, vuelve a calentar el borde y vuelve a intentarlo.
Well, this is the scariest part so hold my beer. I tried something similar to the “iOpener” which is a gel filled heat/cold pack I could microwave. That was good to start warming, but I was too impatient to get the first pick under, so I got out my heat gun. Mine is a 1200 watt model and I used it on low, the tip about 3 fingers away from the glass, sweeping it over 8” sections about 10 times taking about 3 seconds per pass. It worked ok and I now have 10 picks pried under all edges. Took about 35 minutes to this point. Only difficulty here is bracing the iPad while sliding the picks under the glass - need to be careful to not knock out the picks you already have inserted.
One note I might offer is that it’s not entirely clear from your pics which is the top/bottom/left/right side because it’s hard to see the button on the screen in your pics. Another is to mark your 2mm pick depth with whiteout or something similar.
-
-
-
Colocae un iOpener caliente a lo largo de la esquina superior izquierda del iPad, desde la púa de apertura hasta la cámara frontal. Espera un minuto para que el adhesivo se ablande.
-
Usa una púa de apertura para cortar el adhesivo a lo largo del lado superior izquierdo del iPad. Si el corte se vuelve difícil, vuelve a calentar el borde y vuelve a intentarlo.
-
-
-
Vuelve a calentar su iOpener y colócalo sobre el borde superior del dispositivo. Espera un par de minutos para que el adhesivo se ablande.
-
Usa una púa de apertura para cortar el borde superior del iPad, deteniéndote antes de llegar a la cámara frontal.
-
Si el corte se vuelve duro, vuelve a calentar el borde y vuelve a intentarlo.
-
-
-
Vuelve a calentar su iOpener y colócalo sobre el borde superior del dispositivo. Espera un par de minutos para que el adhesivo se ablande.
-
Inserta una púa de apertura o una hoja de spudger de alabarda justo después de la cámara frontal.
-
Usa la púa de apertura para cortar el adhesivo en la esquina superior derecha.
-
Si el corte se vuelve duro, vuelve a calentar el borde y vuelve a intentarlo.
-
-
-
-
Suaviza el adhesivo calentando el borde derecho del iPad con un iOpener.
-
Usa una púa de apertura o un spudger de alabarda para cortar a lo largo del borde derecho del iPad, hasta llegar a la esquina inferior derecha.
-
Deja una púa de apertura en el medio del borde derecho para evitar que el adhesivo se vuelva a sellar.
-
-
-
Usa un iOpener para calentar el borde inferior del iPad.
-
Inserta una púa de apertura o una hoja de spudger de alabarda de 1/4" en la esquina inferior derecha del iPad.
-
Desliza la púa de apertura a lo largo del borde inferior del iPad, deteniéndote aproximadamente 1/2" antes de llegar al botón de inicio.
-
-
-
En este punto, has cortado la mayor parte del adhesivo de la pantalla. Usa una púa de apertura para cortar con cuidado cualquier resto de adhesivo a lo largo de los bordes hasta que se libere la pantalla. Si algunas partes se resisten, calienta el área con un iOpener para aflojar el adhesivo.
-
-
-
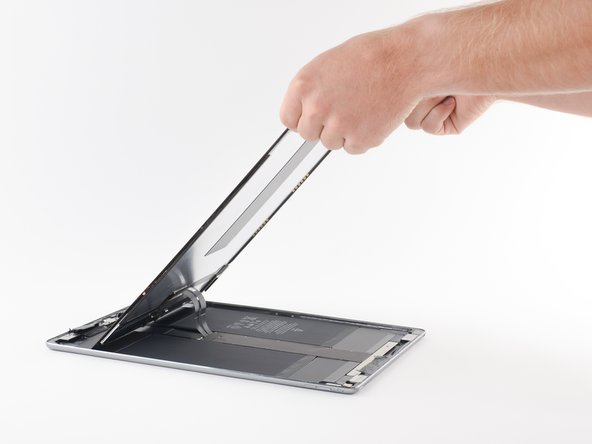
Levanta el borde superior de la pantalla y desliza toda la pantalla hacia la cámara frontal para acceder a los componentes internos del iPad.
-
Usa cinta adhesiva para pegar el borde inferior de la pantalla al marco para evitar que la pantalla se deslice.
For me, disaster struck at this step. I was being careful but somehow lifted the wrong end and snapped the ribbon cable.
😟😟😟 Be careful It would have been helpful to label the screen's top and bottom edges with a marker and tape at the beginning of the repair process. For that matter, label right and left edges as well. Then change all dialog to reference top, bottom, left, or right. I think it would make it easier to follow the instructions
-
-
-
Coloca una tira larga de cinta adhesiva en el borde superior de la pantalla. Dobla la cinta sobre el borde y asegúrate de que esté bien sujeta.
-
Sujeta el otro extremo de la tira al borde inferior del marco del iPad para sostener la pantalla en ángulo. Asegúrate de que la cinta se adhiera firmemente al marco.
Just make sure you use plenty of tape on the backside of the screen and on the underside of the iPad and the tape won't slip.
-
-
-
Usa un destornillador Phillips para quitar los nueve tornillos que sujetan el escudo EMI de la placa lógica:
-
Ocho tornillos de 1,2 mm
-
Un tornillo de 2,4 mm
-
-
-
Levanta el escudo EMI de la placa lógica desde el borde más cercano a la parte superior del iPad.
-
Despega y retira el escudo EMI de la placa lógica.
-
Retira el escudo EMI de la placa lógica.
In the iPad 4G version, this is where the cellular radio sits. You might see some different chips underneath the EM shield, and a little adhesive gasket. When I pulled my EM shield off I tried not to disturb that adhesive, and put it back when I was done.
-
-
-
Haz un bloqueador de batería con una tarjeta de juego y deslízalo debajo del conector de la placa lógica para desconectar la batería.
-
Deja el bloqueador allí para evitar que los cables del conector de la batería hagan contacto hasta que hayas completado las reparaciones.
-
-
-
Usa un destornillador Phillips para quitar los tres tornillos que sujetan el soporte del cable de la pantalla:
-
Dos tornillos de 2,4 mm
-
Un tornillo de 1,2 mm
-
Retira el soporte del cable de la pantalla.
-
-
-
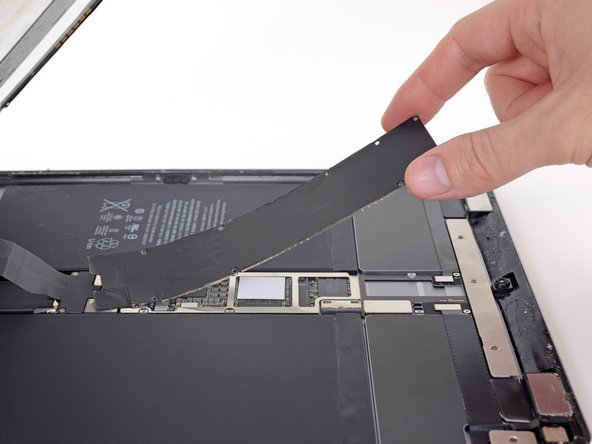
Usa el extremo plano de un spudger para levantar y desconectar los cables de la pantalla y del digitalizador de los enchufes de la placa lógica.
Would it help to draw a sharpie line between the two parts of the connector, so these can be alingned when refitting?
-
-
-
Retira la pantalla.
-
Si tu pantalla no vino con adhesivos preaplicados, usa nuestra guía de aplicación de adhesivos para pantallas para instalar tiras adhesivas precortadas nuevas cuando vuelvas a armar tu iPad.
Phew! One hour 45, took my time, maybe cut that in half if I did it again and pray I don’t have to. Working sideways, the little screws were usually caught by the battery on the bottom edge. Need a shorter Phillips than in the iFixit kit. And looks like I don’t need the pre-cut adhesives I bought as they were on the replacement screen - hopefully I can get a refund.
Good time for a coffee break before cleaning off the old adhesive. Quite a relief to get the screen off & thanks much to you guys for getting me this far.
Es wäre sehr schön, wenn hier noch jemand beschreiben könnte, wie man "unfallfrei" die Klebereste vom Display rundherum entfernt. Ich habe das in meinem Falle ganz vorsichtig mit Isopropanol (hochrein) getan. Die Klebereste gingen damit gut ab - trotzdem ist das eine sehr aufwendige Arbeit, bis man alles sauber hat. Zudem kann man noch so vorsichtig sein, durch die angebrachte Displayunit auf der Rückseite der Displayscheibe und die dadurch entstehende Kapillarwirkung zieht sich immer Isopropanol zwischen Display und Displayunit, was danach zu hellen Flecken führt. Ich hoffe, die verschwinden wieder, wenn das Iso abgetrocknet / ausgetrocknet ist.
Vielleicht hat jemand eine gute Idee, wie man diese Klebereste entfernt, ohne dass das Beschriebene passiert.
Markus,
I just wouldn't use any isopropyl alcohol to remove the residue. We're going to immediately apply more adhesive right after we remove the old adhesive, so if there's a little bit of sticky residue remaining, that's not a problem for us. I would just scrape as best as I could with a spudger, make sure there's no adhesive on the internals, and call it a day.
-
-
-
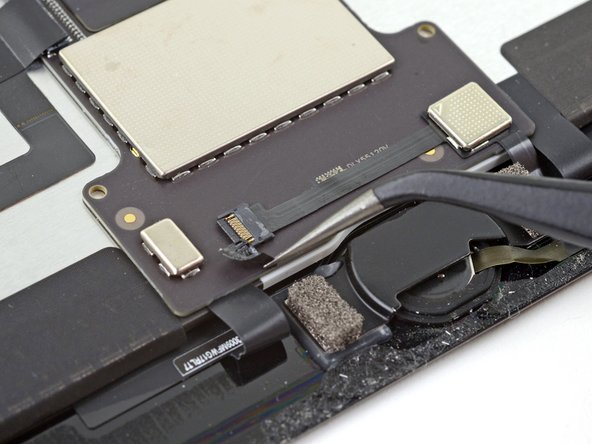
Retira la cinta que cubre el conector ZIF sobre el botón de inicio.
-
-
-
Usa un iOpener, una pistola de aire caliente o un secador de cabello para ablandar el adhesivo debajo del cable antes de levantarlo.
-
Alternativamente, aplica unas gotas de alcohol isopropílico al cable y espera un minuto para que el adhesivo se ablande.
I used a heat gun on low air, set to 150°C, and very very gentle pressure with the tweezers, and it came out very easily and neatly.
-
-
-
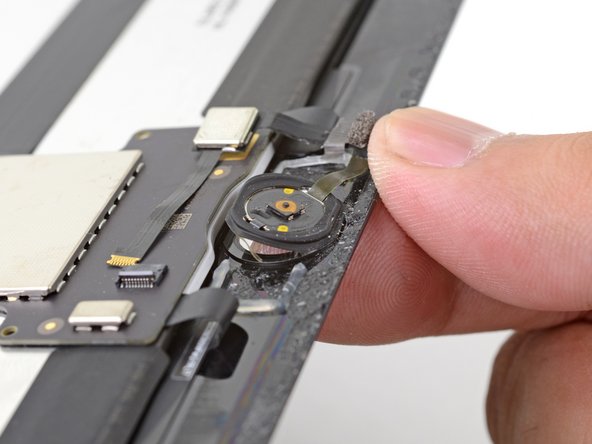
Aplica unas gotas de alcohol isopropílico en la base del soporte del botón de inicio.
-
Alternativamente, puedes usar un iOpener calentado para aflojar el adhesivo.
-
-
-
Retira el soporte del botón de inicio.
-
Raspa la mayor cantidad posible de residuos de adhesivo antiguo y luego límpialos con acetona o alcohol isopropílico de alta concentración (>90 %).
-
Asegura el soporte con pegamento E6000, superpegamento o cinta de doble cara de alta resistencia. Asegúrate de que el soporte esté alineado correctamente antes de permitir que se seque el adhesivo, o el botón de inicio no hará clic cuando se presione.
Would be really nice if the adhesive strip kit for the screen included the adhesive bits needed to secure the existing home button to the new screen (or a new home button to an existing screen).
One more thing about the bracket: you really need a strong adhesive when you put it back, so that pushing the button doesn’t dislodge it. If it doesn’t hold the button firmly, you can push the button out of its socket during normal use. Getting the bracket in and aligning it without accidentally sticking it in the wrong place or (much worse) sticking it to the fragile ribbon cable takes some very careful work.
This is an excellent guide, but I’d like to see maybe the first two steps of reassembly, showing how to do this correctly.
When replacing the bracket, a very slight difference in the replacement part caused the bracket to make the home button click all the time. The little white washer between the home button and the back of the glass was about 0.3 mm thicker than the original, and i had already superglued those parts together.
Fortunately, the playing card included in the kit is about 0.3 mm thick. I cut 2 small rectangles and superglued them to the feet of the bracket, so it would stand away from the home button. Then superglued the bracket on, and now it clicks perfectly. Hopefully I don't have any issues with the playing card delaminating as the home button wears, because I definitely don't know if i could get this ipad apart again (the first time was easier because the screen was already shattered).
-
-
-
Presione suavemente el botón de inicio desde la parte delantera de la pantalla hacia adentro con la punta de un dedo.
-
-
-
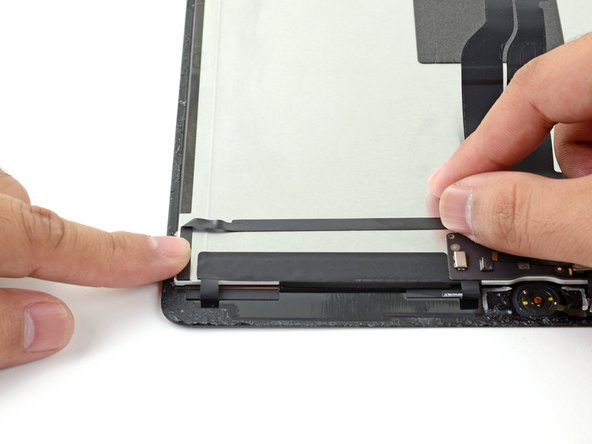
Retira toda la cinta de embalaje.
-
Despega los revestimientos adhesivos de los cables flexibles y presiona los cables en su lugar en el panel de la pantalla.
-
Dobla y conecta el cable flexible en la esquina inferior izquierda de la pantalla.
-
No peles ni expongas el adhesivo perimetral hasta que hayas probado tu reparación y estés listo para sellar el iPad.
manca la parte di montaggio del nuovo schermo ?
Ciao Roberto,
Per montare il nuovo schermo, puoi seguire le istruzioni dello smontaggio in ordine inverso. I punti con la puntina da disegno si riferiscono in particolare al rimontaggio.
Buona riparazione!
-


Compara tu nueva pieza de repuesto con la pieza original; es posible que debas transferir los componentes restantes o quitar los respaldos adhesivos de la nueva pieza antes de instalarla.
Para volver a armar tu dispositivo, sigue estas instrucciones en orden inverso.
Lleva tus desechos electrónicos a un centro de reciclaje certificado.
¿La reparación no salió según lo planeado? Consulta nuestra Comunidad de respuestas para obtener ayuda para solucionar problemas.
Cancelar: No complete esta guía.
88 personas más completaron esta guía.
Un agradecimiento especial a estos traductores:
100%


Estos traductores nos están ayudando a reparar el mundo! ¿Quieres contribuir?
Empezar a traducir ›

21 comentarios
Hello there OK so I have 2 screens with 2 different connectors one L shaped (which is on the new screen) and the old cracked screen has a rectangular type? I’m not sure rather it’s a 1gen/2nd gen type of problem? I’m about to grab my hot air gun to completely disassemble the cracked screen, as maybe I’m missing something? Any assistance is welcome… well actually please help me with this before I get a headache since this has totally frustrated me and i’ve had this sitting for nearly 2 1/2 months now but it’s about that time that I readdress this in attempt to fix it.
Hi, does your replacement screen have the home button assembly included? Otherwise there's need of soldering the assembly to it before it can be installed.
Dreetn -
hi
does anyone knows why there is a foam adhesive in thr back of the screen ? do i need to put back when i replaxe screen ?
thanks
I suppose the foam adhesive is similar to the one on the back of the 6s screens. I guess it has more of a heat dissipation function or is meant to absorb any pointy pressure points from inside that may develop (loose screw, sand, dirt...)
Dreetn -
hi
hope someone can help . i tested couple of screens before fitting them in they were working but once tech close it there no touch or black lcd (backlight on but no image )
NB : they disconnect battery before connecting Screen
If you don't have this problem while the assembly is still loose, my best guess is that you have an unwanted contact somewhere, causing a short circuit or malfunction. Perhaps in the bending of the flex?
Dreetn -
Removing the screen takes a great degree of patience. You apply heat, and pull on the suction cup, and for a long time nothing seems to happen. Do not try to replace time with force at this point keep heating and pulling on various areas, you will get separation. It took 5 or 6 heating/pulling cycles to start to see results. Then you can work your way around.
MAKE SURE YOU DO NOT INSERT ANY CARDS/PICKS/SPUDGERS MORE THAN 1/4 inch tops!! YOU WILL DAMAGE THE SCREEN. Just replaced the battery in my iPad Pro 12.9 (A1652). Unfortunately I did not read this until completed. I now have several areas on my $1000 iPad where the white screen has orange burn looking marks around the edges. Looks like it was a $200 oops. Live and Learn. I’m now a member and will utilize this website for future endeavors…
You know any workshop who does a repair for my three iPad Pro 12.9 front glasses with the digitizer,
Sometimes the process is called OCA refurbishment oder LCD refurbishment.
NOT the display-unit as a whole. I have two models from 2015 and one from 2017. The model numbers are a 1584 and a 1670.
In Germany there are a few companies who are able to do it, but not affordable. The prices are nearly as high as a complete swap of the display unit.
Just wondering, I work in a repair shop, and am replacing the front panel entirely but unfortunately screwed up soldering the daughterboard. Is this a part they MUST be transferred or am I safe to just replace it?
Hello.
Is it possible to change only the “Glas” and not the Display? My display works fine but the Protecting Glas is broken.
Hi, that’s possible for very, very experienced technicians. Not only do you need to heat up the screen quite a lot to soften up the LOCA glue, but furthermore you need to cut it with a cutting wire while making sure not to damage the LCD underneath. I also fear the iPad pro will probably require some micro-soldering to be able to (dis)connect the glass from all the rest (but perhaps I’m confusing things with the first screen modules in mind that came out but still needed some micro-soldering to finish them of at that time). In short, if you haven’t separated touchscreens/glass plates several times before … don’t even think about it. The above is only half the trouble to go through as the new touchscreen/glass needs to be attached to the LCD again with new LOCA glue afterwards. Again a job which requires a lot of expertise.
Dreetn -
I used this guide to replace a screen for my iPad Pro. The device powers on but now gets stuck in a boot loop. I took it to a local phone repair shop and they said they don’t do repairs on iPad Pros because they always get stuck in boot loops. I wish there was a warning on this guide telling people this so they don’t go to all the effort and spend money on a new screen just to get their iPad stuck in a boot loop.
Brandon, I don’t know of any specific ‘sensitivity’ that iPad Pro’s have towards repairing that would result in bootloops.
I think it is more likely that either
- The repair shop isn’t keen on repairing your device because parts are expensive and/or difficult to find (for instance motherboard parts). They just tell you a believable story to avoid having to say ‘Too risky’ or ‘Not worth our effort/time’.
- Something got damaged during the repair.
Another possibility, which you can easily put aside yourself, is software damage. Try a full restore (without data retention) with tools such as 3uTools. It’s free software. I advise using the iTunes restore method. You can first try a restore with ‘retain user’s data’ but success ratio is minimal there. Best is to go for a clean flash/restore.
Good luck!
Dreetn -
No matter how many times I have tried to apply the iOpener, or to use a dryer for 10 mins (iPad was super hot), I’m simply unable to lift the screen with the suction cup, even for a micron. Anything I could have missed ?
Hi Laurent, it sounds like you’re on the right track—continue gradually applying more heat until the adhesive softens a little. Unfortunately these screens are super hard to remove. Just be careful about applying too much heat at once in a small area as that could damage the screen.
While removing the screen I accidentally pulled the soldering from the daughterboard to the display cable. is their a way to fix this or is it an issue?
This was an awesome guide! It was really fun, but a lot of really careful work!! How could anybody do this repair and charge a reasonable rate for the labor? It took me soooo long.