Introducción
Reemplazar una pantalla LCD dañada o que no funciona en un iPad 6.
"Advertencia: el método de aislamiento de la batería en esta guía está obsoleto, y puede resultar en un daño irreversible a los pines de la batería de la placa lógica, destruyéndola efectivamente. Si eliges aislar la batería de esta manera, presta atención a todas las advertencias y trabaja con extremo cuidado. Si decides completar la guía sin aislar la batería, evita utilizar herramientas metálicas excepto cuando sea completamente necesario (como cuando quite los tornillos) para evitar un cortocircuito en la batería y dañar el componente sensible del circuito.
Qué necesitas
-
-
Calienta el iOpener y aplícalo al borde izquierdo en el dispositivo por dos minutos.
-
-
-
Mientras estas esperando a que se afloje el dispositivo, nota que las siguientes áreas son sensibles al palanqueo:
-
Cámara frontal
-
Antenas
-
Cables del display
-
-
-
Jala el mango azul hacia atrás para desbloquear los brazos del Anti Clamp.
-
Coloca un objeto debajo de tu iPad para que repose a nivel de las ventosas de succión.
-
Posiciona las ventosas de succión cerca del centro del borde izquierdo--una arriba, y una abajo.
-
Sostén el inferior del Anti-Clamp firmemente y presiona hacia abajo en la ventosa superior para aplicar succión.
-
-
-
Jala el mango azul hacia el frente para bloquear los brazos.
-
Gira el mango en sentido horario 360 grados o hasta que la ventosa empiece a estirarse.
-
Asegúrate que la ventosa de succión queden alineadas entre sí. Si empiezan a desalinearse, afloja la ventosa de succión ligeramente y realinea los brazos.
-
-
-
Espera un minuto para darle oportunidad al adhesivo soltar y exponer un hueco de apertura.
-
Si tu pantalla no se esta calentando lo suficiente, puedes usar una secadora de cabello para calentar a lo largo del borde izquierdo de la iPad.
-
Inserta una púa de apertura debajo del digitalizador cuando el Anti-Clamp cree un huego lo suficientemente grande.
-
Salta el siguiente paso.
-
-
-
Una vez que la pantalla este caliente al tacto, aplica una manija de succión al borde izquierdo de la pantalla y lo más cercano al borde posible.
-
Levanta la pantalla con la manija de succión para crear un hueco pequeño entre el digitalizador y el marco.
-
Inserta una púa de apertura en el hueco entre el digitalizador y el marco.
-
-
-
Inserta una segunda púa de apertura en el hueco que acabas de crear.
-
Desliza la púa hacia la esquina izquierda inferior en el dispositivo para separar el adhesivo.
-
Deja la púa en la esquina inferior izquierda para prevenir que el adhesivo vuelva a sellar.
-
-
-
Calienta el IOpener y aplícalo al borde superior en el dispositivo por dos minutos.
-
-
-
Rota la púa alrededor de la esquina superior izquierda en el dispositivo para separar el adhesivo.
-
-
-
Desliza la púa de apertura a lo largo del borde superior del dispositivo, deteniéndote justo antes de llegar la cámara frontal.
-
-
-
-
Calienta un iOpener y aplícalo al borde derecho del dispositivo por dos minutos.
-
-
-
Rota la púa alrededor de la esquina superior derecha del dispositivo para separar el adhesivo.
-
-
-
Inserta una nueva púa de apertura y deslízala hacia el centro del borde derecho del iPad.
-
-
-
Calienta el iOpener y aplícalo al borde inferior del dispositivo por dos minutos.
-
-
-
Desliza la púa den inferior izquierdo hacia la esquina inferior izquierda para separar el adhesivo.
-
Deja la púa en la esquina inferior izquierda antes de pasar al paso siguiente.
-
-
-
Inserta una nueva púa de apertura en el hueco que acabas de crear en el borde inferior del iPad.
-
Desliza la púa sobre la antena, deteniéndose antes del botón de inicio.
-
Deja la púa en la izquierda del botón de inicio antes de continuar.
-
-
-
Calienta un iOpener y aplícalo al borde derecho de tu dispositivo por dos minutos.
-
-
-
Mientras sostienes el digitalizador, desliza una púa de apertura entre los dos cables del display para separar lo que queda del adhesivo.
-
-
-
Remueve los cuatro tornillos Phillips #00 de 4.3mm que mantienen el LCD
Both of the iPad 6th gen models i have seen so for (note they were cellular also) had the LCD secured with a grey silicone kind of adhesive in each corner under the screws. So you can’t just lift the LCD as you normally would after removing screws, it would break. I found you could pick at the corner closest to the rear camera easiest, slightly lift that corner and gently separate the other side next to the headphone jack. Then while supporting the LCD , lever the other end free with a up-and-down motion making slight progress each time.
On my iPad 6, there were small rubber tabs covering the two screws on the front camera side. I carefully held them out of place with tweezers while unscrewing the screws.
-
-
-
Usa la punta plana de un spudger para levantar el LCD de su lugar y poderla sostener con los dedos. Puede que haya pegamento alrededor de los agujeros de los tornillos que se tenga que cortar con un cuchillo
-
Gira el LCD levantando desde la cámara frontal hasta el botón inicio como si fuese un libro.
-
Pon la pantalla sobre su cara para permitir el acceso a los cables.
When you replace the LCD be sure to make sure it is screwed in fully. It is easy not, especially on the cornet where the digitizer cables are. The LCD is very sensitive and if you bend it then it can stop working. I was just pressing the digitized in place at the end of a repair and the screen was covered in white lines.
I have no idea of what the logic board looks like !!!
-
-
-
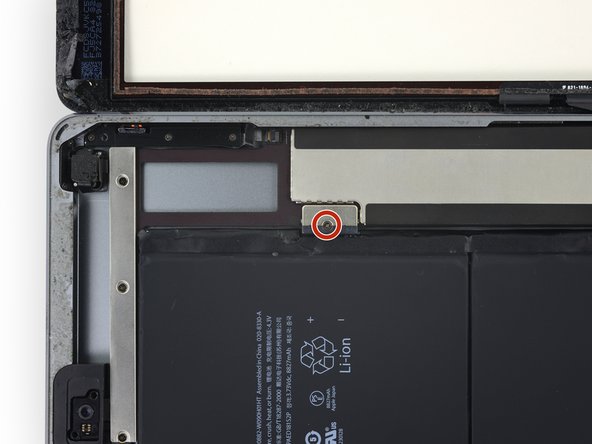
Remueve el único tornillo Phillips #000 2.3mm uniendo el conector de la batería a la tarjeta madre
-
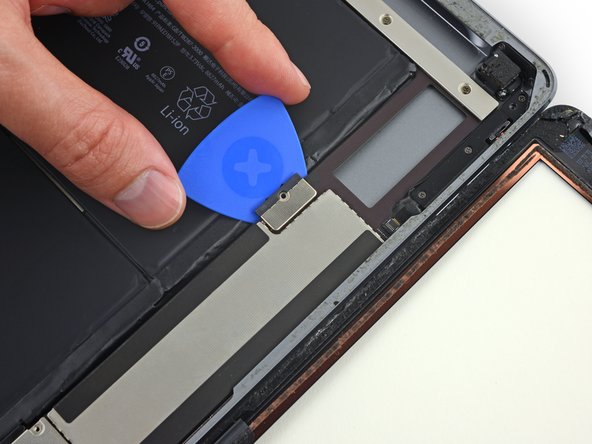
Desliza el bloqueador de batería por debajo del conector de la tarjeta lógica en un ángulo de 35 grados.
-
No empujes el bloqueador de la batería debajo del conector con demasiada fuerza. Si estas teniendo problemas colocando el bloqueador de batería debajo de la tarjeta lógica, puedes intentar usar un naipe en vez para desconectar la batería.
-
El bloqueador de batería o naipe idealmente debería deslizarse debajo de la tarjeta lógica sin encontrar algún bloqueo. Después de la inserción, debe descansar en un ángulo de 15 grados.
-
Deja el bloqueador de batería en este lugar conforme trabajas.
If you insert a regular pick without a gap then you can damage this connector and will need a new motherboard. If in doubt just insert into the left corner enough to raise it a tiny bit. Arguably, if you are not sure, then it is safer just power off and don’t power back on until everything is fully connected. A photo of how this connector looks with its cover off would really help for people that have not seen this type of battery connector before. You just need to get it to lift a tiny bit, Do not try to slide anything under the contacts….
I bumped this darn thing several times, it was twisted and skewed making me freak out but the iPad still works. I am thinking you should pull it out and put the screw back in right after the LCD is removed. Then use it again just before putting the LCD screen back in. The pick is sticking out there waitng to be be bumped.
Hi Robin,
Unfortunately, there is no easy way to pull the battery connector out of the logic board. If you try to pry this connector off, you will irreparably damage it. The easiest solution is to insert the battery blocker in-between to cut the power.
The battery isolation pick or battery blocker is an outdated way of isolating the battery, as you risk damaging the battery pins underneath the logic board.
So what is the new method?
This is my question as well. Seems like this phrase contradicts the instructions. Confusing. Any reply?
We are currently working on a better isolation procedure! In the meantime, I’ve updated the warning to hopefully clarify the issue.
Why do you need to “To reduce the risk of a short”? There does not seem to by any risk of a “short” in this process. I can see other reasons for disconnecting the battery. I am an electrical engineer so I would appreciate a professional grade answer to this question.
I’ll give it a shot!
When you remove the screw, it doesn’t disconnect the battery, as the connector uses spring contacts to touch the battery pads.
If you leave the battery connected, it leaves the logic board energized. As there are many exposed traces and SMT components on the logic board, there is a chance that you accidentally bridge a trace with a metal tool, resulting damage. In addition, the display connector contains tiny pins, and the pinout is such that if you pry the connector from an energized logic board, there is a chance that a voltage rail pin may accidentally touch something it shouldn’t, blowing out the backlight circuitry.
My battery was dead when i did the repair. Did not really need to perform this step
Take a waterproof playing card, cut out the shape of the battery blocker and slide that under. Battery blocked and pins not at risk of damage. Got that from a YouTube video made by a microsolder repair tech fixing the damage caused by jamming a blocker in between the contacts.
Thanks for the tip Melody! I’ve updated the instructions to include the playing card method.
I could not for the life of me get the playing card in there, but my iPad was turned off, so I decided to ‘risk’ a short, instead of potentially damaging the battery connectors by jamming the card in there as hard as possible. My repair went fine, no short, however I realized AFTER closing everything up that I forgot to put the battery screw back in. Really hoping this doesn’t become an issue long term, because I don’t want to pry this brand new screen off just to put the battery in.
Let us know! I wasn't able to use the screw again after removing the battery blocker. Now my iPad turns off and on every so many minutes and when it restarts it's 1% and then shows actual charge.
When you come to screw this back together, do not overestimate how little force it takes to strip the thread on this #000 screw. I did, and I now I can't screw this back down and have the problem where the iPad restarts every 3 mins 20 sec after you turn it on due to a poor connection here. I've used card to pack this out so the LCD puts a little clamping force on the terminal once you screw it back in, but it's not really enough so the iPad still suddenly restarts occasionally.
I use a small screwdriver and pry underneath that brown bracket from the top edge by the camera (with the elongated metal cover removed of course) all the way before the battery, then lift up just enough for me to unhinged the battery out of the secure post. I don't know why Apple has to go through ALL THIS just to connect the battery since there is a small screw AND ADHESIVE securing it anyway. Nonetheless the whole job (replacing the lcd screen and battery was a major pain in the neck!
-
-
-
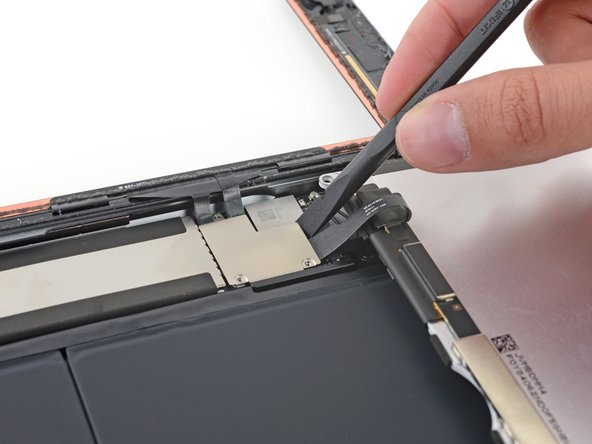
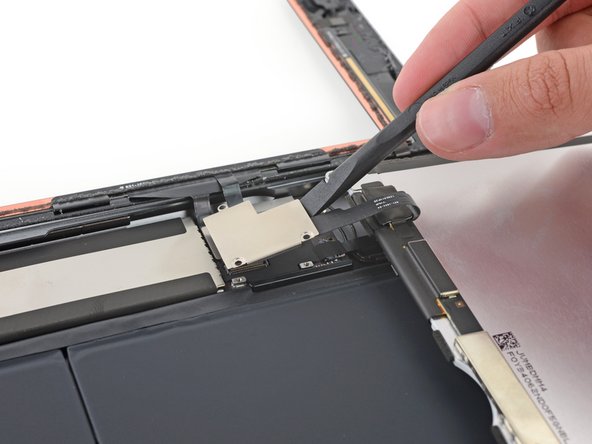
Quita los tres tornillos Phillips #000 1.4mm del soporte que mantiene los cables del LCD
I believe these are also Phillips #00, not Phillips #000.
I lost a 1.4mm screw where can I buy these small screws and how big are they? 1.4mm x? flared or flat head
-
Para volver a armar el dispositivo, sigue las instrucciones en orden inverso.
Para volver a armar el dispositivo, sigue las instrucciones en orden inverso.
Cancelar: No complete esta guía.
23 personas más completaron esta guía.
Un agradecimiento especial a estos traductores:
100%
Estos traductores nos están ayudando a reparar el mundo! ¿Quieres contribuir?
Empezar a traducir ›
12 comentarios
No comments…. No one is brave enough to attempt this :)
I tried to replace the LCD with the iPad AIR 1 LCD and is NOT compatible. It fits and the connector is the same but shows just like tv static noise.
I have same issue, but with LCD iPad 5, some idea to make it compatible.
I replaced the front screen and now the number 9 on the passcode keypad isn’t working. I don’t get it.
I’m having the same issue! Different numbers, but same issue. Just certain sections of the screen won’t respond to touch.
I did this (screen replacement) on my iPad 6 LTE about a month ago. Was wicked difficult because my the screen was completely shattered and removing all of the shards was, well, a major PITA. It wasn’t all that bad otherwise as long as you TAKE YOUR TIME getting it apart in the first place. The only real issue I had otherwise was getting it back together with new adhesive strips because the screen doesn’t set on top straight down. You have to almost put one side down with the screen at an angle then lay it down but because of the adhesive strips, you can’t lay it down then adjust it. So that was not fun. Otherwise it wasn’t all that bad IF you are like me and savvy with electronics repair. *** also, once back together and fired up, I have some dead spots where there is zero registration of any touch on the screen. No clue as to why, and it’s frustrating because of the cost of these things and the replacement parts. Better than no usable screen I guess.
Please excuse any typos should you encounter any.
Hi Bryan,
If you haven’t yet, I would suggest checking two things. It sounds like either the digitizer cable may be having bad connectivity, or the digitizer may be shorting on something. Check, clean, and re-seat all of your display cable connectors as well as making sure the connectors have no debris. What is this (possibly conductive) gray foam adhesive called and where. Maybe that will remove the dead spots.
This was extremely difficult! But it was a little easier for me as I am an IT professional. Some helpful pro tips: definitely spend time just heating the adhesives over a period of a couple of days. The hardest part of the repair was separating the broken screen from the rest of the ipad. On re-assembly, check to make sure that the home button and touch are functioning properly before putting on new adhesives. This way you can correct any mistakes. Otherwise, you will have to undo the work you just did. Take your time, don’t rush so that you don’t make mistakes or break anything. The guide is very helpful and I was able to repair my ipad 6th generation.
Kevin
Ugh. This has been a PITA. I damaged the connector for lcd screen. bought replacement screen and now won’t work. HELP! Do I need to remove the old heat shield and attach it to the new lcd? What was I thinking?
Ive used 3 brand new LCDs and can’t get any of them to show a picture, when i plug in the old broken one it lights up just fine but is shattered beyond use. im starting to wonder if you can’t just replace the LCD without some sort of trick that only apple knows about
at least you have some dead spots. I just replaced LCD and digitizer. LCD was fine except I threw the LCD cable bracket away because I thought it came with the new one as it was attached to the old one. Needless to say I have no LCD cable bracket. The digitizer does not respond at all though and LCD screen works.
Managed to repair a few of these over the years... my 3 kids al had 6th gen's and 2 had cracked glass (digitizers) that I've done... today I did an LCD swap for an older one at work that had backlight strobing. No issues with the repair. Heat gun for adhesive along with the Anti-Clamp (great tool btw) and a iSesame opener tool... didn't bother with the battery disconnect. Just removed the LCD bracket/cable and installed "new" LCD I purchased from iFixit... though it was clearly used... it did have a plastic film on the screen but was VERY dirty on back and had old adhesive on it. But it worked fine. I did pick up a new digitizer in case I broke the glass removing the old one, but didn't need it. I had some extra adhesive laying around that I used to replace some of the marred adhesive from opening this one up. All-in-all, pretty straightforward ipad repair. And yes, had the glass been shattered, it is a MUCH longer and annoying repair. Been there before. Take your time cleaning it all up first.


