Introducción
Esta guía solo demuestra como remover la unidad óptica.
El Xbox 360 esta diseñado para que la unidad DVD trabaje solo con con la consola en la que este instalada. Reemplazar la unidad DVD con una unidad DVD de reemplazo no funciona, ya que el reemplazo tiene una unidad llave de DVD diferente, la cual la consola no aceptará.
Qué necesitas
-
-
Agarra el conjunto del disco duro y presiona el botón de liberación mientras levantas su borde delantero.
-
Quita el conjunto del disco duro de la ventilación superior.
-
-
-
Inserta el extremo plano de un spudger o el borde de una herramienta de apertura de Xbox 360 en el pequeño hueco en el borde frontal de la ventilación inferior.
-
Levanta el borde frontal de la parte inferior de la ventilación de la placa frontal.
You can avoid this step by pulling the front cover off. Just make sure you don't break the springs for the USB bay area.
Hello, thank you ifix for this guide, I followed this guide, I got stuck at some point but I resolved it. Also I want to share this resource: Step by Step guide to fix Xbox 360 errors it helped me go through all the things associated with Xbox 360 and the troubleshooting of errors. Hope this can also help you all.
-
-
-
Para soltar los clips, trabaja desde el borde frontal de la ventilación inferior.
-
Mientras levantas ligeramente el borde frontal de la ventilación inferior, usa la punta de un spudger para empujar los clips lo más cerca del frontal de la ventilación inferior hacia adentro de la consola.
-
-
-
Inserta el extremo plano de un spudger entre la placa frontal y la carcasa exterior cerca del botón de encendido.
-
Pasa el spudger por el borde de la placa frontal para liberar los clips que lo sujetan al frontal de la consola.
The faceplate just pulls off, using a tool is completely unneccessary. https://beta.support.xbox.com/help/xbox-...
-
-
-
La ventilación superior está sujeta a la consola con clips. Los dos primeros clips están debajo de la ventilación superior, lo más cerca de la placa frontal, como se muestra en las fotos.
-
-
-
Inserta el extremo plano de un spudger en los pequeños huecos previamente mencionados para soltar los clips.
I found this step difficult. I wasn't able to see where the clips were from the pictures. If you look at step 14 you can see what the clips look like after the vent is taken off. Once you realize where they are it is a lot easier.
-
-
-
-
Pon la consola en vertical con el borde superior hacia abajo.
-
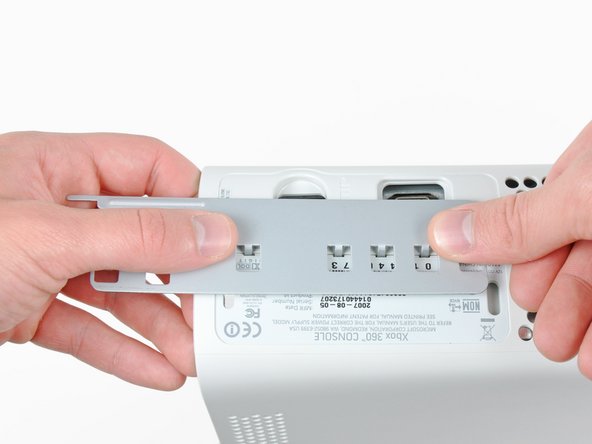
Con cuidado quita la etiqueta de la garantía de la consola.
LOL “Romove the warenty seal”
-
-
-
Presiona la herramienta de apertura de la Xbox 360 en las pestañas que sujetan la carcasa inferior a la carcasa superior cerca de los puertos de E/S.
-
Mientras presionas hacia abajo la herramienta, separa las carcasas inferior y superior para liberar las pestañas restantes.
I didn't have an XBox tool, so I followed instructions in this video for this step (https://www.youtube.com/watch?v=qaxIB6cX...) to pry it open with your fingers and a screwdriver.
The small (metal) women's hair clip is best for un-latching the tabs. The screw drivers just make the holes bigger.
You can also use the pointed end of a plastic spudger to push each clip free while you separate the case with your free hand.
-
-
-
Mientras separas las carcasas superior e inferior, usa la punta de un spudger o el dedo de una herramienta de apertura de Xbox 360 para empujar la pestaña larga resaltada en rojo hacia el centro de la 360.
-
La pestaña debería soltarse, dejando las pestañas cerca del conector de corriente como la única parte que sujeta las carcasas superior e inferior juntas.
-
-
-
Usa la punta de un spudger para soltar la pestaña que sujeta el botón de eyección a la carcasa de metal.
-
Inserta el extremo plano de un spudger entre el botón de eyección y la unidad óptica
-
Apalanca el botón de eyección de sus postes de sujeción y quítalo de la 360.
-
-
-
Quita los seis tornillos plateados T10 Torx de 64 mm que sujetanla carcasa superior a la carcasa de metal.
-
-
-
Quita la cinta de metal que sujeta la unidad óptica a la carcasa de metal.
Looking at mine, I doubt it. It looks like standard foil tape
-
-
-
Agarra el conector de alimentación por sus cables y tira recto hacia afuera de su zócalo en la unidad óptica.
-
Desconecta el conector de datos SATA de su zócalo en la unidad óptica tirando de manera recta.
I found the power cable to be very tough to get out, at least it is the first time doing this.
I found it much easier to remove the SATA cable after lifting the assembly mostly out of the case.
-
-
-
Saca el conjunto de la unidad óptica de la carcasa de metal.
Be careful not to lose or break the two teeny metal clips securing the optical drive assembly snugly to the metal casing on either side of the drive's front face. I used a spudger to press in the topmost tines on these clips because they were catching on the drive and bending up. The clips should stay on the metal housing, not come off with the drive.
-
-
-
Mientras presionas la cubierta de la unidad óptica hacia la cara frontal de la unidad óptica, usa la punta plana de un spudger para soltar los dos clips de retención en el lado inferior de la cubierta.
-


Para reensamblar tu dispositivo, sigue estas instrucciones en orden inverso.
Para reensamblar tu dispositivo, sigue estas instrucciones en orden inverso.
Cancelar: No complete esta guía.
236 personas más completaron esta guía.
Un agradecimiento especial a estos traductores:
100%


Estos traductores nos están ayudando a reparar el mundo! ¿Quieres contribuir?
Empezar a traducir ›

24 comentarios
who knows xbox360 can use desktop drives?We have all kinds of drives,but i am not sure if it is fit for xbox360.
Thanks
That has nothing to do with this guide. If you have any question regarding this equipment, go to the answer section.
Very easy to follow, got my drive fixed...thanks!
" Replacing a defective optical drive with a replacement optical drive does not work. The replacement will have a different DVD drive key, which the game console will not accept."
Not entirely accurate, that statement.
Having fixed a PS3 blu-ray drive by following the excellent guide on here, tried the same technique.
I had a bad drive in my xbox, and I replaced it with a new drive (of the same type). I took the daughter-board from the faulty drive and transplanted it to the good drive. It involved stripping down both drives, disconnecting 2 ribbon cables and unsoldering about 8 wires, transplanting the daughter-board - and resoldering the wires. Then reassembling. It worked for me, anyway.
Sounds like an extremely patience depleting process.
I did this once on one of the newer 360s that are more basic, with help from someone , using scissors.
I am getting the famed red ring of death now...it there any troubleshooting I can do to fix this? I followed all steps and made sure that each wire mirrored the old unit.
you actually can swap the drives out pretty easy. you just rip the key off of the old drive and flash it on the new one. you have to make sure you purchase the same drive model and the use jungle flasher. would they allow an extraction and flashing guide on here? and while you are at it, you can mod them pretty easy as well ;)
Because, You cannot replace the laser without replacing the drive. It is not possible to replace the laser.
No instructions on how to replace the PCB or what kind of drives there are?
So easy a GIRL can do it! Thanks!
This guide is incomplete thus the pictured console wont work upon drive replacement. Please finish the steps for flashing for they are a very required step in replacing the drive at all.
Author just ended the repair when there were more steps needed lol. I have done so many of these repairs and it shouldn’t be in the difficult section. If the PCB is ok, just swap it into a different drive deck you know that works. If your PCB is broken , you will need an X360 USB Pro and 3rd part software to extract the key and flash it and original firmware to the new PCB. I should update this tutorial for it is pretty weak.
What kept you from fulfilling your proclamation?
I realize my 360 is old but I cannot afford to replace it with the one. I replaced the dvd drive and same wont read problem, so I swapped the old board with the new and verified it is the board that is bad, not the drive itself. Now what do I do? Give up and scrap it? How expensive is the fix to replace the board? Are the parts still available? Im not concerned with the technical difficulty.
This guide sucks. He says you cant swap the disc drives without the logic board or it wont work. Then proceeds to swap the drive but doesnt actually show anything about swapping boards too lol
So people will follow this guide and miss a huge key part, thus ending with a nonworking disc drive lol
Crap guide.
It's right there in the header section. It literally says that this guide is ONLY about taking out (and in reverse order putting back in) the optical drive and that, for a new drive to work, it wont work without extra steps. So only very inattentive people will end with a nonworking drive.
But instead of contributing and adding a corresponding guide on how to exchange the logic board in the drive you chose to nag and have a whinge.
Crap comment.
Thank you so much. I was able to fix my Xbox 360
You will have to transfer the daughterboard.
With out googling it I believe there was 3 diff models of DVD drives so make sure u replace it with the same model drive than remove the pcb board from the old one and put it in the new one because there married to the Xbox main board other wise it won't work with the new replacement . MAn I moded ps1s on and remember most of this stuff like it was yesterday. Fun .fun.
WARNING: Just replacing the drive will not make it work correctly. Microsoft has married the drives to the motherboard. Hence, in order to get full operation out of the drive you'll have to perform more steps not listed here. Search in the FAQ on this specific topic for more details. Otherwise, before buying a new drive, try cleaning the inside of the old one and/or replace the belt involved in opening and closing the drive door.
- Good Luck
Eric - Contestar
Thanks..helped!
joseph zulu - Contestar
bress the button and lift with the same hand! i thought mine was stuck because of this pic!!!
Maths with Luigi - Contestar