Saltar al contenido principal

Valve Index Headset Eye Tube Replacement

Qué necesitas

  1. Valve Index Headset Eye Tube Replacement, Adjust the eye tube relief: paso 1, imagen 1 de 1
    • Twist the eye tube relief knob clockwise to fully extend it.

  2. Valve Index Headset Eye Tube Replacement, Remove the face gasket: paso 2, imagen 1 de 2 Valve Index Headset Eye Tube Replacement, Remove the face gasket: paso 2, imagen 2 de 2
    • Use your hand to gently pull the face gasket straight off of the headset.

    • The face gasket is held in place by four magnets that secure to screws in the face bezel.

    • Before installing a face gasket, ensure the four screws securing the face gasket bezel are installed. Otherwise, the face gasket will not stay in place.

  3. Valve Index Headset Eye Tube Replacement, Remove the head strap clip: paso 3, imagen 1 de 3 Valve Index Headset Eye Tube Replacement, Remove the head strap clip: paso 3, imagen 2 de 3 Valve Index Headset Eye Tube Replacement, Remove the head strap clip: paso 3, imagen 3 de 3
    • Insert the flat end of a spudger in between the bottom of the head strap clip and the head strap padding.

    • Pry up on the head strap clip until it is unclipped from the head strap.

    • To reinstall, first locate the recesses on the head strap for mounting the clip. Next, align the clip with the recesses, verify the tether cable is threaded through the clip, then simply press the clip back into place.

  4. Valve Index Headset Eye Tube Replacement, Separate the cable from the head strap guide: paso 4, imagen 1 de 2 Valve Index Headset Eye Tube Replacement, Separate the cable from the head strap guide: paso 4, imagen 2 de 2
    • Use your fingers to pull the tether cable straight up off of the head strap cable guide.

  5. Valve Index Headset Eye Tube Replacement, Disconnect the tether cable: paso 5, imagen 1 de 2 Valve Index Headset Eye Tube Replacement, Disconnect the tether cable: paso 5, imagen 2 de 2
    • Pull the tether cable straight back out of the headset.

  6. Valve Index Headset Eye Tube Replacement, Remove the face gasket bezel: paso 6, imagen 1 de 1
    • Use a T5 Torx screwdriver to remove the four 6.0 mm screws securing the face gasket bezel to the headset.

  7. Valve Index Headset Eye Tube Replacement: paso 7, imagen 1 de 2 Valve Index Headset Eye Tube Replacement: paso 7, imagen 2 de 2
    • Do not try and pry the face gasket bezel off, or you will damage the headset.

    • Grab the left edge of the face gasket bezel with your hand and slide it off of the headset.

    • During reassembly, visually verify the clips on the face gasket bezel are aligned with the headset before sliding it into place.

  8. Valve Index Headset Eye Tube Replacement: paso 8, imagen 1 de 3 Valve Index Headset Eye Tube Replacement: paso 8, imagen 2 de 3 Valve Index Headset Eye Tube Replacement: paso 8, imagen 3 de 3
    • Repeat the previous step for the right side of the face gasket bezel.

    • Remove the face gasket bezel.

  9. Valve Index Headset Eye Tube Replacement, Remove the eye tube gasket: paso 9, imagen 1 de 3 Valve Index Headset Eye Tube Replacement, Remove the eye tube gasket: paso 9, imagen 2 de 3 Valve Index Headset Eye Tube Replacement, Remove the eye tube gasket: paso 9, imagen 3 de 3
    • Use a pair of tweezers to separate the left edge of the eye tube gasket from the headset.

    • Repeat the process for the right edge of the gasket.

    • During reassembly, make sure these holes are secured to the pegs on the headset before continuing.

  10. Valve Index Headset Eye Tube Replacement: paso 10, imagen 1 de 3 Valve Index Headset Eye Tube Replacement: paso 10, imagen 2 de 3 Valve Index Headset Eye Tube Replacement: paso 10, imagen 3 de 3
    • Gently peel the eye tube gasket out of the headset.

    • The eye tube gasket is lightly adhered to the perimeter of the lenses. It should pull off easily.

  11. Valve Index Headset Eye Tube Replacement, Remove the front cover: paso 11, imagen 1 de 2 Valve Index Headset Eye Tube Replacement, Remove the front cover: paso 11, imagen 2 de 2
    • Use your hand to pull the front cover straight off of the front of the headset.

    • The front cover is held in place by four magnets that secure to screws in the motherboard cover.

    • Before installing a front cover, ensure the four screws securing the motherboard cover are installed. Otherwise, the front cover will not stay in place.

  12. Valve Index Headset Eye Tube Replacement, Remove the motherboard cover: paso 12, imagen 1 de 1
    • Use a T5 Torx screwdriver to remove the four 5.4 mm screws securing the motherboard cover to the headset.

  13. Valve Index Headset Eye Tube Replacement: paso 13, imagen 1 de 2 Valve Index Headset Eye Tube Replacement: paso 13, imagen 2 de 2
    • Remove the motherboard cover from the headset.

  14. Valve Index Headset Eye Tube Replacement, Remove the front fascia: paso 14, imagen 1 de 1
    • Use a T5 Torx screwdriver to remove the following eight screws from the front fascia:

    • Four 6.3 mm screws with fine threads

    • Four 6.0 mm screws with coarse threads

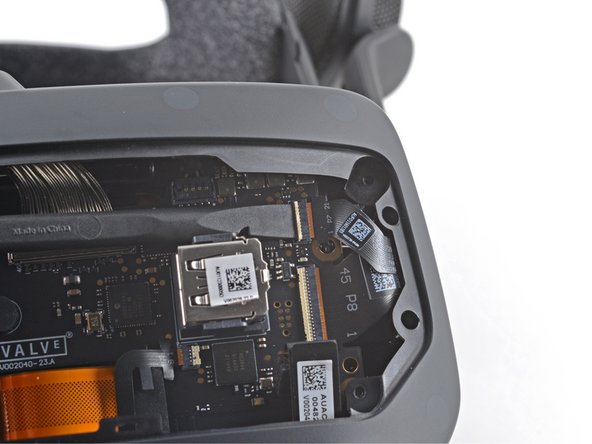
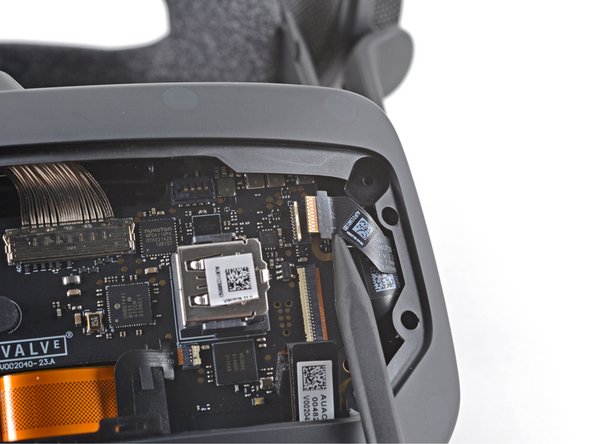
  15. Valve Index Headset Eye Tube Replacement: paso 15, imagen 1 de 3 Valve Index Headset Eye Tube Replacement: paso 15, imagen 2 de 3 Valve Index Headset Eye Tube Replacement: paso 15, imagen 3 de 3
    • Use a spudger to unlock the ZIF connector at the top-left corner of the motherboard.

    • Disconnect the FPC ribbon cable from the motherboard.

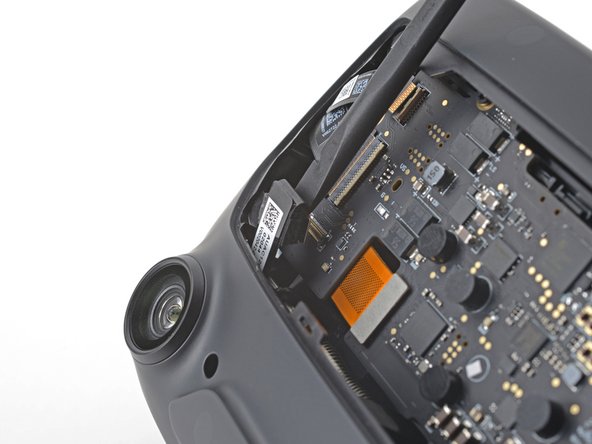
  16. Valve Index Headset Eye Tube Replacement: paso 16, imagen 1 de 3 Valve Index Headset Eye Tube Replacement: paso 16, imagen 2 de 3 Valve Index Headset Eye Tube Replacement: paso 16, imagen 3 de 3
    • Use a spudger to unlock the ZIF connector at the top-right corner of the motherboard.

    • Disconnect the FPC ribbon cable.

  17. Valve Index Headset Eye Tube Replacement: paso 17, imagen 1 de 2 Valve Index Headset Eye Tube Replacement: paso 17, imagen 2 de 2
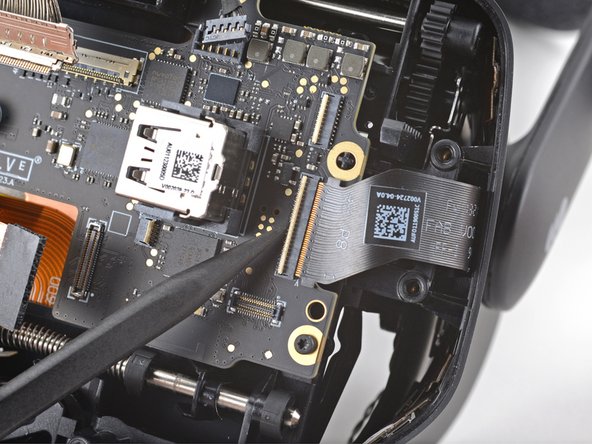
    • Use the flat end of a spudger to disconnect the press connector from the bottom-left corner of the motherboard.

    • To re-attach press connectors like this one, carefully align and press down on one side until it clicks into place, then repeat on the other side. Do not press down on the middle. If the connector is misaligned, the pins can bend, causing permanent damage.

  18. Valve Index Headset Eye Tube Replacement: paso 18, imagen 1 de 2 Valve Index Headset Eye Tube Replacement: paso 18, imagen 2 de 2
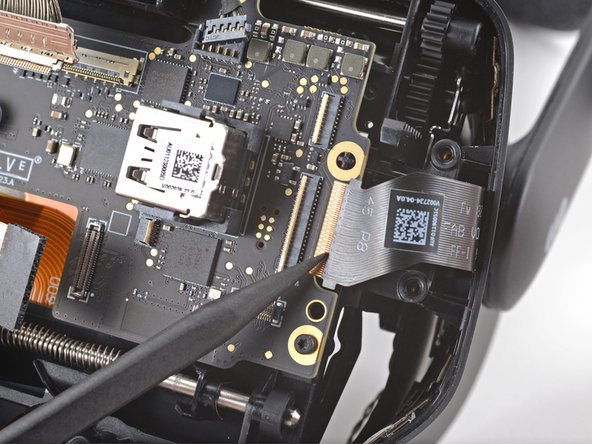
    • Use the flat end of a spudger to disconnect the press connector from the bottom-right corner of the motherboard.

  19. Valve Index Headset Eye Tube Replacement: paso 19, imagen 1 de 2 Valve Index Headset Eye Tube Replacement: paso 19, imagen 2 de 2
    • Insert an opening pick in between the front fascia and the headset.

    • Slide the opening pick over to separate the front fascia from the headset.

  20. Valve Index Headset Eye Tube Replacement: paso 20, imagen 1 de 2 Valve Index Headset Eye Tube Replacement: paso 20, imagen 2 de 2
    • Continue sliding the opening pick along the perimeter of the front fascia until all edges are free.

  21. Valve Index Headset Eye Tube Replacement: paso 21, imagen 1 de 2 Valve Index Headset Eye Tube Replacement: paso 21, imagen 2 de 2
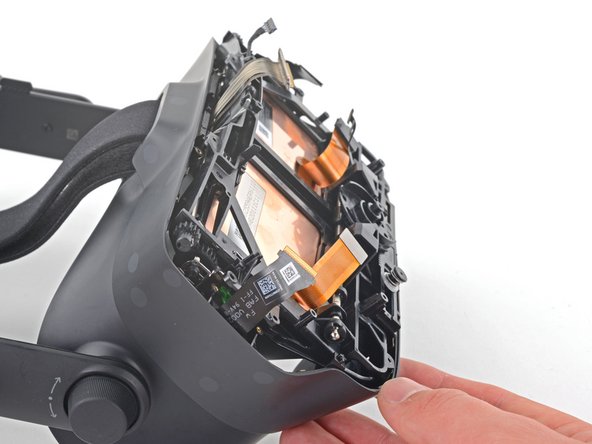
    • Remove the front fascia.

  22. Valve Index Headset Eye Tube Replacement, Remove the motherboard: paso 22, imagen 1 de 1
    • Note the seven cables that must be disconnected in the following steps before the motherboard can be removed.

  23. Valve Index Headset Eye Tube Replacement: paso 23, imagen 1 de 3 Valve Index Headset Eye Tube Replacement: paso 23, imagen 2 de 3 Valve Index Headset Eye Tube Replacement: paso 23, imagen 3 de 3
    • Use the flat end of a spudger to unlock the wide ZIF connector on the left side of the motherboard.

    • Disconnect the FPC ribbon cable from the motherboard.

  24. Valve Index Headset Eye Tube Replacement: paso 24, imagen 1 de 2 Valve Index Headset Eye Tube Replacement: paso 24, imagen 2 de 2
    • Use the flat end of a spudger to disconnect the press connector near the bottom-left edge of the motherboard.

    • During reassembly, be sure this cable is not trapped underneath the motherboard.

  25. Valve Index Headset Eye Tube Replacement: paso 25, imagen 1 de 3 Valve Index Headset Eye Tube Replacement: paso 25, imagen 2 de 3 Valve Index Headset Eye Tube Replacement: paso 25, imagen 3 de 3
    • Use your finger or an opening tool to unlock the display cable connector at the top of the motherboard.

    • Carefully disconnect the display cable connector.

  26. Valve Index Headset Eye Tube Replacement: paso 26, imagen 1 de 2 Valve Index Headset Eye Tube Replacement: paso 26, imagen 2 de 2
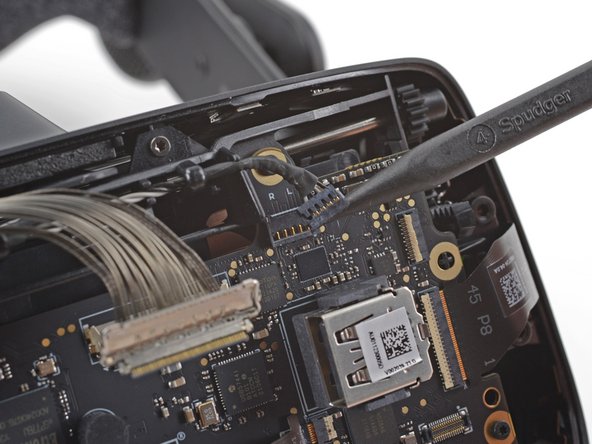
    • Use the pointed end of a spudger to gently disconnect the bundled cable connector from the top-right corner of the motherboard.

  27. Valve Index Headset Eye Tube Replacement: paso 27, imagen 1 de 3 Valve Index Headset Eye Tube Replacement: paso 27, imagen 2 de 3 Valve Index Headset Eye Tube Replacement: paso 27, imagen 3 de 3
    • Use the pointed end of a spudger to unlock the ZIF connector next to the USB port on the motherboard.

    • Disconnect the FPC cable from the motherboard.

    • During reassembly, make sure this ribbon cable is not trapped under the motherboard.

  28. Valve Index Headset Eye Tube Replacement: paso 28, imagen 1 de 2 Valve Index Headset Eye Tube Replacement: paso 28, imagen 2 de 2
    • Use the flat end of a spudger to disconnect the press connector below the USB port on the motherboard.

    • During reassembly, make sure this cable is not trapped under the motherboard.

  29. Valve Index Headset Eye Tube Replacement: paso 29, imagen 1 de 3 Valve Index Headset Eye Tube Replacement: paso 29, imagen 2 de 3 Valve Index Headset Eye Tube Replacement: paso 29, imagen 3 de 3
    • Use a spudger to unlock the wide ZIF connector near the right edge of the motherboard.

    • Disconnect the FPC ribbon cable from the motherboard.

  30. Valve Index Headset Eye Tube Replacement: paso 30, imagen 1 de 1
    • Use a T5 Torx screwdriver to remove the five 6.0 mm screws securing the motherboard to the headset.

  31. Valve Index Headset Eye Tube Replacement: paso 31, imagen 1 de 2 Valve Index Headset Eye Tube Replacement: paso 31, imagen 2 de 2
    • Grab the motherboard by the USB port and carefully remove it from the headset.

    • During reassembly, be very careful not to trap any of the previously disconnected cables under the motherboard.

  32. Valve Index Headset Eye Tube Replacement, Remove the motherboard shield: paso 32, imagen 1 de 2 Valve Index Headset Eye Tube Replacement, Remove the motherboard shield: paso 32, imagen 2 de 2
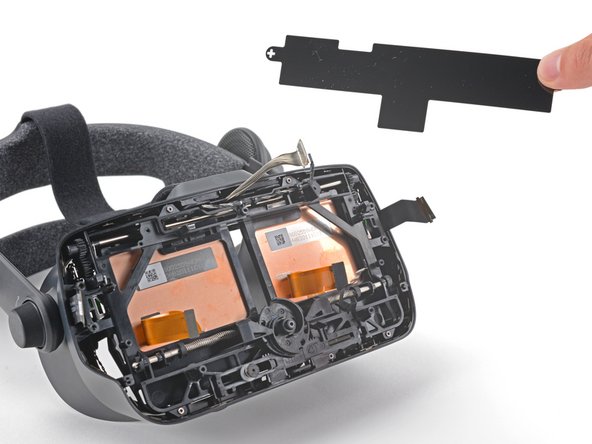
    • Lift the motherboard shield off of the two cross-shaped alignment pegs.

  33. Valve Index Headset Eye Tube Replacement, Remove the IPD screw: paso 33, imagen 1 de 2 Valve Index Headset Eye Tube Replacement, Remove the IPD screw: paso 33, imagen 2 de 2
    • Use your tweezers to remove the rubber boot covering the IPD adjustment screw.

  34. Valve Index Headset Eye Tube Replacement: paso 34, imagen 1 de 1
    • Use a 2.5 mm (3/32 in) flathead screwdriver to remove the 6.5 mm IPD screw from the headset.

  35. Valve Index Headset Eye Tube Replacement, Remove the upper eye tube rail: paso 35, imagen 1 de 1
    • Use a T5 Torx screwdriver to remove the five 4.5 mm screws securing the midframe.

  36. Valve Index Headset Eye Tube Replacement: paso 36, imagen 1 de 2 Valve Index Headset Eye Tube Replacement: paso 36, imagen 2 de 2
    • With the midframe loose, slide the case towards the back of the headset to expose the eye tube rails.

  37. Valve Index Headset Eye Tube Replacement: paso 37, imagen 1 de 1
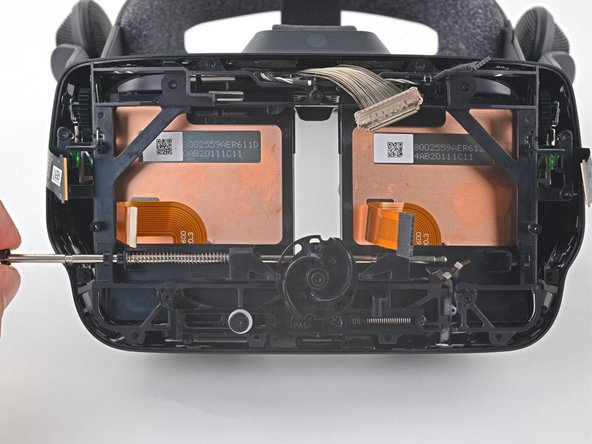
    • Use a T5 Torx screwdriver to remove the 4.4 mm screw securing the left end gear to the eye tube rail.

    • If the screw is not accessible, turn the eye relief knob to rotate the gear until it faces outward.

  38. Valve Index Headset Eye Tube Replacement: paso 38, imagen 1 de 1
    • Remove the left end gear from the eye tube rail.

  39. Valve Index Headset Eye Tube Replacement: paso 39, imagen 1 de 3 Valve Index Headset Eye Tube Replacement: paso 39, imagen 2 de 3 Valve Index Headset Eye Tube Replacement: paso 39, imagen 3 de 3
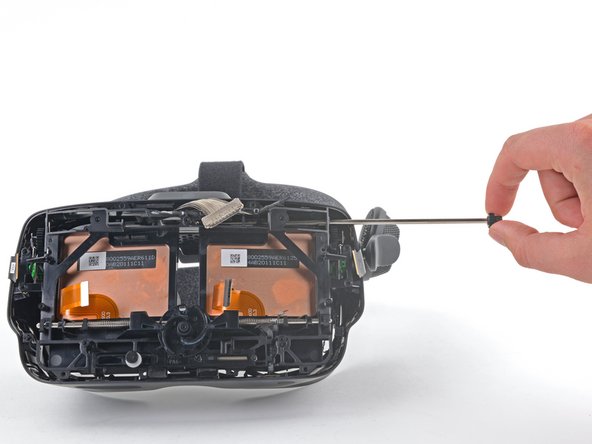
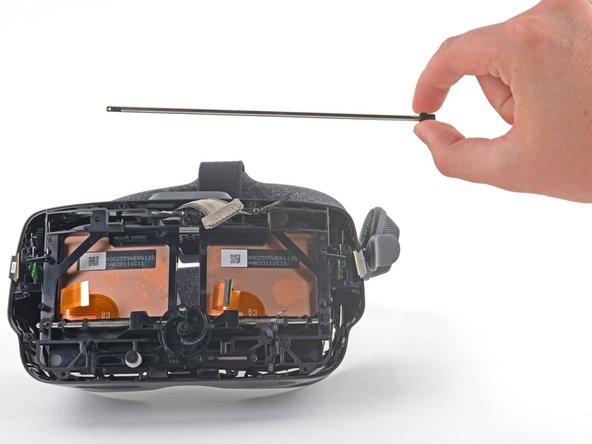
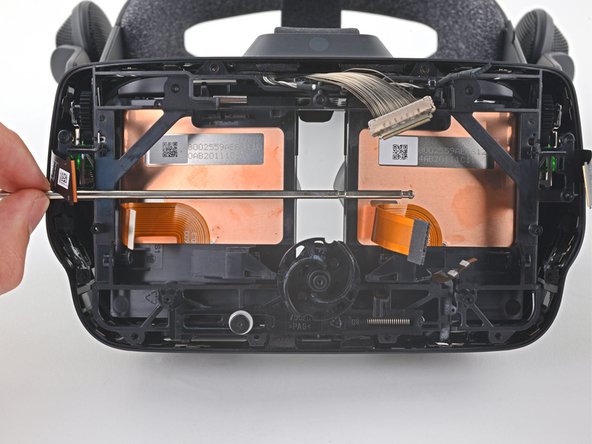
    • Grab the gear on the opposite side and slide the eye tube rail out of the headset.

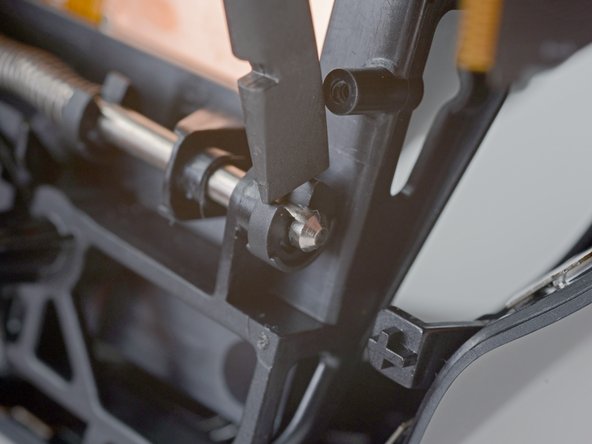
    • When removing the upper eye tube rail, two plastic bushing will fall out and two metal springs may fall out. Keep track of these parts.

    • During reassembly, slide the bushings back on to the eye tube rail and use a pair of tweezers to align the springs to their original positions.

  40. Valve Index Headset Eye Tube Replacement, Remove the lower eye tube: paso 40, imagen 1 de 3 Valve Index Headset Eye Tube Replacement, Remove the lower eye tube: paso 40, imagen 2 de 3 Valve Index Headset Eye Tube Replacement, Remove the lower eye tube: paso 40, imagen 3 de 3
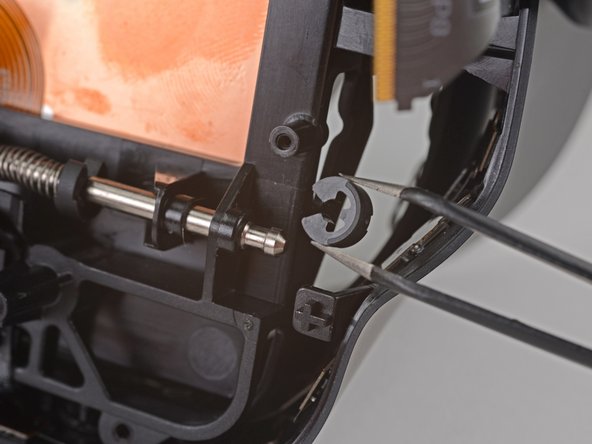
    • Use a spudger or your fingers to remove three of the four clips from the lower eye tube rail.

    • Hold the clips steady with one finger to prevent them from ejecting.

    • To reinstall these clips, place the open end on the groove in the rail and press them into place.

    • Two of the clips require holding the spring back to install them.

  41. Valve Index Headset Eye Tube Replacement: paso 41, imagen 1 de 2 Valve Index Headset Eye Tube Replacement: paso 41, imagen 2 de 2
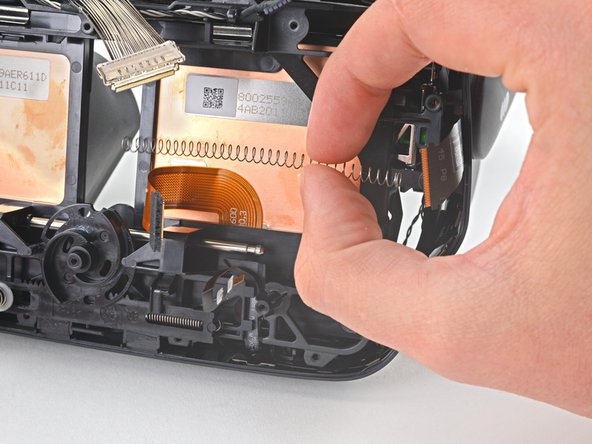
    • Hold each spring with one hand to prevent them from ejecting as you slide the lower eye tube rail out.

    • During reassembly, slide the springs on to the rail and carefully "walk" them back with your fingers until they are entirely on the rail.

  42. Valve Index Headset Eye Tube Replacement: paso 42, imagen 1 de 3 Valve Index Headset Eye Tube Replacement: paso 42, imagen 2 de 3 Valve Index Headset Eye Tube Replacement: paso 42, imagen 3 de 3
    • Remove the lower eye tube rail.

    • The eye tubes are now loose and can fall out.

  43. Valve Index Headset Eye Tube Replacement, Remove the eye tube(s): paso 43, imagen 1 de 2 Valve Index Headset Eye Tube Replacement, Remove the eye tube(s): paso 43, imagen 2 de 2
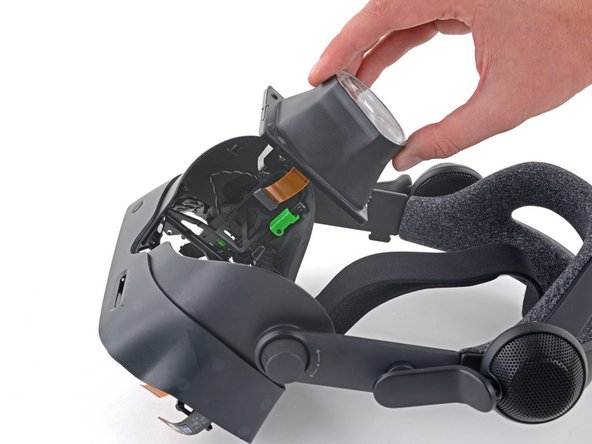
    • Remove the eye tube(s).

    • The eye tubes are a tight fit and can be tricky to remove and install. Try different orientations as you work them in or out; do not force them.

Conclusión

Compare your new replacement part to the original part—you may need to transfer remaining components or remove adhesive backings from the new part before installing.

To reassemble your device, follow the above steps in reverse order.

Take your e-waste to an R2 or e-Stewards certified recycler.

Repair didn’t go as planned? Try some basic troubleshooting, or ask our Valve Index Answers community for help.

15 personas más completaron esta guía.

Sam Omiotek

Miembro Desde 02/25/19

72,866 Reputación

288 Guías creadas

18 comentarios

I gained two extra small pieces not mentioned, I think when removing the top rail, they just dropped out into the housing. Looks like they go next to the eye tubes and are not included with the replacement so make sure you don't lose them!

https://imgur.com/a/AW4dHOW

Fizz - Contestar

I believe those are suppose to add tension to the top rail. I lost mine but it should be for a small metal spring tensioner (I think).

Gabe -

Great guide. Thanks so much!

David S - Contestar

Hey, you guys forgot to mention anything about 2small pieces of bent metal no thicker then a staple that looks pretty important. Might want to include every piece that may be affected when assembling/disassembling the headset, Especially in the later stages.

Jesse the Dragon (Dragon) - Contestar

wtf are these??? I also had them fall out and don't know what they are!

Patrick Hartge -

Agregar Comentario

Ver Estadísticas:

Ultimas 24 horas: 29

Ultimos 7 días: 146

Ultimos 30 días: 611

Todo El Tiempo: 18,252