Introducción
Usa esta guía para reemplazar el ensamblaje del medio marco en su Samsung Galaxy S6. El ensamblaje del medio marco contiene la bobina de inducción, los botones de encendido y volumen, la lente de la cámara y el altavoz.
Esta guía implica quitar el vidrio trasero. Al quitar el vidrio trasero se destruye el adhesivo que lo mantiene en su lugar. Sigue esta guía para volver a instalar el cristal trasero.
Qué necesitas
-
-
Inserta un clip o herramienta de expulsión de SIM en el orificio de la ranura de la tarjeta SIM en el lado del botón de encendido del teléfono.
-
Presione para expulsar la bandeja de la tarjeta SIM.
-
-
-
Calienta el iOpener durante treinta segundos.
-
Dependiendo de la potencia de tu microondas, puede necesitar más o menos tiempo. El iOpener está suficientemente caliente cuando apenas está demasiado caliente al tacto.
-
A lo largo del procedimiento de reparación, en cuanto el iOpener se enfríe, vuelve a calentarlo en el microondas treinta segundos más cada vez.
-
-
-
-
Llena una olla o cacerola con suficiente agua para sumergir completamente el iOpener.
-
Calienta el agua hasta que hierva. Apaga el fuego.
-
Coloca un iOpener en el agua caliente durante 2-3 minutos. Asegúrate de que el iOpener esté completamente sumergido en el agua.
-
Utiliza unas pinzas para extraer el iOpener calentado del agua caliente.
-
Seca bien el iOpener con una toalla.
-
Tu iOpener está listo para ser utilizado. Si necesita recalentar el iOpener, calienta el agua hasta que hierva, apaga el fuego y coloca el iOpener en el agua durante 2-3 minutos.
-
-
-
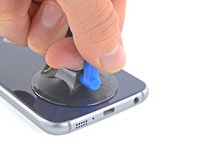
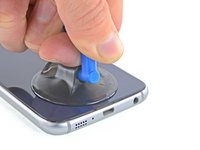
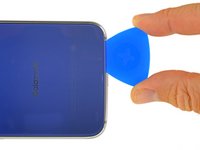
Coloca el iOpener caliente sobre el panel trasero durante dos minutos para soltar el adhesivo alrededor del borde del cristal.
-
Mueve el iOpener para calentar la sección restante del panel durante dos minutos.
-
-
Herramienta utilizada en este paso:Tweezers$4.99
-
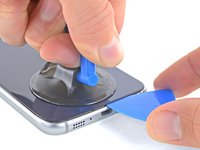
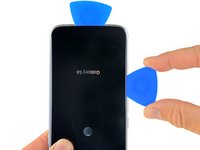
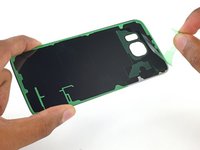
Usa pinzas para despegar cualquier adhesivo restante de cristal trasero y el chasis del teléfono.
-
Luego, limpia las áreas de adhesión con alcohol isopropólico de concentración alta ( al menos 90%) y un paño anti-pelusa. Desliza en una dirección solamente, no desde atrás hacia adelante. Esto ayudará a preparar la superficie para un adhesivo nuevo.
-
Despega el adhesivo del nuevo cristal trasero, alinea cuidadosamente un borde del cristal contra el chasis del teléfono y presiona firmemente el cristal contra el teléfono.
-
-
-
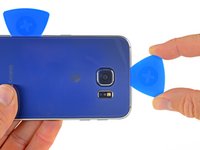
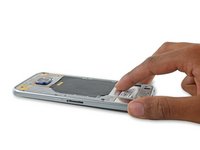
Retira los trece tornillos Phillips # 00 de 3.5 mm que sujetan el medio marco al teléfono.
-
-
-
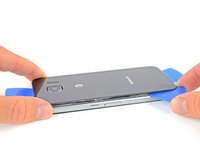
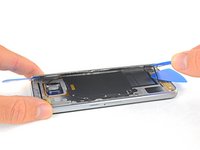
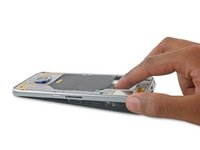
Sujeta firmemente el borde del conjunto del medio marco.
-
Levanta el conjunto del medio marco mientras empujas hacia abajo la batería para separar el conjunto del medio marco del resto del teléfono.
-
Al levantar el medio marco, ten cuidado de evitar el engancharlo en la toma de audio o puerto de carga.
-
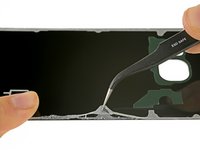
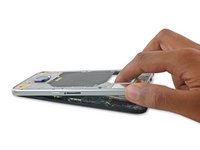
Una vez que el marco medio es parcialmente separado, pasa una pua de apertura alrededor de las esquinas del resto del teléfono para separar la parte superior del marco del medio.
-
Para evitar daño al conector de audífonos, remueve la parte superior del marco medio primero, después empuja el marco medio hacia abajo para desengancharlo del puerto de audífonos.
-
Capaz tendrás que calentar y aplicar el iOpener a los bordes de la pantalla para ablandar el adhesivo de pantalla si el marco medio es difícil.
-


Para volver a armar tu dispositivo, sigue estas instrucciones en orden inverso. Al volver a instalar el cristal trasero, consulta la guía de reemplazo de adhesivo de vidrio.
Para volver a armar tu dispositivo, sigue estas instrucciones en orden inverso. Al volver a instalar el cristal trasero, consulta la guía de reemplazo de adhesivo de vidrio.
Cancelar: No complete esta guía.
18 personas más completaron esta guía.
Un agradecimiento especial a estos traductores:
100%


Estos traductores nos están ayudando a reparar el mundo! ¿Quieres contribuir?
Empezar a traducir ›

6 comentarios
Step 18
Is it really that "simple" to separate the midframe from the front of the phone? In most videos (even the one on ifixit) a suction cup is used (after warming the front) with some prying tools.
So, does Step 18 really work?
It appears that the front is hold together by only 4 adhesives in the corners. Are this damaged during the front removal process? (is there a replacement kit?)
Just another question, I damaged the heart sensor plastic cover, is it possible to buy just that part or do I need to buy a complete midframe?
Can this step be exactly with a simple push as stated? Other sources required focusing heat on the 4 corners and run through with a pick....?
Secondly, how can one avoid damaging the lamination under the glass while removing it or trying to get the first foothold with the pick. Most guides I have seen appear to skip this step.
I have seen one phone parts site (EtradeSupply) list all different variants of the mid housing (G920F, G920V, G920R etc). But another site (WitRigs) has just one, as if they aren't specific.
Does anyone know? Because i'm in Australia and can't find G920i variant.
Also, has anyone simply swapped over the antennas, and crimped them onto the new housing?
Ok Guys I am definitely !#^&@@ off right now.... but to the point.
Please Edit to this guide --> @Step 18:
First of all: Heat the for corners with your iOpener to lose the adhesive which sits in the corners.
Be very very gentle when you push down on the battery and try to put a little pressure onto or maybe into the headphone jack when you first encounter that the display gets lose, because the headphone-jack fits very well in the frame and holds on a little corner.
Only go around the whole display with a spudger when the adhesive is really warm to lose it when it doesn't come out as easy as you thought. Because otherwise you may face that the display to display-glass laminate gets damaged. That just happened to me at the upper display side... so to get a perfect new looking phone I have to replace that as well....EXPENSIVE :(
Hope this may help you guys.
but ... nevertheless ... thank you guys from IFixit for your continous effort to help people repairing there stuff - heads up :-)
Hi Jakob, thanks for your input! When writing this guide we used a device that had been previously disassembled, so our experience may have been different from yours. Just to be clear: you have an issue with step 18 because the adhesive between the midframe and front assembly is very strong and simply pushing the battery is not adequate? Are there other steps that need to be adjusted?
And, as a general note, you can edit this guide yourself! When you hover your cursor over any particular step, an "Edit" button will appear. Alternatively, you can scroll to the top of the page and click the "Edit" tab up there.